
A detailed guide on installing Kali Linux on VirtualBox
A lot of the users would like to do crazy stuffs with their Kali Linux. If you’re doing something you’re not sure, you want to install unknown packages, modify some code but don’t want to break your HOST OS, running and installing Kali Linux on VirtualBox is the best way to go. You could also try using VMware but as VMware is proprietary and VirtualBox is free to use, there’s no argument which way usual users would go. Running Kali Linux on VirtualBox is great as in that way all you need to do is take a snapshot and if you break sometime, you can quickly roll back. This imposes another problem though. If you keep breaking things and keep rolling back for everything, you don’t really learn the Operating System itself. You are learning to bypass and overlook a problem with a easy way out. I am going to judge that? Maybe not. Linux can be quite complicated sometimes specially you never used it before. You might have just heard about Kali Linux from a friend and learned how much it can achieve and wanted to give it a try without actually installing it in your hard disk alongside your primary OS (may that be Windows or Linux or MAC).
Pros of running Kali Linux on VirtualBox
- You can run more than one OS simultaneously.
- You can install/re-install/backup/move/restore/rollback your guest OS easily.
- You can manage allocation of resource (Memory, Hard disk). Resource Management!
- You can copy your VirualBox to a different machine. Portability!
- You can completely break your installation and roll back in few clicks.
- You’re forced to troubleshoot and thus learn.
- Great for learning and testing.
Cons of running Kali Linux on VirtualBox
- Performance drop. Usually much slower.
- GPU Acceleration doesn’t work.
- USB Wireless cards can be problematic.
- You tend to avoid learning troubleshooting and just rollback quite often.
- You won’t be comfortable installing and running in real machine if you’re too used to VM’s.
- Can’t use FULL graphics as the card is Virtualized.
- Adds an additional layer between OS and actual hardware.
Saying all that, it’s true for any Virtualized environment. If you’re learning, testing.. yes go ahead. Even best one uses VM’s to test cause it’s just too much time consuming to install and re-install and update.
What is VirtualBox
VirtualBox is a general-purpose full virtualizer for x86 hardware, targeted at server, desktop and embedded use. It is a powerful x86 and AMD64/Intel64 virtualization product for enterprise as well as home use. Not only is VirtualBox an extremely feature rich, high performance product for enterprise customers, it is also the only professional solution that is freely available as Open Source Software under the terms of the GNU General Public License (GPL) v2. Presently, VirtualBox runs on Windows, Linux, Macintosh, and Solaris hosts and supports a large number of guest operating systems including but not limited to Windows (NT 4.0, 2000, XP, Server 2003, Vista, Windows 7, Windows 8), DOS/Windows 3.x, Linux (2.4, 2.6 and 3.x), Solaris and OpenSolaris, OS/2, and OpenBSD.
VirtualBox is being actively developed with frequent releases and has an ever growing list of features, supported guest operating systems and platforms it runs on. VirtualBox is a community effort backed by a dedicated company: everyone is encouraged to contribute while Oracle ensures the product always meets professional quality criteria.
Things you need to install
As I am going to show this in Windows here’s the link to Windows installer. You can download MAC or Linux installer and follow EXACTLY the same steps to install and run VirtualBox in your machine.
- VirtualBox 4.3.10 for Windows hosts x86/amd64
- VirtualBox 4.3.10 Oracle VM VirtualBox Extension Pack for All supported platforms
Extension pack provides the following added functionality:
- The virtual USB 2.0 (EHCI) device;
- VirtualBox Remote Desktop Protocol (VRDP) support;
- Host webcam passthrough;
- Intel PXE boot ROM and
- Experimental support for PCI passthrough on Linux hosts.
If you need instructions on how to install VirtualBox in your machines (may that be a Windows, Linux or MAC or Abracadabra, refer to their User Manual. VirtualBox user Manual is VERY detailed and specific installation instruction can be found here.
Download page: https://www.virtualbox.org/wiki/Downloads
Kali Linux
I mean if you don’t know what Kali Linux is, you wont be here!! Right? Anyhow, Kali is the Hindu goddess associated with empowerment! I’m just kidding. Kali Linux is a Debian-derived Linux distribution designed for digital forensics and penetration testing. It is maintained and funded by Offensive Security Ltd. It was developed by Mati Aharoni and Devon Kearns of Offensive Security through the rewriting BackTrack, their previous forensics Linux distribution. Say hi to Mati and Kali Dev team at www.kali.org.
You need to download the latest version of Kali Linux ISO from here.
You can also download from CDImage Page here:
I would personally suggest downloading using TORRENT and it seems more stable and less chance of data corruption.
In this guide I will outline very detailed step by step instructions on installing Kali Linux on VirtualBox where Windows 7 is the HOST operating system.
Installing Kali Linux on VirtualBox
In this guide, I will cover the followings:
- Create a new Virtual Machine
- Create a new Virtual disk (VDI, dynamic allocation etc.)
- Modifying some VirtualBox settings (allocating physical and Video memory, selecting OS Type, CPU acceleration etc.)
- Loading Kali ISO
- Booting Kali ISO (initial info, location, timezone etc.)
- Kali disk partitioning (you should try other ways than I’ve showed here to learn)
- Finalizing instllation and running Kali on VirtualBox.
- Install Virtualbox Guest Additions packages
")
")
")
")
")
")
")
")
")
")
")
")
")
")
")
")
")
")
")
")
")
")
")
")
")
")
")
")
")
")
")
")
")
")
")
")
")
")
")
")
")
")
")
")


You have two options here to follow this guide,
- You can just use the slideshow in this page and pretty much follow that..
- You can read this really long informative guide to get a better understanding of what to do
So choice is yours.
Step 1: Create a new Virtual Machine
I’ve already given instructions and provided links on how to get VirtualBox and install that above. If you’ve missed it, go back and install VirtualBox.
Once you’ve installed VirtualBox,
- Open it.
- Click on New to create a New Virtual Machine.
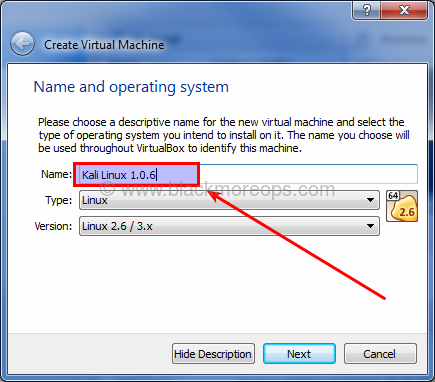
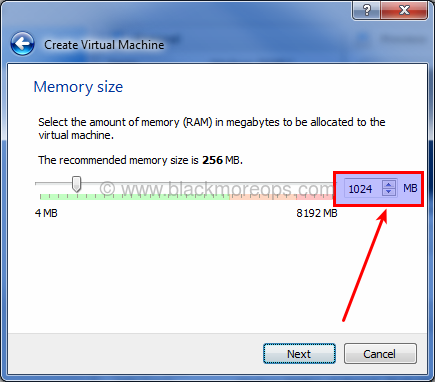
Step 1.a: Enter a name for you VBox
Enter Kali Linux 1.0.6 as the name. You’ll see Type is set to Linux automagically and version will be Linux 2.3/3.x. We will fix those later. Click Next.
Step 1.b: Allocate Memory/RAM
Default memory size is 256 MB.
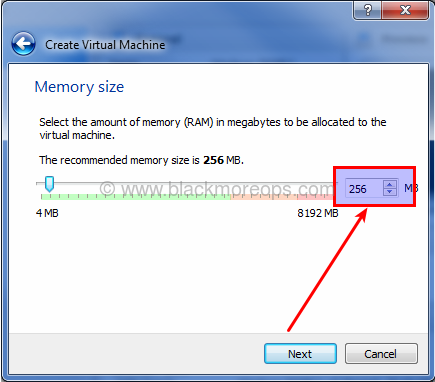
Change it to 1024 (1GB).
223 comments
Very good and in-depth write up, but let me clear up some of the cons. On modern HW, running Kali on VM with full virtualization support is not much slower. GPU acceleration is not important to Kali. If you want to do some hashcat, or other GPU based cracking, it’s extremely easy to transfer your output file to the host OS and crack with full GPU support. USB Wi-Fi cards work very well, but are a pita to get registered the first time. Finally, switch to VMware. VMware has been proven to be faster and more stable.
Hi David,
You’re right. I couldn’t try it in VMWare as it’s quite expensive (Player isn’t but Workstation is where you should ideally run Kali). If I can get a copy of licensed VMWare, I’ll write a post comparing VMWare and VirtualBox – Speed, Processing, Ease of Installation, Usage and Peripherals support.
Thanks for your comment and positive feedback.
-BMO
please tell me , install virtualbox in kali linux 1.0.7, (error kernel ?)
sorry kali linux 1.0.6 . error kernel
you need to enable the vertualisation
just restart
u need to enable HARDWARE VIRTUALIZATION which is present in bios
Respect Sir……………………Thanks Great work…………..
May u live long………………………………
Hello,
i cant continue to Graphical install because it’s giving me some kernel error…Pls help me!
reply ASAP pls
If you are using Virtual Box then,
Go to settings —> System —> Processor —–> Enable PAE/NX
You need a bigger cpu try using another computer
I was just wondering why mine continues on step 4 it just repeatedly goes nope failed to get the format of the file when i click on the kali iso
Could you please do a detailed guide on how to install NetHunter on a Samsung galaxy S5!
HELP ITS STILL SAYS INSTALLATION STEP FAILED PLS WHAT DO I DO
GO BACK TO BASICS, A COMMADORE 64???? Seriously google, google, google, most problems are caused by a lack of understanding … I myself am a newbie and came here cause i cant work out the mirrors, thus I came here. I figure there is no way to understand the answer to the question until i have worked out what i dont know ????c Im sure we will both get there in the end, good luck mate !!!
load debconf preconfiguration file failed kali linux I am keep getting this error pls help
loda faster vmware sucks no matter how uch good conf u have if it stucks at startup u dont’hve solution without good guidance source.
great in depth guide for a Linux noob, thank you for your time and effort.
Step 8.b didn’t work as planned (might be different file name now, but there again i’m not used to Linux terminal). i ended up manually browsing the mounted image, finding, copying and pasting the required file to the /root directory, then found an option in the file properties to run as an executable, which seemed to launch the installer.
Hey im still stuck on this part, just followed this guide through and the last step wont work, keeps telling me permission denied
Just enable PAE/NX in the VM settings
Hi i m following the as u have posted here, downloaded the kali 64 amd iso but the virtual box doesnot show one when i have to select one in step 3 n next problem i face is during graphical installation part as it does not move further from there, language option doesnot pop up n i m stuck pls help me out. Using it windows 7 ultimate.
Hi Hemant,
Ensure you’ve allocated 20GB space. Disconnect networking and retry.
If you have AntiVirus/Firewall on your Windows 7, turn it off and try again. Some firewalls are notorious and they block Memory access.
You also need to ensure that your Kali ISO was not damaged during download. This is usually the most common issue. Follow this guide to verify that:
Verifying SHA1 Checksums of Downloaded Images. This same guide also shows multiple troubleshooting steps for Kali Linux.
Good Luck.
-BMO.
Hi i figured out my mistake n installed the 32 bit version… Somehow i have managed to install it(sheer luck) now i m stuck with the vboxadditions file 4.3.10_93012.. I m not able to install the getting an error where its not able to copy it n plus some error 32 cannot match the file after tht? Pls help
Finally figured evrything on my own… Thanks
Hey blackMORE Ops,
Just to let you know, the frequent issue of the install process being stuck sometimes has to do with network connectivity.
In my case, I found that while I was stuck on the package manager configuration screen, it was actually due to /etc/resolv.conf being empty and therefore, all DNS queries were unable to complete. DHCP should have taken care of this but I guess it’s one of those bugs that wildly occur.
Sorry that it seems like a stupid question that how i can log in again after finishing graphical installation. When i start it again, it just show the default settings for me to choose, so which one should i choose to enter the system i have already configured ? Thanks for your help !
Hi Dirk,
Once you’ve finished installing, the installation process should prompt you to reboot. After rebooting, you should get the login prompt. See image:
Good Luck.
-BMO
Thanks for your reply ! sorry that maybe my presentation was hard to understand, what i really means is that i have already finished all the installation and configured my own settings, and then used poweroff command to close it, but when i rebooted it again, it showed the original boot menu with live mode, install etc.. So i just wonder which mode i should choose to enter the system with my own settings already. Thanks for your help
Dirk, check a few Youtube videos on how to install Kali on VirtualBox. There’s few good ones out there. It can be tough to explain in writing sometimes!! Good Luck.
Thanks for your opinion, i really appreciate for your help !
Hello BlackMore !!
Its an anazinf tutorial and I want to say thanks for this !
I follow step by step your tutorial and using the same version of the software and packages here.
Everything is running OK for the install and for the boot after install BUT i can’t access to the login screen.
I have a “Ooops an error occur” screen with a picture which appears and have no other choice that click on the button on the right corner to reboot or shutdown.
Tried already bith, same problem….
Any helps and/or ideas please ..?
Hi Zell,
I’ve never seen that error on VirtualBox, that usually happens on Physical installations. You’ve surely allocated only 8GB space (that’s the default VirtualBox settings). You need at least 16GB (Make it 20GB as per guide). Delete this VirtualBox installation and create a new one with 20GB. Good Luck.
Hi, i keep getting a error message on step 4 (VERR_NOT_SUPPORTED). everything is set correctly to my knowledge and i have downloaded it twice to ensure there was no error but i cannot get any further.
Hi Sam, that error usually means that the download failed. Perhaps try the torrent.
Step 8b is not working for me.
It is showing error.
Excellent tutorial, thank you for taking the time and dedication.
Everything goes fine until step 7a. after 7a. My installation hangs on a screen that says configure packet manager.. Pls help what to do ?
Did you allowed enough space (i.e. 20GB?). Unless there’s an issue with your downloaded ISO file, it should just work. Also, try without network connection as some adapters plays up.
hi blackmore again,
i have 1TB hard disk and i want to use kali is my daily used OS, only kali. how should i partition disk?
I would follow something like what RedHat recommended.
https://access.redhat.com/site/documentation/en-US/Red_Hat_Enterprise_Linux/6/html/Installation_Guide/s2-diskpartrecommend-x86.html
Put BOOT and HOME (in Linux home for root is /root) in different partition so that you can always reuse them in case you need to reinstall. By putting HOME/ROOT in different partition, you won’t loose anything. Try in a VirtualBox first before you get some confidence to actually use it in Physical installation.
Wow…very detailed. However, why wouldn’t you just use Vagrant/Virtualbox? `vagrant box add kali-linux http://ftp.sliim-projects.eu/boxes/kali-linux-1.0-amd64.box && vagrant kali init` BOOM DONE!
Are you complaining or showing off?
Thank you very much on this guide, it was very helpful and I succeeded first try thanks to you.
thank you very much i suceessfully installed kali ……… thats u for doing so much hard work in writing whole tutorial
when leaving the http space vacant,it showing a error
Thanks for this precious guide!
Ciao dall’Italia
Good article that falls apart at Step 7.f when you seem to just give up and not really be bothered explaining why you’re doing.
For example Step 7.f clicking Applications does not bring up the details dialogue you show. Similarly Steps 8. Did you get bored?
Hey Blackmore, thanks for the amazing tutorial. I’m facing some problems that I’d love to receive help on.
First of all, I’ve followed every step as explained above.
I downloaded and installed the extension pack and it doesn’t says invalid settings detected anymore but when I start the machine it says you need to either download the extension pack or disable USB 2.0. This keeping apart, I for now, decided to disable this option.
Now when I start machine the kali linux boot screen welcomes me, when I click on graphical install a black screen comes up and it stays there.
I waited for 2-3 minutes but still the black screen and not the installation UI.
Please help me ASAP
Kindest Regards
Mayank
Mayank, read the comments. It’s all in there.
helo sir i have still problem with that can we acess kali on window xp
You made a very serious mistake in step 8a: apt-get install linux-header-$(uname -r)
The correct one is apt-get install linux-headers-$(uname -r).
Let’s see what’s difference.
Thanks for your guide.
Seriously you don’t that a serious mistake which was pointed out by almost every reader!! I did made that mistake but I never fixed it, spoon feeding will only take someone this far specially when you’re using Kali Linux. (btw even the screenshot shows correct command).
Thank you very much. I really appreciate you took the time, explaining this in such detail.
Once again, thank you!
Excellent tutorial. Thank you for taking the time to put it together. It saved me a ton of time to set up my environment.
Hi there blackMORE ops… it would appear I’ve run into a problem.
I’ve followed your tutorial completely but yet I get stuck at step 8.b.
I don’t understand what the issue might be… since I’ve already mounted the VBoxAdditions iso… and now appears on my desktop. but as I try to run the command “cp VBoxLinuxAdditions.run /root/”, my command gives the bloody finger and tells me “cp: cannot stat `VBoxLinuxAdditions.run’: No such file or directory” and thus I now I’m left standing, not knowing really what to do. Have I perhaps missed out on something?
Never mind, I’ve solved the issue just as I posted the comment. Great guide I’ll say, great job and thanks.
Hello,
I’m stuck on the same problem that you were. Can you tell me how you solved it?
Please how did you solve this?
U have to go in the right directory with “cd” to wwork with this command
Would you please tell me how to solve this issue?
Never mind already figured the problem on my own, i feel kind of silly now thanks and great tutorial
I couldn’t get around this problem till I followed the steps here: http://superuser.com/questions/261643/cant-install-guest-additions-using-virtualbox-ubuntu-guest-os-win7-host-os. I’m on a Mac but they worked perfectly for me.
Excellent guide by the way!! Thank you! :)
Tutorial was very helpful for noobs., i did it acording to given instructions but it is showing ERROR in starting
process like this, guide me..
Failed to open a session for the virtual machine kali-linux-1.0.9-i386.
The virtual machine ‘kali-linux-1.0.9-i386’ has terminated unexpectedly during startup with exit code 1.
Result Code: E_FAIL (0x80004005)
Component: Machine
Interface: IMachine {480cf695-2d8d-4256-9c7c-cce4184fa048}
Hi Bao! Just wondering did you ever solve this issue? My VB use to work fine with Linux and then all of a sudden I get this when I want to start it! I deleted it installed about 100 time and did the steps again even changed versions of both Linux and VB… but it will no go… I browsed all over the web… seems like no one knows?! if you have solved.. it would be awesome to say how.. thanks!
Avira antivirus? That was my problem…
i’m stuck at step 4. i don’t have a cd/dvd drive and i just have the iso file downloaded on my computer and i don’t understand what exactly it is that I’m supposed to do here instead
Just click on the disc icon and select your Kali Linux Iso file =)
Are you blind can’t you read the presentation
For latest Kali disk must be bigger than 8GB, it crashed after installing in my VBox with 8GB and then my virtual disk was broken when I tried to resize it
Thanks! Very helpful.
Hi BlackMORE Ops
I installed Kali-Linux-1.0.9a-amd64 onto a 64 bit machine running Windows 8 and the current version of VirtualBox (v4.3.16 r95972), but at step 3a above, there are only 32 bit options in the drop down menu – there isn’t the option to select Debian (64 bit), so I selected Debian (32 bit).
When I attempt to boot onto a virtual machine, I receive the message “This kernel requires an x86-64 CPU, but only detected an i686 CPU. Unable to boot – please use a kernel appropriate for your CPU”
Any suggestions would be greatly appreciated
Thanks,
Craig
Hey Craig,this is kinda a sudden reply out of the blue but for your problem (which I personally once encountered)you need to go in your BIOS and then find something that says Hardware Virtualization or any other along those lines and enabled it,after your’re done save and exit your bios,now you should be able to enable 64bit (It worked for me) Peace Out.
thanx nigguh shit was cash
Thank you so much. There are dozens of procedures on the net for installing Kali Linux in VirtualBox. I spent days trying them with no success. Your complete instructions finally did the trick. But half my problem was just the stupid thing that I did not know the proper procedure for logging on. I removed the OS and started over again three times after being unable to log on and thinking I did something wrong. But your instructions were complete right down to the log on. Yeah, simple if you know the trick. But I did not. Thank you again.
Kali-Linux 1.0.9 / Virtualbox 4.3.18 / Windows 7 64-bit Pro
Hi,I’m following your guide on installing Kali Linux on VirtualBox however when the time comes for partitioning disks I encounter the following error:Failed To Load Installer Component,
Loading partman-lvm failed for unknown reason. Aborting.
Using VirtualBox 4.3.18 for Windows hosts (64-bit) and Kali Linux 64-bit Torrent version 1.0.9a.
However I realized that the size of your ISO is 2.92 GB but mine is 2.84GB (if that makes any difference) so I deleted the ISO and downloaded it again but the ISO still remains at 2.84GB so I don’t think that my ISO is corrupted.
Any ideas anyone? Help would be appreciated.Thank You.
Hi Frank
I am installing Kali now using VirtualBox 4.3.18 hosts (64 bit) and Kali Linux 1.0.9a and I am having the same error as you.
Failed To Load Installer Component,
Loading partman-lvm failed for unknown reason. Aborting.
Have you solved it? Please can you give me any idea? Thank you in advance!
Thanks a million times! Just used your guide to install Kali 1.0.9a
Mine gets about 80% done then says it failed
I appreciate the article. I am also using VirtualBox but working with a macbook. I am unclear as to why but when I attempt to select the Kali Iso in step 4 the file is grey and will not allow me to add it. I used the exact settings that you used so it’s possible i used the incorrect Kali file for my system. If anyone seems to know what iso file i should use i’d appreciate the help. Thank you
Hello there. I have a little problem. To be specific my problem is after doing Step 7.a! After I hit enter the installation continue…but after that the program don’t want to show me next step,that is Step 7.b: Install GRUB boot loader. Can someone help here? Does anyone have a clue what is a problem!? Please!
absollutely amazing tutorial!!keep up the gud work pal!
Please I need some help on installing kali when I reach about 40% the virual box freezes and the virtual hard disk stops at 4.29 GB.
I have tried to do it over 3 times and each time it stops at the same spot.
Hi blackMORE Ops! Thanks for your guide! I have some troubles when I press Enter to get in Graphical Install. The machine shut down immediately. Any idea about the problem?
Thanks man. Its a very good installation guide. worked fine for me.
In installed VirtualBox and downloaded Kali to a DVD. I followed all the steps, however, my VirtualBox startup keeps getting aborted and I can never get into Kali. I am using a Mac OS X. Not sure why this is happening.
I can’t seem to get to Step 5.b. Please advise
No solution, just similar experiences.
I had the same issue of aborting on GUI startup on Kali 2.0, Virtual Box 4.3.28 on OSX. Aborted with multiple issues, some of them being
flags: 64 bit ncq stag only ccc
measured clock 69907 rejected
And a whole lot of other things I don’t understand. Time was of the essence so I abandoned that and installed it all successfully and painlessly on a borrowed Win7 box.
I tried non-GUI (like plain “install”) and it also aborted, but at different points.
Frustration won out. Good luck.
After much trial and error and self troubleshooting I was able to do this on my own. Thank you very much !
I am using VirtualBox version – 4.3.20 r96997
Running Windows 7 Pro 32-bit
When I attempt to start VM, I receive a popup message with the abort button:
NtWriteVirtualMemory/Peb failed: 0xc0000022 (RC=-1073741790)
I then recieve another popup “failed to open a session for the virtual machine “XXXX” ….
The error code is as follows:
Result Code:
E_FAIL (0x80004005)
Component:
Machine
Interface: IMachine {480cf695-2d8d-4256-9c7c-cce4184fa048}
In the startup log, here are what seem to be some relevant details
c: Error (rc=-1073741790):358c.755
c: NtWriteVirtualMemory/Peb failed: 0xc0000022358c.755
c: Error -1073741790 in supR3HardNtChildScrewUpPebForInitialImageEvents! (enmWhat=5)358c.755
c: NtWriteVirtualMemory/Peb failed: 0xc0000022358c.755
c: supR3HardNtEnableThreadCreation:358c.755
c: supR3HardenedWinVerifyCacheScheduleImports: Import todo: #0 ‘opengl32.dll’.358c.755
c: supR3HardenedWinVerifyCacheScheduleImports: Import todo: #1 ‘vboxrt.dll’.358c.755
.
.
c: supR3HardenedMonitor_LdrLoadDll: error opening ‘C:\Windows\system32\wintab32.dll’: 0 (NtPath=\??\C:\Windows\system32\wintab32.dll; Input=C:\Windows\system32\wintab32.dll)358c.755
c: supR3HardenedMonitor_LdrLoadDll: pName=C:\Windows\system32\wintab32.dll (rcNtResolve=0xc0150008) *pfFlags=0x0 pwszSearchPath=00704b1
Anyone have a suggestion?
I assume you’ve downloaded 64bit Kali Linux iso?
I’m having issues installing on Yosemite. I’ve verified that the hash of my downloaded file is correct. After choosing Graphical Install, it just aborts. No error whatsoever. Help? Thanks!
Really helpful, thank you !
When I click Graphical install nothing happens… Any suggestions?
hello bro… i got this message … Couldn’t retrieve dists/kali/main/binary-amd64/Packages. This may be due to a network problem or a bad CD, depending on your installation method. If you are installing from a CD-R or CD-RW, burning the CD at a lower speed may help.
Hi goku,
There’s a big post with many Kali installation errors and possible solutions here: Step failed: Installing the system or Installing step failed : Install the system at 80% or The failing step is install the system error on Kali Linux.
Read those up. Good luck,
-BMO.
Installed KL just fine using VB. However cannot enable Bluetooth adapter.
Hi Chris,
You need to unmount/disconnect BT adapter from host and then mount it on VB. I found several posts asking similar questions in VB forums. Look those up.
(In short, it’s exactly the same process as using a Wifi Adapter.) Good luck,
-BMO
After the step 5 a my VM stuck on this step
[14.760680] random: nonblocking pool is initialized
–ravi
Can you please make a tutorial about installing kali linux alongside windows 8.1.
Hi Ravi,
Can you try disabling/disconnecting unused peripherals (such as Card reader, Floppy Drive etc.) and retry install? Also double check if you’re trying to install 64bit Kali on a 32 bit Windows host or similar. Google also returned several solutions and all points to hardware issues. Check PAE/NX etc. too. Cheers,
-BMO
If you exit VBox (turn off the device) will you lose all data ?
Thank you for the exceptional tutorial, I found this very helpful in installing Kali on my machine. However, on the last step, for some reason the Guest Additions won’t install properly when I try running them from the terminal. The output I get is nearly the same as the screenshot, except I get a failed message when it attempts to start the GA(something to do with modprobe failing). Furthermore, this seems to prevent Kali from booting into full-screen when I reboot it. Would you have any suggestions?
This should help:
http://www.blackmoreops.com/2014/06/10/correct-way-install-virtualbox-guest-additions-packages-kali-linux/
blackops i am using 64 bit sony vaio laptop sve 15136cns ihad downloaded kali linux 64 bit but it shows on 32 bit not 64 bit please reply
Did you change filename by mistake? Boot it Live mode and check what’s really inside.
Hi I had the same problem, what worked for me was inatalling a previous version of virtual box. Unfortunately I can’t tell exactly which one but just try with an older one.
Thanks , it works every time !
Nice explanation which I followed closely. I am trying to load kali on a VM on Fedora. When I hit start however I get this message: Faild to open a session for the virtual machine Kali2 The virtual machine ‘Kali2’ has terminated unexpectedly during startup with exit code 1 (0x1). In a separate box I get the error “Kernel driver not installed (rc=1908) . What am I doing wrong?
Thanks
whether we should download linux first time ?
please answer
iam download kali linux 64 bit,but in virtual box just read 32 bit why ?
Thanks
Turn On Windows Virtualization and this will Fix your Problem
After Step 5.d I Get An Error That “Error Reading Release File” “The CD Rom Doesn’t Contain A Valid ‘Relaese’ File OR That File Could Be Read Only”
What Does This Error Mean.
I’m using kali-linux-1.1.0a, trying to put it in VirtualBox and after I press reboot (final step) it doesn’t ask me for a pw, it just reboots but only to say: “Oh no! Something has gone wrong. A problem has occurred and the system can’t recover. Please contact a system administrator”. Even when I turn off the machine, and change the settings like you said to enable PAE it continues to do this. How do I get around this?
Nevermind, I increased drive from 8Gb to 20Gb and it worked perfectly.
You missed “Step 2.c: Allocate disk size”. Read more carefully.
i have install kali linux 2.0 on virtual box. After completing the entire installation black screen appears and not moving further anywhere .. plz help
Ive been mucking around with Bt5r3 and Kali for 2+ years now VM’s and hard install. This was the first time i ever got VBGA’s to work and i have tried many times, even the ghastly Oracle site is no help..
IMPORTANT! when issuing the ./VBoxLinuxAdditions.run command make sure you are in the right folder. ie use cd /root. You will inevitably get a permissions error if you try and run VBoxLinuxAdditions.run from the mounted cd drive as the previous chmod command didn’t / couldn’t alter a file on a cd.,
Anyway while i was here i checked out some other tutorials and must say i have never come across a site that updates links and deprecates its own tutorials, as well as being my new number 1 source for all things hack related, THANK YOU.
I never leave comments so i really am having a gushing orgasm :)
watch my video for complete tutorial go to https://youtu.be/phZZLSym0oo
hey kali lovers the post is awesome but you can also check this awesome video for complete detailed installation guide of kali on windows. go to https://www.youtube.com/watch?v=phZZLSym0oo
Thank you Boss
Thanks a lot … tried it initially and it wasn’t installing. This post was excruciatingly detailed and that helped a lot
when i do the ./VBoxLinuxAdditions.run it show no such file or directory what it’s mean ?how solve
I’m using kali on oracle virtual box. I have added extensions compat wireless annd tried basically everything to get my wireless connections(bluetooth and wifi) running on virtual box but it just doesnt work.So basicslly can you please tell how do i get my bluetooth and wifi running on virtual box without using bluetooth or usb adapters
Hello,
I encountered the following problems:
I did not see any option to choose the graphical installation (i’m using the amd 64-mini.iso) so i’m forced to use the other “install” option available there, is that okay?
After i commence installation everything goes well until I get to a point where I’m told to choose insert a proxy address or leave blank if I not using a proxy, I notice that when I leave it blank and try to proceed I get the following error message: “An error has been detected while trying to use the following debian archive mirror. Possible reason for the error are: incorrect mirror specified; mirror is unavailable (possibly due to an unreliable network connection); mirror is broken (for example because an invalid release file was found); mirror does not support the correct debian version. Additional details may be found in var/log/syslog or on virtual console 4. Please check the specified mirror or try a different one.”
I have tried everything I think I can try, maybe I’m not doing the right thing or I’m doing the right thing the wrong way. Please educate me.
I’m using a 64 bit intel penium system. Thanks.
Can I have a pdf copy of this tutorial for future reference I bet there are people wanting to have a copy for long tutorials like this. Thank you.
bro im using this and everything went smoothly exept i cant hear the sound for the kali in my laptop speakers any help pls
Kali linux not connecting to internet :(
It seems that I can`t modify the CPU!
Why is that?
It seems that I can`t change the CPU!
I think Virtual box did not detect my CPU!
How do change that?
I got errors with the install at 8. After researching it I found the sources.list file was incomplete. This caused the apt-get update to fail and the guest installation to also fail. I would extend section 8 as follows: –
review and edit /etc/apt/sources.list so that all 4 lines are in there per http://docs.kali.org/general-use/kali-linux-sources-list-repositories
The current ISO has only 2 lines in the sources.list file, resulting in a failed install. Adding the extra config fixes the problem. You should review this file with
cat /etc/apt/sources.list and see if it lines up with the 4 lines suggested in the document referenced above (docs.kali.org)
apt-get update
then you’re back on track and ready to do the header install
apt-get install linux-headers-$(uname -r)
Thank you for helping, wish god bless you!
I just want to say TQ for a great detailed how-to. got it working on 2nd try. 1st try failed – entirely my bad as I missed the grub instal part.
I get the ISO to boot in its VM, its recognizing my keyboard up and down commands to select which install I want. But it wont recognize my enter command to run the install. Any advice?
i use windows 10. kali linux can support ?
hey you missed an important part and it is “GrubBootLoader”, because after finish installing then restart then blank screen just cuse of wrong boot loader path
do i have to do step 8? can i just use it right away?
Thanks
Have problem with step 7b, it said “VBoxLinuxAdditions.run : no such file or directory”, pls help:(
Hi, I’m on step 8.b and typing in the first command line into terminal exactly the same as in the image but it keeps saying no such file exists? and ideas
when trying to install the extension pack i get an error:
Failed to install the Extension Pack C:/Users/epikkaos/Downloads/Oracle_VM_VirtualBox_Extension_Pack-4.3.10-93012.vbox-extpack.
Failed to load the main module (‘C:\Program Files\Oracle\VirtualBox/ExtensionPacks/Oracle_VM_VirtualBox_Extension_Pack/win.amd64/VBoxPuelMain.DLL’): VERR_SYMBOL_NOT_FOUND – GetLastError=127.
Result Code: E_FAIL (0x80004005)
Component: ExtPackManagerWrap
Interface: IExtPackManager {edba9d10-45d8-b440-1712-46ac0c9bc4c5}
what does this mean and what do i do to fix it?
No need in answering the above question turns out it was user error :)
I’m having the same error, how did you fix it?
Hello ! when I start the Step 7 the system just appear bad archive mirror I can’t found what is my problem and can you teach me the detailed step to solve problem ? Thank You
iam using windows 7 64bit…i instaled vm ware workstation for kali linux…but i couldnt instal kali linux some went wrong… instal cheyumbol secnd option unde quest operating system avide ethu operating systmkodukkanam.? you tubil okke linux debien anullathe ..athu koduthit njan instal cheythu again error….coming error massage (A problem has occurred and the system can’t recover. Please contact a system administrator.) this msg so .. contro+alt+f2 and apt-get install x-window-system ..njan ithu avide type cheythu…appol pinneyum prblm.. (E: unable to locate package x window system )coming this msg …? plss help me anyone plssssssss..ORCLE ASLSO I TRY TO INSTAL BUT COMING SAME PRBLM.
Hi David,
at the installation of system, it said installation failed.
i retried several times but it keeps on bringing the samething
please i need help
i am using kali-linux-2.0-amd64iso and virtualbox version is VirtualBox-5.0.12-104815-Win.exe
Hello Blackmoreops,
I just downloaded Kali linux 2016.1 but stuck in black screen,after I selected graphical installation.I am using 32bts windows 7
Hello
After I finish install kali linux on virtual box
I use new version from ISO kali ( kali-linux-2016.1-i386)
then I see black screen
loading ‘ please wait…..
same hereeeee! please help
Very usefull, thank you..
i did all the steps it worked fine but after it finished the installation then its stuck on loading pls wait… Help man i installed it several times its the same and great guide by the way
If you have Firewall or Antivirus running, try disabling that.
I disabled my FireWall and my Avast antivirus then I restarted Kali Linux on VirtualBox, It hang on “Loading, Please wait” in Black Screen. I don’t want to re-install. what can i do ?
hey i need some help i followed the guide but i never make it till step 7 i got this text
” an instalation step failed you can try to run the failing item again from the menu or skip it and choose something else the failing step is INSTAL THE SYSTEM”
iv tried the install on my laptop and desk top but i end up the same everytime :(
can you help me
Greetz Mikko,
same problem here
I have installed it right and as I opened it, it gets stuck at loading, please wait page in the black blank screen and does not get open at all. NEED SOME HELP PLZZZ
In step 4 i tried to load the iso kali file in and i got this error. please help
Failed to open the optical disk file C:\Users\User\Downloads\kali-linux-2016.1-i386.iso.
Could not get the storage format of the medium ‘C:\Users\User\Downloads\kali-linux-2016.1-i386.iso’ (VERR_NOT_SUPPORTED).
Result Code: VBOX_E_IPRT_ERROR (0x80BB0005)
Component: Medium
Interface: IMedium {05f2bbb6-a3a6-4fb9-9b49-6d0dda7142ac}
Callee: IVirtualBox {fafa4e17-1ee2-4905-a10e-fe7c18bf5554}
Callee RC: VBOX_E_OBJECT_NOT_FOUND (0x80BB0001)
The same happened to me and i downloaded every version (2016.1) on the page and they all said the same
Failed to open the disk image file C:\Users\Nick\.VirtualBox\kali-linux-2016.1-i386.iso.
Could not get the storage format of the medium ‘C:\Users\Nick\.VirtualBox\kali-linux-2016.1-i386.iso’ (VERR_NOT_SUPPORTED).
Result Code: VBOX_E_IPRT_ERROR (0x80BB0005)
Component: MediumWrap
Interface: IMedium {4afe423b-43e0-e9d0-82e8-ceb307940dda}
Callee: IVirtualBox {0169423f-46b4-cde9-91af-1e9d5b6cd945}
Callee RC: VBOX_E_OBJECT_NOT_FOUND (0x80BB0001)
… Black Screen =(((
I’ve done all the steps & it works got everything loaded. I start the Kali machine up & get to a login page asking for Username & then password page after that. But, we never set up a Username. So, I’m not sure what it would be. I’ve tried several w/ the password that we did set up, but to no avail… Can you please help me. I’ve installed it several times & its the same.. Excellent guide by the way!!!
root
toor
Awesome guide for installing Kali on VM !!! Thanks much.
After I finish install kali linux on virtual box
then I see black screen
loading ‘ please wai
After setting everything up exactly as you said to, I push start, go to graphical install. Then all I get is a black screen… thoughts?
when kali linux boot order appears then my navigation keys do not work i dont know how to interact with boot order please tell me by sending me a mail please anybody
I installed with those steps on Kali 2016.1 but when I finished installing and started it up kali, there was a black screen with only: ” – ”… How do i fix this or is there a updates version for kali 2016.1?
Same. Please help someone…
Same black screen
Sir i have downloaded kali linux 2016.1 vbox -i686. i have installed. as i start machine it shows VT.x error. I don’t have VT.x in my computer. pls suggest what should i do.
Regards
This is -totally- retarded, the “Guided partitioning”, in this tutorial: “Step 6.a: Choose Partitioning method”.
Previously selected the VM to have (to use) 2048 MB “Base Memory”, or 2 GB RAM; Also, chose to have “Separate /home, /usr, /var and /tmp partitions”. So, WHY isn’t the automated installer recognizing that my SWAP (/tmp) partition should reflect that – and NOT be “377.5 MB” in size. What kind of a crazy, random, bullshit number is that, LOLz; ffs (Jesus Christ).
What are we to do, now?.. Gotta scrap it and get into manual-mode… Stress, over nothing, why!.. The UBUNTU ((X)Ubuntu) setup program has NO such issues; it does it, all, automagically & correctly, bah!
^^ http://i.imgur.com/3nh9oXB.png
Step 6.a the partitioning method & Step 6.c: scheme may be alright for the purposes of virtualization, here… However when installing Kali Linux IRL, it may be best to “Separate /home, /usr, /var and /tmp partitions” – for example, so that the SWAP partition could be encrypted (among other things!..:))
P.S.
By the way, a question of mine, posted recently, about how the HECK to manually-format the partition(s) is nowhere to be found? o.0
Screenshot @http://i.imgur.com/Ka25FtO.png (& I hadn’t written it “correctly”, because what I meant to say is that the Kali installer is -seriously- flawed. unfortunately – and it’s nothing wrong with this tutorial, thanks!)
… Dang it, cannot edit the comments here! :( Forgot to add, here’s a screenshot of how the Xubuntu (16.04.1 LTS) installer sets-up the “linux-swap” partition, according to the amount of RAM available on the system; by default, it requires NO user interaction: http://i.imgur.com/HJYV1VG.png :)
I need help
It went well until it showed some errors about not being able to mount /media and the screen went black and only show “-“
Important:
Step 4b: There is a newer version available of the Oracle VM VirtualBox Extension Pack: VirtualBox 5.1.10 Oracle VM VirtualBox Extension Pack: https://www.virtualbox.org/wiki/Downloads
Step 8: For Kali Linux 4.6.0 I had to execute the following before continuing with step 8:
apt-get update && upgrade -y && dist-upgrade -y
restart
Otherwise, I was getting an error.
Dear TS,
I got this error, The virtual machine ‘Kali’ has terminated unexpectedly during startup with exit code 1 (0x1). More details may be available in ‘C:\Users\anonymus\VirtualBox VMs\Kali\Logs\VBoxHardening.log’.
I have configured the vbox settings as the tutorial shown. but when I started the virtual machine i got the error message, where’s the problem comes from? from the vbox configuration or the iso’s file.
Thanks
I used this tutorial, after all the steps done right and starting first time black screen only. What to do? Thanks in advance.
Obrigada! Depois de tantos posters de busca atrás de resolver meu problema, encontrei o seu e meu problema foi resolvido! Parabéns! Excelente post!
On Kali Linux Boot menu, I highlighted Graphical install option and pressed Enter.
Now all I see is black screen :/ :( Need help
same happened to me. i went back to settings>display, unchecked “enable 3d acceleration” and it worked fine.
Respect Sir…………..
Great work….
May u live long…………..
Ameeen………….
I keep getting this error every time i try and install the extension pack :( I’m on windows 64bit… “Failed to load the main module (‘C:\Program Files\Oracle\VirtualBox\ExtensionPacks\Oracle_VM_VirtualBox_Extension_Pack\win.amd64\VBoxPuelMain.DLL’): VERR_SYMBOL_NOT_FOUND – GetLastError=127.”
problem fixed! use this link to get the latest extension pack.
http://download.virtualbox.org/virtualbox/5.1.14/Oracle_VM_VirtualBox_Extension_Pack-5.1.14-112924.vbox-extpack
I have tried a couple of times to do this but every time I get to the password to finally log in it says, “Sorry, that didn’t work. Please try again”. I have kept the name and password simple but no luck. Any suggestions?
Heya, I’m trying to install kali, and the last few attempts I’ve been getting stuck on ‘Configure the package manager’ could anybody help me get past this?
same here T_T
Thank you for this info instruction. Ive been following this instruction carefully up to this point . im running into a problem , a slight one . when I run “Graphic installation” in selected menu, I get this message in terminal , ” Mount: mounting /dev/sda on /media failed : invalidate arrangement
Unmount: can’t unmount/ media: invalied argument. it proceeded on to next page to Selected Language. My question is, should I worried about this? will this end up crapping out larer in the future?, if so, how should i fix this. thanks.
i am not able to login to my recently installed kali account in virtual box………what should i do??
plzzz HELP!!!!!!
BEST! THANK YOU SO MUCH.
I’ve been looking for this for days XD
very detailed guide.
AWESOME WORK! :D
after installation of it it dosnt show anything just a black screen
After enter on graphical installation a black shows up then nothing only black screen I just did step by step but nothing shows up plz help
Once i have selected “Graphical Install” i just get a blank black screen, and seems to be doing nothing from that point, any ideas please? Thanks in advance.
when i click on install button it shows
” This kernal requires the following features not present on the cpu:
unable to boot- please use a kernal appropriate for your cpu.”
what should i do now sir plz tell me?
i did the install an went to reset then i restarted it, some startup comands ran up the screen and the it went to the black screen with the “-” in the top left corner and wont go anywhere
read the comments and no answers pls help
hey there’s tons of messages here but I just have to say THANK YOU, u’re the best !!
thanks alot for this detailed info really helpful! thumps up!
Black screen with “-“…. Please help
Great guide that still holds up :) Thanks for this!!
Great guide, smooth sailing the whole way through with no problems. Thanks
10 star rating out of 5! Thanx dude
after entering graphical settings went wrong pls explain me
I am glad that I observed this site, exactly the right
information that I was searching for!
Why I cant download iso file.
when I try to download, it says cant reach reach this page..
how to download???
Hello I have a problem. I already installen kali linux but after the instal it switched to a blackscreen with a flikkering underscore. I tried installing it again or closing and booting it up again but I always end up on the flikkering underscore. Can someone pls help
hi man i instaled kali linux on my windows7 with virtual box
after i go in and do install graphical an error shows saying:
-end kernel panic not syncing fatal exeption in interrupt.
and it also said :
kernel offset 0x16000000 FROM 0xc1000000
Hi there, thanks for the detailed write up on how to install as my installation is now working.
Hey,
Great article, can you tell me how do i change the drive when the disk partition happens in the kali installation. It always installs on the C: drive, i want to install it on the D: drive. My virtual box is configured in the D: drive.
Massa, you are a gem…have been able to install kali. Your guide was superb. Keep it up man.
May God bless you
Hey you rock! Am able to install KALI LINUX on my VirtualBox. thanks
with these we can install software of linux?
Damn Dude !!
You’ve explained this entire process perfectly and made it easy for everyone
Keep it up !
Thank you for putting this together!
I followed every step and Its just simply not working. Just to let you know, If you try to replicate this again on a new PC, It wont work. Working on why not….
i’ll having problem with with grub bootloader can anyone tell me how to solve i was installing kali linux on virtual box
i was installing kali on on virtual box machine but in a step grub bootloader was not installed notification appear tell me how to solve this problem …i m so worried
Hi, when I ran the VM, it output this error: Fatal! No bootable medium found. System Halted.
i am getting error while installing linux headers-
E: Unable to locate package linux-headers-4.17.0-kali1-amd64
E: Couldn’t find any package by glob ‘linux-headers-4.17.0-kali1-amd64’
E: Couldn’t find any package by regex ‘linux-headers-4.17.0-kali1-amd64’
i want to install virtualbox on my linux bootable pendrive
what will happen if i select install in place of graphical install
Greatest and full working tutorial installed kali successfully which i wasn’t vable to install from moths you helped like a fairy thanks!.
i am still facing same issue during installing kali linux with virtual box. I followed all step of this manual.
http://download.virtualbox.org/virtualbox/4.3.10/Oracle_VM_VirtualBox_Extension_Pack-4.3.10-93012a.vbox-extpack
The link for the extension pack needs updated. Above should be the correct one, testing now to make sure.