
Have you ever wondered how to find hidden devices in your network? Well, before we go into that, let’s understand some basic technologies that no one talks about, like ARP or The Address Resolution Protocol. ARP uses a simple message format containing one address resolution request or response. The size of the ARP message depends on the upper layer and lower layer address sizes, which are given by the type of networking protocol (usually IPv4) in use and the type of hardware or virtual link layer that the upper layer protocol is running on. The message header specifies these types, as well as the size of addresses of each. The message header is completed with the operation code for request (1) and reply (2). The payload of the packet consists of four addresses, the hardware and protocol address of the sender and receiver hosts.

The principal packet structure of ARP packets is shown in the following table which illustrates the case of IPv4 networks running on Ethernet. In this scenario, the packet has 48-bit fields for the sender hardware address (SHA) and target hardware address (THA), and 32-bit fields for the corresponding sender and target protocol addresses (SPA and TPA). Thus, the ARP packet size in this case is 28 bytes. The EtherType for ARP is 0x0806. (This appears in the Ethernet frame header when the payload is an ARP packet. Not to be confused with PTYPE below, which appears within this encapsulated ARP packet.)
If you have a device that is on the same network but not responding to any requests such as ping, HTTP, HTTPS etc. This is done intentionally, for example a Check Point Firewall doesn’t respond to anything by design. Similarly a Cisco ASA, Router or BIG-IP F5 might not respond to any requests as they are designed to be silent. In those cases, using arp-scan to scan MAC address is a quick way to find those devices.
arp-scan
The ARP Scan Tool (also called ARP Sweep or MAC Scanner) is a very fast ARP packet scanner that shows every active IPv4 device on your Subnet. Since ARP is non-routable, this type of scanner only works on the local LAN (local subnet or network segment).
The ARP Scan Tool shows all active devices even if they have firewalls. Devices cannot hide from ARP packets like they can hide from Ping. To find active IP addresses outside your subnet, use the Ping Scan Tool (a Ping Sweep tool AKA NetScanner).
Install arp-scan
Binary packages are available for the following operating systems:
- Debian Linux:
arp-scanis part of the standard Debian distribution on Lenny and later. - Ubuntu Linux:
arp-scanis available from gutsy (7.10) in universe. - Fedora:
arp-scanis available for Fedora 6 and later - RedHat Enterprise Linux:
arp-scanis available for RedHat EL 5 and later - Gentoo Linux
- FreeBSD:
arp-scanis available from the FreeBSD ports collection - OpenBSD:
arp-scanis available as an OpenBSD package
Installation is usually as simple as shown below for Debian or Ubuntu like distributions:
root@debian:~# apt-get install arp-scan
(or)
user@ubuntu:~$ apt-get install arp-scan
Kali Linux being the awesome pentest distro it is, has it pre-installed.
Use arp-scan to find hidden devices
arp-scan can be used to discover IP hosts on the local network. It can discover all hosts, including those that block all IP traffic such as firewalls and systems with ingress filters.
arp-scan works on Ethernet and 802.11 wireless networks. It may also work with token ring and FDDI, but they have not been tested. It does not support serial links such as PPP or SLIP, because ARP is not supported on them. You will need to be root, or arp-scan must be SUID root, in order to run arp-scan, because the functions that it uses to read and write Ethernet packets require root privilege.
Discovering all hosts on the local network
If the system you are testing from has an address on the network you wish to scan, the simplest way to scan it is with a command similar to:
root@kali:~# arp-scan --interface=eth0 --localnet
(or)
user@ubuntu:~$ sudo arp-scan --interface=eth0 --localnet
Here, --interface=eth0 represents the interface to use for scanning, and --localnet makes arp-scan scan all possible IP addresses on the network connected to this interface, as defined by the interface IP address and netmask. You can omit the --interface option, in which case arp-scan will search the system interface list for the lowest numbered, configured up interface (excluding loopback).
The network interface name depends on the operating system you are using, the network type (Ethernet, Wireless Etc), and for some operating systems on the interface card type as well. In this document, the interface name eth0 is used for examples except where a different network type is being discussed.
All arp-scan options have both a long form like --interface=eth0 and a corresponding short form like -I eth0.
I’ve used the long form in this document for clarity. I’ve also used wlan0 in the following example and I am on a Wireless network.
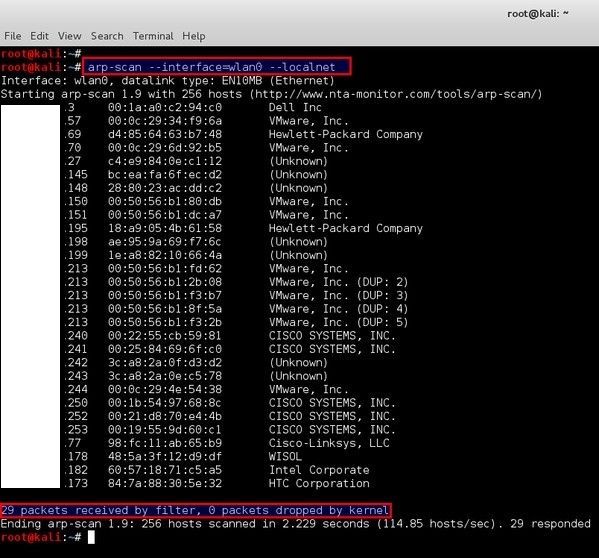
root@kali:~# arp-scan --interface=wlan0 --localnet
Interface: wlan0, datalink type: EN10MB (Ethernet)
Starting arp-scan 1.9 with 256 hosts (http://www.nta-monitor.com/tools/arp-scan/)
10.0.1.3    0b:1a:a0:c2:94:c0    Dell Inc
10.0.1.57    0b:0c:29:34:f9:6a    VMware, Inc.
10.0.1.69    d4:85:64:63:b7:48    Hewlett-Packard Company
10.0.1.70    0b:0c:29:6d:92:b5    VMware, Inc.
10.0.1.27    c4:e9:84:0e:c1:12    (Unknown)
10.0.1.148    28:80:23:ac:dd:c2    (Unknown)
10.0.1.150    0b:50:56:b1:80:db    VMware, Inc.
10.0.1.151    0b:50:56:b1:dc:a7    VMware, Inc.
10.0.1.195    18:a9:05:4b:61:58    Hewlett-Packard Company
10.0.1.198    ae:95:9a:69:f7:6c    (Unknown)
10.0.1.199    1e:a8:82:10:66:4a    (Unknown)
10.0.1.213    0b:50:56:b1:fd:62    VMware, Inc.
10.0.1.213    0b:50:56:b1:2b:08    VMware, Inc. (DUP: 2)
10.0.1.213    0b:50:56:b1:f3:b7    VMware, Inc. (DUP: 3)
10.0.1.213    0b:50:56:b1:f3:2b    VMware, Inc. (DUP: 4)
10.0.1.213    0b:50:56:b1:8f:5a    VMware, Inc. (DUP: 5)
10.0.1.240    0b:22:55:cb:59:81    CISCO SYSTEMS, INC.
10.0.1.242    3c:a8:2a:0f:d3:d2    (Unknown)
10.0.1.241    0b:25:84:69:6f:c0    CISCO SYSTEMS, INC.
10.0.1.243    3c:a8:2a:0e:c5:78    (Unknown)
10.0.1.244    0b:0c:29:4e:54:38    VMware, Inc.
10.0.1.250    0b:1b:54:97:68:8c    CISCO SYSTEMS, INC.
10.0.1.252    0b:21:d8:70:e4:4b    CISCO SYSTEMS, INC.
10.0.1.253    0b:19:55:9d:60:c1    CISCO SYSTEMS, INC.
10.0.1.145    bc:ea:fa:6f:ec:d2    (Unknown)
10.0.1.77    98:fc:11:ab:65:b9    Cisco-Linksys, LLC
10.0.1.178    48:5a:3f:12:d9:df    WISOL
10.0.1.167    f0:25:b7:3e:a1:b1    (Unknown)
10.0.1.182    60:57:18:71:c5:a5    Intel Corporate

29 packets received by filter, 0 packets dropped by kernel
Ending arp-scan 1.9: 256 hosts scanned in 2.259 seconds (113.32 hosts/sec). 29 responded
root@kali:~#
So in the above example arp-scan was used to scan the network of the device wlan0, and it discovered 29 alive nodes apart from localhost machine. The option --localnet makes arp-scan scan the local network.
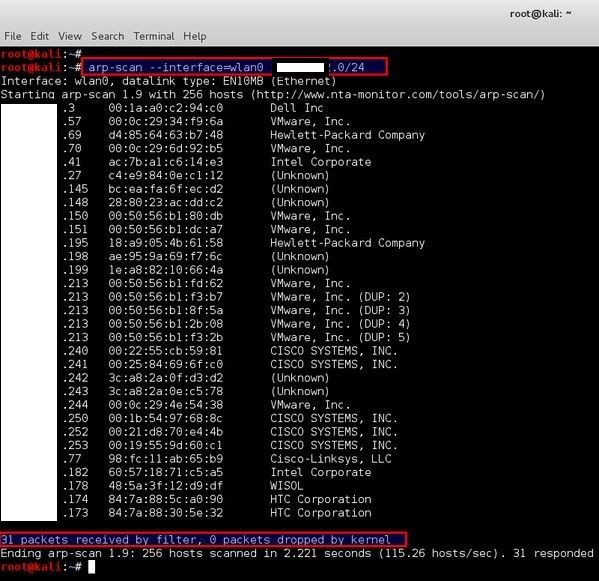
Here is an example showing arp-scan being run against the network 10.0.1.0/24:
root@kali:~# arp-scan --interface=wlan0 10.0.1.0/24
(or)
user@ubuntu:~$ sudo arp-scan --interface=wlan0 10.0.1.0/24
Interface: wlan0, datalink type: EN10MB (Ethernet)
Starting arp-scan 1.9 with 256 hosts (http://www.nta-monitor.com/tools/arp-scan/)
10.0.1.3    0b:1a:a0:c2:94:c0    Dell Inc
10.0.1.57    0b:0c:29:34:f9:6a    VMware, Inc.
10.0.1.69    d4:85:64:63:b7:48    Hewlett-Packard Company
10.0.1.70    0b:0c:29:6d:92:b5    VMware, Inc.
10.0.1.41    ac:7b:a1:c6:14:e3    Intel Corporate
10.0.1.27    c4:e9:84:0e:c1:12    (Unknown)
10.0.1.145    bc:ea:fa:6f:ec:d2    (Unknown)
10.0.1.148    28:80:23:ac:dd:c2    (Unknown)
10.0.1.150    0b:50:56:b1:80:db    VMware, Inc.
10.0.1.151    0b:50:56:b1:dc:a7    VMware, Inc.
10.0.1.195    18:a9:05:4b:61:58    Hewlett-Packard Company
10.0.1.198    ae:95:9a:69:f7:6c    (Unknown)
10.0.1.199    1e:a8:82:10:66:4a    (Unknown)
10.0.1.213    0b:50:56:b1:fd:62    VMware, Inc.
10.0.1.213    0b:50:56:b1:f3:b7    VMware, Inc. (DUP: 2)
10.0.1.213    0b:50:56:b1:8f:5a    VMware, Inc. (DUP: 3)
10.0.1.213    0b:50:56:b1:2b:08    VMware, Inc. (DUP: 4)
10.0.1.213    0b:50:56:b1:f3:2b    VMware, Inc. (DUP: 5)
10.0.1.240    0b:22:55:cb:59:81    CISCO SYSTEMS, INC.
10.0.1.241    0b:25:84:69:6f:c0    CISCO SYSTEMS, INC.
10.0.1.242    3c:a8:2a:0f:d3:d2    (Unknown)
10.0.1.243    3c:a8:2a:0e:c5:78    (Unknown)
10.0.1.244    0b:0c:29:4e:54:38    VMware, Inc.
10.0.1.250    0b:1b:54:97:68:8c    CISCO SYSTEMS, INC.
10.0.1.252    0b:21:d8:70:e4:4b    CISCO SYSTEMS, INC.
10.0.1.253    0b:19:55:9d:60:c1    CISCO SYSTEMS, INC.
10.0.1.77    98:fc:11:ab:65:b9    Cisco-Linksys, LLC
10.0.1.182    60:57:18:71:c5:a5    Intel Corporate
10.0.1.178    48:5a:3f:12:d9:df    WISOL
10.0.1.174    84:7a:88:5c:a0:90    HTC Corporation
10.0.1.173    84:7a:88:30:5e:32    HTC Corporation

31 packets received by filter, 0 packets dropped by kernel
Ending arp-scan 1.9: 256 hosts scanned in 2.221 seconds (115.26 hosts/sec). 31 responded
root@kali:~#
Now I’ve found 31 hosts that responded to this new sweep, so those two are my hidden servers.
Using an interface without an IP address
You can still use arp-scan even if the interface does not have an IP address. If you use arp-scan in this way, it will use the IP address of 0.0.0.0 for the arpsha field in the ARP packet unless you specify the IP address to use with the –arpsha option.
Some operating systems will only respond to ARP requests if the IP address specified in the arpsha field is plausible. The exact rules vary between operating systems, but the most common is that the address in arpsha must be within the IP network of the interface that the ARP request is received on. This is explored further in the fingerprinting section.
ARP spoofing and Proxy ARP
Because ARP does not provide methods for authenticating ARP replies on a network, ARP replies can come from systems other than the one with the required Layer 2 address. An ARP proxy is a system which answers the ARP request on behalf of another system for which it will forward traffic, normally as a part of the network’s design, such as for a dialup internet service. By contrast, in ARP spoofing the answering system, or spoofer, replies to a request for another system’s address with the aim of intercepting data bound for that system. A malicious user may use ARP spoofing to perform a man-in-the-middle or denial-of-service attack on other users on the network. Various software exists to both detect and perform ARP spoofing attacks, though ARP itself does not provide any methods of protection from such attacks.
[toggle title=”arp-scan scan help menu – Click to expand” state=”close”]
root@kali:~# arp-scan --help
Usage: arp-scan [options] [hosts...]

Target hosts must be specified on the command line unless the --file option is
given, in which case the targets are read from the specified file instead, or
the --localnet option is used, in which case the targets are generated from
the network interface IP address and netmask.

You will need to be root, or arp-scan must be SUID root, in order to run
arp-scan, because the functions that it uses to read and write packets
require root privilege.

The target hosts can be specified as IP addresses or hostnames. You can also
specify the target as IPnetwork/bits (e.g. 192.168.1.0/24) to specify all hosts
in the given network (network and broadcast addresses included), or
IPstart-IPend (e.g. 192.168.1.3-192.168.1.27) to specify all hosts in the
inclusive range, or IPnetwork:NetMask (e.g. 192.168.1.0:255.255.255.0) to
specify all hosts in the given network and mask.

These different options for specifying target hosts may be used both on the
command line, and also in the file specified with the --file option.

Options:

Note: where an option takes a value, that value is specified as a letter in
angle brackets. The letter indicates the type of data that is expected:

A character string, e.g. --file=hostlist.txt.

 An integer, which can be specified as a decimal number or as a hexadecimal
    number if preceeded with 0x, e.g. --arppro=2048 or --arpro=0x0800.

 A floating point decimal number, e.g. --backoff=1.5.

 An Ethernet MAC address, which can be specified either in the format
    01:23:45:67:89:ab, or as 01-23-45-67-89-ab. The alphabetic hex characters
    may be either upper or lower case. E.g. --arpsha=01:23:45:67:89:ab.

 An IPv4 address, e.g. --arpspa=10.0.0.1

 Binary data specified as a hexadecimal string, which should not
    include a leading 0x. The alphabetic hex characters may be either
    upper or lower case. E.g. --padding=aaaaaaaaaaaa

 Something else. See the description of the option for details.

--help or -h            Display this usage message and exit.

--file= or -f     Read hostnames or addresses from the specified file
                        instead of from the command line. One name or IP
                        address per line. Use "-" for standard input.

--localnet or -l        Generate addresses from network interface configuration.
                        Use the network interface IP address and network mask
                        to generate the list of target host addresses.
                        The list will include the network and broadcast
                        addresses, so an interface address of 10.0.0.1 with
                        netmask 255.255.255.0 would generate 256 target
                        hosts from 10.0.0.0 to 10.0.0.255 inclusive.
                        If you use this option, you cannot specify the --file
                        option or specify any target hosts on the command line.
                        The interface specifications are taken from the
                        interface that arp-scan will use, which can be
                        changed with the --interface option.

--retry= or -r    Set total number of attempts per host to ,
                        default=2.

--timeout= or -t  Set initial per host timeout to  ms, default=100.
                        This timeout is for the first packet sent to each host.
                        subsequent timeouts are multiplied by the backoff
                        factor which is set with --backoff.

--interval= or -i  Set minimum packet interval to .
                        This controls the outgoing bandwidth usage by limiting
                        the rate at which packets can be sent. The packet
                        interval will be no smaller than this number.
                        If you want to use up to a given bandwidth, then it is
                        easier to use the --bandwidth option instead.
                        The interval specified is in milliseconds by default,
                        or in microseconds if "u" is appended to the value.

--bandwidth= or -B  Set desired outbound bandwidth to , default=256000.
                        The value is in bits per second by default. If you
                        append "K" to the value, then the units are kilobits
                        per sec; and if you append "M" to the value, the
                        units are megabits per second.
                        The "K" and "M" suffixes represent the decimal, not
                        binary, multiples. So 64K is 64000, not 65536.
                        You cannot specify both --interval and --bandwidth
                        because they are just different ways to change the
                        same underlying parameter.

--backoff= or -b  Set timeout backoff factor to , default=1.50.
                        The per-host timeout is multiplied by this factor
                        after each timeout. So, if the number of retries
                        is 3, the initial per-host timeout is 500ms and the
                        backoff factor is 1.5, then the first timeout will be
                        500ms, the second 750ms and the third 1125ms.

--verbose or -v         Display verbose progress messages.
                        Use more than once for greater effect:
                        1 - Display the network address and mask used when the
                            --localnet option is specified, display any
                            nonzero packet padding, display packets received
                            from unknown hosts, and show when each pass through
                            the list completes.
                        2 - Show each packet sent and received, when entries
                            are removed from the list, the pcap filter string,
                            and counts of MAC/Vendor mapping entries.
                        3 - Display the host list before scanning starts.

--version or -V         Display program version and exit.

--random or -R          Randomise the host list.
                        This option randomises the order of the hosts in the
                        host list, so the ARP packets are sent to the hosts in
                        a random order. It uses the Knuth shuffle algorithm.

--numeric or -N         IP addresses only, no hostnames.
                        With this option, all hosts must be specified as
                        IP addresses. Hostnames are not permitted. No DNS
                        lookups will be performed.

--snap= or -n     Set the pcap snap length to . Default=64.
                        This specifies the frame capture length. This
                        length includes the data-link header.
                        The default is normally sufficient.

--interface= or -I  Use network interface .
                        If this option is not specified, arp-scan will search
                        the system interface list for the lowest numbered,
                        configured up interface (excluding loopback).
                        The interface specified must support ARP.

--quiet or -q           Only display minimal output.
                        If this option is specified, then only the minimum
                        information is displayed. With this option, the
                        OUI files are not used.

--ignoredups or -g      Don't display duplicate packets.
                        By default, duplicate packets are displayed and are
                        flagged with "(DUP: n)".

--ouifile= or -O  Use OUI file , default=/usr/local/share/arp-scan/ieee-oui.txt
                        This file provides the IEEE Ethernet OUI to vendor
                        string mapping.

--iabfile= or -F  Use IAB file , default=/usr/local/share/arp-scan/ieee-iab.txt
                        This file provides the IEEE Ethernet IAB to vendor
                        string mapping.

--macfile= or -m  Use MAC/Vendor file , default=/usr/local/share/arp-scan/mac-vendor.txt
                        This file provides the custom Ethernet MAC to vendor
                        string mapping.

--srcaddr= or -S  Set the source Ethernet MAC address to .
                        This sets the 48-bit hardware address in the Ethernet
                        frame header for outgoing ARP packets. It does not
                        change the hardware address in the ARP packet, see
                        --arpsha for details on how to change that address.
                        The default is the Ethernet address of the outgoing
                        interface.

--destaddr= or -T  Send the packets to Ethernet MAC address
                        This sets the 48-bit destination address in the
                        Ethernet frame header.
                        The default is the broadcast address ff:ff:ff:ff:ff:ff.
                        Most operating systems will also respond if the ARP
                        request is sent to their MAC address, or to a
                        multicast address that they are listening on.

--arpsha= or -u   Use  as the ARP source Ethernet address
                        This sets the 48-bit ar$sha field in the ARP packet
                        It does not change the hardware address in the frame
                        header, see --srcaddr for details on how to change
                        that address. The default is the Ethernet address of
                        the outgoing interface.

--arptha= or -w   Use  as the ARP target Ethernet address
                        This sets the 48-bit ar$tha field in the ARP packet
                        The default is zero, because this field is not used
                        for ARP request packets.

--prototype= or -y  Set the Ethernet protocol type to , default=0x0806.
                        This sets the 16-bit protocol type field in the
                        Ethernet frame header.
                        Setting this to a non-default value will result in the
                        packet being ignored by the target, or sent to the
                        wrong protocol stack.

--arphrd= or -H   Use  for the ARP hardware type, default=1.
                        This sets the 16-bit ar$hrd field in the ARP packet.
                        The normal value is 1 (ARPHRD_ETHER). Most, but not
                        all, operating systems will also respond to 6
                        (ARPHRD_IEEE802). A few systems respond to any value.

--arppro= or -p   Use  for the ARP protocol type, default=0x0800.
                        This sets the 16-bit ar$pro field in the ARP packet.
                        Most operating systems only respond to 0x0800 (IPv4)
                        but some will respond to other values as well.

--arphln= or -a   Set the hardware address length to , default=6.
                        This sets the 8-bit ar$hln field in the ARP packet.
                        It sets the claimed length of the hardware address
                        in the ARP packet. Setting it to any value other than
                        the default will make the packet non RFC compliant.
                        Some operating systems may still respond to it though.
                        Note that the actual lengths of the ar$sha and ar$tha
                        fields in the ARP packet are not changed by this
                        option; it only changes the ar$hln field.

--arppln= or -P   Set the protocol address length to , default=4.
                        This sets the 8-bit ar$pln field in the ARP packet.
                        It sets the claimed length of the protocol address
                        in the ARP packet. Setting it to any value other than
                        the default will make the packet non RFC compliant.
                        Some operating systems may still respond to it though.
                        Note that the actual lengths of the ar$spa and ar$tpa
                        fields in the ARP packet are not changed by this
                        option; it only changes the ar$pln field.

--arpop= or -o    Use  for the ARP operation, default=1.
                        This sets the 16-bit ar$op field in the ARP packet.
                        Most operating systems will only respond to the value 1
                        (ARPOP_REQUEST). However, some systems will respond
                        to other values as well.

--arpspa= or -s   Use  as the source IP address.
                        The address should be specified in dotted quad format;
                        or the literal string "dest", which sets the source
                        address to be the same as the target host address.
                        This sets the 32-bit ar$spa field in the ARP packet.
                        Some operating systems check this, and will only
                        respond if the source address is within the network
                        of the receiving interface. Others don't care, and
                        will respond to any source address.
                        By default, the outgoing interface address is used.

                        WARNING: Setting ar$spa to the destination IP address
                        can disrupt some operating systems, as they assume
                        there is an IP address clash if they receive an ARP
                        request for their own address.

--padding= or -A  Specify padding after packet data.
                        Set the padding data to hex value . This data is
                        appended to the end of the ARP packet, after the data.
                        Most, if not all, operating systems will ignore any
                        padding. The default is no padding, although the
                        Ethernet driver on the sending system may pad the
                        packet to the minimum Ethernet frame length.

--llc or -L             Use RFC 1042 LLC framing with SNAP.
                        This option causes the outgoing ARP packets to use
                        IEEE 802.2 framing with a SNAP header as described
                        in RFC 1042. The default is to use Ethernet-II
                        framing.
                        arp-scan will decode and display received ARP packets
                        in either Ethernet-II or IEEE 802.2 formats
                        irrespective of this option.

--vlan= or -Q     Use 802.1Q tagging with VLAN id .
                        This option causes the outgoing ARP packets to use
                        802.1Q VLAN tagging with a VLAN ID of , which should
                        be in the range 0 to 4095 inclusive.
                        arp-scan will always decode and display received ARP
                        packets in 802.1Q format irrespective of this option.

--pcapsavefile= or -W     Write received packets to pcap savefile .
                        This option causes received ARP responses to be written
                        to the specified pcap savefile as well as being decoded
                        and displayed. This savefile can be analysed with
                        programs that understand the pcap file format, such as
                        "tcpdump" and "wireshark".

Report bugs or send suggestions to arp-scan@nta-monitor.com
See the arp-scan homepage at http://www.nta-monitor.com/tools/arp-scan/
[/toggle]
Conclusion
arp-scan is a simple tool yet very powerful. Those of you who are familiar with Cisco Routers and switches, CheckPoint Firewall and Big-IP F5, you know it too well that sometimes the only way to find a device is by using a arp response. Once you’ve found the MAC address, you can find more info about that device by matching that MAC address to it’s vendor. It is importing to understand ARP/MAC responses for penetration tester and it is used heavily for arpspoof and Man-In-The-Middle Attack. It also helps in cases when someone is spoofing IP address and DoS-ing your server. You can however spoof MAC address easily to evade trace.
All in all, it’s a useful tool and you should try the commands shown above. It will help someday when you are scratching you head in the middle of a service outage!
Thanks for reading, do share.
Resources
- Project website
http://www.nta-monitor.com/tools-resources/security-tools/arp-scan - Full documentation
http://www.nta-monitor.com/wiki/index.php/Arp-scan_Documentation
9 comments
how can i scan for hosts beyond my local router??
Project website is invalid
Thanks, project moved to github, I’ve updated the link.
how can I see who other devices are in my house?
but it has some problem like sometimes it can identify all the devices on the network but sometimes it fails to find all…. WHY?
I want to know if i can trace mac address someone been using my ip address to threaten people and i noticed on my network there was devices signed into my computer, can someone help me with this i will pay you
Speak to the admin of your network, if they are any good they’ll have the culprit tracked down in no time. Also, take your computer/s to local repair shop for clean reinstall, don’t install anything unless you absolutely need it.
Change your passwords to all your social media and any other important accounts – set up 2 factor authentication.
Good luck.
Not able to see undiscoverable NVR on same router!
NVR camera’s uses separate network 172...*. As that’s in separate network and different subnet, it doesn’t route. You will however see NVR Management Centre/Control IP.