
20 things to do after installing Kali Linux 1.x
I’ve compiled a small list of things that I always perform after installing a fresh copy of Kali Linux in this post. Because I got multiple laptops and workstations, I’ve tried to generalize the following instructions to suit everyone’s(including mine??) requirements. This is my top list of 20 things to do after installing Kali Linux. Your requirement’s might be completely different. If you have a suggestion, let me know via comments section. You can comment without registering.. so that’s an easy way to give me feedback and opinion.
WARNING: Following guide was written and tested for Kali Linux 1.x. I am working best to write a guide on Kali Linux 2.0 – Kali Sana. Use this guide at your own risk for Kali Linux 2.0 – Kali Sana.

Table of Contents
Standard Packages:
Standard packages contains anything and everything I found useful. This list if divided into 3 parts:
- Kali Specific
Kali Linux is a special build from Debian. Kali Linux inherits a lot of the issues from Debian Linux. This section shows you how to resolve of those. They are not specific to Kali Linux only and you might be leave them as it is, but I found that if I see an error my OCD kicks in and I have to make it go away…
- Useful utilities and Software’s
A collection of utilities and software’s I found useful. These are day to day software’s that are available in most other Linux distributions or at least I think they should be made available as part of a default installation.
- Enhancements and accessibility
Kali Linux is made to boot up fast and low of resources. But if you have some more CPU and GPU power to spare, you might want to try to make it look more colorful.
Kali Specific:
1. Fix Device not managed error – wired network
If you want NetworkManager to handle interfaces that are enabled in /etc/network/interfaces: Set managed=true in /etc/NetworkManager/NetworkManager.conf. So this file looks like:
[main]
plugins=ifupdown,keyfile

[ifupdown]
managed=true
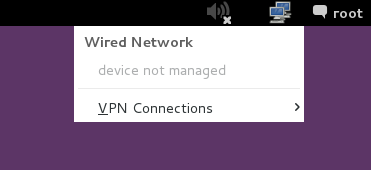
Read the full article on fixing Wired Network interface “Device not managed” error in Debian or Kali Linux.
2. Fix default repository
The simplest way is to edit the /etc/apt/sources.list remove or comment every-line with # at the front and add the following lines..
leafpad /etc/apt/sources.list
Comment or remove existing config with the following lines:
Kali Linux 2.0 – Kali Sana users – Use the following Repo list:
# Regular repositories
deb http://http.kali.org/kali sana main non-free contrib
deb http://security.kali.org/kali-security sana/updates main contrib non-free
# Source repositories
deb-src http://http.kali.org/kali sana main non-free contrib
deb-src http://security.kali.org/kali-security sana/updates main contrib non-free
Kali Linux 1.x users – you can keep using the repo below:
## Regular repositories
deb http://http.kali.org/kali kali main non-free contrib
deb http://security.kali.org/kali-security kali/updates main contrib non-free
## Source repositories
deb-src http://http.kali.org/kali kali main non-free contrib
deb-src http://security.kali.org/kali-security kali/updates main contrib non-free
Save and close the file.
Kali Linux 1.x details and explanations can be found in adding official Kali Linux 1.x Repositories page.
Kali Linux 2.x – Kali Sana details and explanations can be found in adding official Kali Linux 2.0 – Kali Sana Repositories page.
3. Update, Upgrade, Dist-Upgrade
Clean, update, upgrade and dist-upgrade your Kali installation.
apt-get clean && apt-get update && apt-get upgrade -y && apt-get dist-upgrade -y
4. Fix PulseAudio warning
My Kali throws me this warning:
[warn] PulseAudio configured for per-user sessions ... (warning).Debian variants also throws similar warning during boot.To fix this do the following:
leafpad /etc/default/pulseaudio
Find this line:
PULSEAUDIO_SYSTEM_START=0
Replace 0 with 1
PULSEAUDIO_SYSTEM_START=1
Where, 0 = don’t start in system mode, 1 = start in system mode
reboot
I am having second thoughts about this step, refer to the whole article below to know WHY! If you have a suggestion about it, leave that on that article so that I can sort through them and pick the best one.
Details and explanations can be found in Fixing PulseAudio configured for per-user sessions … (warning) in Kali Linux page.
5. Enable sound on Boot
Follow the steps below to fix sound mute in Kali Linux on boot
apt-get install alsa-utils -y
In GNOME Desktop (The default Kali Desktop)
- Right Click on the small volume ICON and select Sound Preferences
- Alternatively, you can also go to Applications > System Tools > Preferences > System Settings > Sound to bring up the same options.
- Use the Output volume slider to ON, shown similar the screenshot above. That’s it you’re done. Close Sound window.
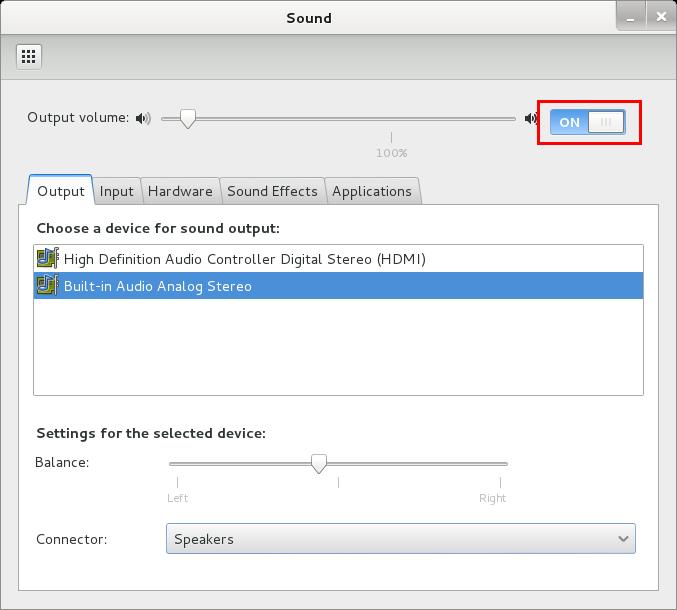
Details and explanations can be found in fixing sound mute in Kali Linux on boot page.
221 comments
hi…..when i am installing kali linux 1.0.7 i cannot detect my windows 7 partition done previously when installing the windows 7, it shows me that entire disk is free of space,what to do for this step to detect my partitions….so help me guys what to do at this step plzzzzzzzz……..also if i do the partition at that stage my data will be fully erased with windows OS,after installing i cannot install windows OS i m stucked at partition stage help me guyzzz what to do……plzzzz…..plzzzzz….plzzz……i m installing kali without virtual machine…i m installing directly by DVD-ROM
Hello this is best Thank you!!!!!!!! but can i ask you a question
My computer is acer aspire v3-571g
CPU= Intel® Core™ i7-3632QM CPU @ 2.20GHz
GPU= Nvidia Geforce gt 630M 1GB
RAM= 8GB
and i cant control the brightness of the screen and i’ve tried to install it and it worked but cant get rid of the black screen!!!
so Please Please Help!!!!!!!
i meant i’ve tried installing the nvidia driver and it workded but…..
Someone posted a similar issue in Kali forum, search for screen brightness problem on Kali Linux. I can’t remember on top of my head but I think it was something to do with Bluetooth being turned on. As for NVIDIA driver, follow the new post here
inposible to install nvidia drivers,always blackscreen,fix with rm /etc/X11/xorg.conf after dont have nvidia
Read the comments and the new guide here
Thanks iam really sucking with this may this post can help me out thanks a lot
broo plz help me i newly install kali linux 1.0.8 in my laptop amd64bit i update and upgrade it when i type in terminal apt-get install flashplugin-nonfree it say enable to locate package only not lash player evething that contain apt-get install is not installing what i do plz help me
as soon as possible
saad,
You are missing repositories. That’s step 2 on this guide. Apart from that did you follow this post: How to Install Flash in Kali Linux? There’s quite a few ways to install Flash.
Good Luck,
-BMO
very nice! thank you!
Dude! nice list!
thanx man that was very helpfull and so perfect
root@r3fr3sh:/usr/sbin# /usr/sbin/add-apt-repository ppa:noobslab/themes
/usr/sbin/add-apt-repository: line 1: f: command not found
/usr/sbin/add-apt-repository: line 4: syntax error near unexpected token `then’
/usr/sbin/add-apt-repository: line 4: `then’
facing the same problem too
Just amazing! thanx so much for your input, I would have never known all the above was needed on a fresh install of kali L My kali is now all it can be NICE!!
Awesome post! I’m kind of stuck at a place. Help me out! How do I save the file in the add-apt-repository part?
press ‘esc’ to switch from insert mode to command mode and type…
:w
to save the file
or
:wq
to save and quit.
update-alternatives –install /usr/bin/javac javac /opt/jdk1.7.0_45/bin/javac 1
every time i put this command in I get
update-alternatives: error: alternative path /opt/jre1.7.0_67/bin/javac doesn’t exist
Can someone please help
Just create the folder manually and it should work.
this is how I did it.
sudo mkdir /opt/jdk1.7.0_45/
sudo mkdir /opt/jdk1.7.0_45/bin
sudo mkdir /opt/jdk1.7.0_45/bin/javac
sudo update-alternatives –install /usr/bin/javac javac /opt/jdk1.7.0_45/bin/javac 1
this is a bash script i wrote to do all the work for you all the way up to “more advanced stuffs”.
might need tweaking to work for you.
#! /bin/bash echo starting Kali upgrades... #! Fix device not managed error echo Fixing device not managed error... echo '[main]' > test.txt echo 'plugins=ifupdown,keyfile' >> test.txt echo '[ifupdown]' >> test.txt echo 'managed=true' >> test.txt mv /etc/NetworkManager/NetworkManager.conf /etc/NetworkManager/NetworkManager.conf.old cp test.txt /etc/NetworkManager/NetworkManager.conf rm test.txt echo done. #! Fix default repository echo Fixing default repository... echo '## Regular repositories' > test.txt echo 'deb http://http.kali.org/kali kali main non-free contrib' >> test.txt echo 'deb http://security.kali.org/kali-security kali/updates main contrib non-free' >> test.txt echo '## Source repositories' >> test.txt echo 'deb-src http://http.kali.org/kali kali main non-free contrib' >> test.txt echo 'deb-src http://security.kali.org/kali-security kali/updates main contrib non-free' >> test.txt mv /etc/apt/sources.list /etc/apt/sources.list.old cp test.txt /etc/apt/sources.list rm test.txt echo done. #! Update, Upgrade, Dist-Upgrade echo updating system... apt-get clean && apt-get update && apt-get upgrade -y && apt-get dist-upgrade -y echo done. #! Installs applications echo installing applications... echo installing alsa utils apt-get install alsa-utils -y echo installing flash apt-get install flashplugin-nonfree -y update-flashplugin-nonfree --install -y echo installing file roller apt-get install unrar unace rar unrar p7zip zip unzip p7zip-full p7zip-rar file-roller -y echo installing tor apt-get install tor -y echo installing filezilla apt-get install filezilla filezilla-common -y echo installing HTOP and Nethogs apt-get install htop nethogs -y echo installing remina and recordmydesktop apt-get install gtk-recordmydesktop recordmydesktop remmina -y echo installing gdebi package manager apt-get install gdebi -y echo installing uget apt-get install uget -y echo done. #! enables auto login at boot echo Enabling auto login at boot... echo '# GDM configuration storage - modified for Kali' > test.txt echo '#' >> test.txt echo '# See /usr/share/gdm/gdm.schemas for a list of available options.' >> test.txt echo '' >> test.txt echo '[daemon]' >> test.txt echo '# Enabling automatic login' >> test.txt echo ' AutomaticLoginEnable = true' >> test.txt echo ' AutomaticLogin = root' >> test.txt echo '' >> test.txt echo '# Enabling timed login' >> test.txt echo '# TimedLoginEnable = true' >> test.txt echo '# TimedLogin = user1' >> test.txt echo '# TimedLoginDelay = 10' >> test.txt echo '' >> test.txt echo '# Reserving more VTs for test consoles (default is 7)' >> test.txt echo '# FirstVT = 9' >> test.txt echo '' >> test.txt echo '[security]' >> test.txt echo 'AllowRoot = true' >> test.txt echo '' >> test.txt echo '[xdmcp]' >> test.txt echo '' >> test.txt echo '[greeter]' >> test.txt echo '# Only include selected logins in the greeter' >> test.txt echo '# IncludeAll = false' >> test.txt echo '# Include = user1,user2' >> test.txt echo '' >> test.txt echo '[chooser]' >> test.txt echo '' >> test.txt echo '[debug]' >> test.txt echo '# More verbose logs' >> test.txt echo '# Additionally lets the X server dump core if it crashes' >> test.txt echo '# Enable = true' >> test.txt mv /etc/gdm3/daemon.conf /etc/gdm3/daemon.conf.old cp test.txt /etc/gdm3/daemon.conf rm test.txt echo done... #! add debian repository echo adding debian repository apt-get install python-software-properties -y apt-get install apt-file -y apt-file update -y apt-file search add-apt-repository -y cd /usr/sbin #! Add debian repository echo Adding Debian repository... echo '#!/bin/bash' > test.txt echo 'if [ $# -eq 1 ]' >> test.txt echo 'NM=`uname -a && date`' >> test.txt echo 'NAME=`echo $NM | md5sum | cut -f1 -d" "`' >> test.txt echo 'then' >> test.txt echo 'ppa_name=`echo "$1" | cut -d":" -f2 -s`' >> test.txt echo 'if [ -z "$ppa_name" ]' >> test.txt echo 'then' >> test.txt echo 'echo "PPA name not found"' >> test.txt echo 'echo "Utility to add PPA repositories in your debian machine"' >> test.txt echo 'echo "$0 ppa:user/ppa-name"' >> test.txt echo 'else' >> test.txt echo 'echo "$ppa_name"' >> test.txt echo 'echo "deb http://ppa.launchpad.net/$ppa_name/ubuntu oneiric main " >> /etc/apt/sources.list' >> test.txt echo 'apt-get update >> /dev/null 2> /tmp/${NAME}_apt_add_key.txt' >> test.txt echo 'key=`cat /tmp/${NAME}_apt_add_key.txt | cut -d":" -f6 | cut -d" " -f3`' >> test.txt echo 'apt-key adv --keyserver keyserver.ubuntu.com --recv-keys $key' >> test.txt echo 'rm -rf /tmp/${NAME}_apt_add_key.txt' >> test.txt echo 'fi' >> test.txt echo 'else' >> test.txt echo 'echo "Utility to add PPA repositories in your debian machine"' >> test.txt echo 'echo "$0 ppa:user/ppa-name"' >> test.txt echo 'fi' >> test.txt cp test.txt /usr/sbin/add-apt-repository rm test.txt chmod o+x /usr/sbin/add-apt-repository chown root:root /usr/sbin/add-apt-repository echo done. #! downloads themes echo downloading Themes... /usr/sbin/add-apt-repository ppa:noobslab/themes /usr/sbin/add-apt-repository ppa:alecive/antigone echo done. #! downloads JDK echo downloading JDK wget -nc --retry-connrefused -O /root/java.tar.gz -c --tries=0 http://ftp.osuosl.org/pub/funtoo/distfiles/oracle-java/jdk-7u67-linux-i586.tar.gz echo download complete. #! installs JDK echo installing JDK tar -xzvf /root/java.tar.gz mv jdk1.7.0_67 /opt cd /opt/jdk1.7.0_67 echo done. echo script complete please restart echo type reboot and press enter to reboot now or just type exit to close read xit $xitThere is an error in the above script that I wrote.
I made a mistake and placed a -y after the flash update giving us
“update-flashplugin-nonfree –install -y”
without the quotes of course.
This entry should read
“update-flashplugin-nonfree –install”
or flash will not work.
Mahalo and my apologies for not catching my mistake sooner.
THANK YOU VERY MUCH YOUR A TRUE HACKER MY BOSS
Few more thing su can add are: VMware Player + A Script To relay TOR IPs + toilet/figlet + open fixtracking[dot]com from Iceweasel/Chrome & add disconnect /ABP. (y)
whether these improvements can be applied to live usb?
I’m unable to find my wireless network.. In network section there is only wired network .. please help me.. i need to connect to my wifi..
Use this link : http://linuxcommando.blogspot.in/2013/10/how-to-connect-to-wpawpa2-wifi-network.html
Try these commands in your Terminal…
Virtualbox?
Not virtually… Its Direct installation..
Hi again Prashanth Nani,
Few considerations, see my recent response to guardian-venom.
http://www.blackmoreops.com/2014/03/05/install-amd-ati-proprietary-fglrx-driver-kali-linux-1-0-6/#comment-1703
=====
Hi guardian-venom,
This worked on 1.0.6 and will continue to work on any of the newer versions of Kali where you have kernel headers available. I thought it was quite clear from the Kali Forum posts (i.e. Kali dev team removed old kernel headers). The instructions are solid to date and worked every time for the newer versions of Kali.
Also, if you’re using Kali 1.0.7… you won’t be able to upgrade to Kali 1.0.9 cause like I said, Kali dev team removed the packages in-between. I suggest starting with Kali 1.0.9 fresh install. Hope that clears our some confusions. Cheers,
-BMO
======
Saying that, I will go ahead and do a fresh installation on Kali in both ATI and NVIDIA based computers and see how it all goes. Cheers,
-BMO
I have been looking for a detailed guide like this ages ago. Hope you continue to provide newer updates as well. Keep Rocking BMO!
You are so genius person.well.
We except more from you .. thanks…….
i m facing this problem.
apt-get install unrar unace rar unrar p7zip zip unzip p7zip-full p7zip-rar file-roller -y
E: Could not open lock file /var/lib/dpkg/lock – open (13: Permission denied)
E: Unable to lock the administration directory (/var/lib/dpkg/), are you root?
And i tried to clean the dircetory but can’t solve this.
And one more thing i want to install VMWare tools in kali Linux .what will i do.i tried but
many times but could not find proper header file.i alreary installed it.but cant do that
Is your package installer open?
Hi chiragmoradiya,
1. Are you trying to update/install too many things in multiple terminals? You can only use 1 terminal to update/install at a time – this is done to keep package manager clean.
2. Are you logged in as
rootuser? Or do you havesudoprivileges?3. As for headers, I think you’ve installed an older Kali Linux version. Only Kali 1.0.8 or newer versions can update now. (Kali Dev team removed old packages).
Cheers,
-BMO
hey i cant type in terminal when it need password….help me…tell me exactly what to do because i am just a new user.
The password is hidden. No text or indicator will appear. Just type the password and hit enter like normal.
Dude… Totally awesome!!! Thanks so much for putting all this info in one place!