
20 things to do after installing Kali Linux 1.x
I’ve compiled a small list of things that I always perform after installing a fresh copy of Kali Linux in this post. Because I got multiple laptops and workstations, I’ve tried to generalize the following instructions to suit everyone’s(including mine??) requirements. This is my top list of 20 things to do after installing Kali Linux. Your requirement’s might be completely different. If you have a suggestion, let me know via comments section. You can comment without registering.. so that’s an easy way to give me feedback and opinion.
WARNING: Following guide was written and tested for Kali Linux 1.x. I am working best to write a guide on Kali Linux 2.0 – Kali Sana. Use this guide at your own risk for Kali Linux 2.0 – Kali Sana.

Table of Contents
Standard Packages:
Standard packages contains anything and everything I found useful. This list if divided into 3 parts:
- Kali Specific
Kali Linux is a special build from Debian. Kali Linux inherits a lot of the issues from Debian Linux. This section shows you how to resolve of those. They are not specific to Kali Linux only and you might be leave them as it is, but I found that if I see an error my OCD kicks in and I have to make it go away…
- Useful utilities and Software’s
A collection of utilities and software’s I found useful. These are day to day software’s that are available in most other Linux distributions or at least I think they should be made available as part of a default installation.
- Enhancements and accessibility
Kali Linux is made to boot up fast and low of resources. But if you have some more CPU and GPU power to spare, you might want to try to make it look more colorful.
Kali Specific:
1. Fix Device not managed error – wired network
If you want NetworkManager to handle interfaces that are enabled in /etc/network/interfaces: Set managed=true in /etc/NetworkManager/NetworkManager.conf. So this file looks like:
[main]
plugins=ifupdown,keyfile

[ifupdown]
managed=true
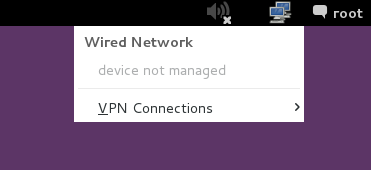
Read the full article on fixing Wired Network interface “Device not managed” error in Debian or Kali Linux.
2. Fix default repository
The simplest way is to edit the /etc/apt/sources.list remove or comment every-line with # at the front and add the following lines..
leafpad /etc/apt/sources.list
Comment or remove existing config with the following lines:
Kali Linux 2.0 – Kali Sana users – Use the following Repo list:
# Regular repositories
deb http://http.kali.org/kali sana main non-free contrib
deb http://security.kali.org/kali-security sana/updates main contrib non-free
# Source repositories
deb-src http://http.kali.org/kali sana main non-free contrib
deb-src http://security.kali.org/kali-security sana/updates main contrib non-free
Kali Linux 1.x users – you can keep using the repo below:
## Regular repositories
deb http://http.kali.org/kali kali main non-free contrib
deb http://security.kali.org/kali-security kali/updates main contrib non-free
## Source repositories
deb-src http://http.kali.org/kali kali main non-free contrib
deb-src http://security.kali.org/kali-security kali/updates main contrib non-free
Save and close the file.
Kali Linux 1.x details and explanations can be found in adding official Kali Linux 1.x Repositories page.
Kali Linux 2.x – Kali Sana details and explanations can be found in adding official Kali Linux 2.0 – Kali Sana Repositories page.
3. Update, Upgrade, Dist-Upgrade
Clean, update, upgrade and dist-upgrade your Kali installation.
apt-get clean && apt-get update && apt-get upgrade -y && apt-get dist-upgrade -y
4. Fix PulseAudio warning
My Kali throws me this warning:
[warn] PulseAudio configured for per-user sessions ... (warning).Debian variants also throws similar warning during boot.To fix this do the following:
leafpad /etc/default/pulseaudio
Find this line:
PULSEAUDIO_SYSTEM_START=0
Replace 0 with 1
PULSEAUDIO_SYSTEM_START=1
Where, 0 = don’t start in system mode, 1 = start in system mode
reboot
I am having second thoughts about this step, refer to the whole article below to know WHY! If you have a suggestion about it, leave that on that article so that I can sort through them and pick the best one.
Details and explanations can be found in Fixing PulseAudio configured for per-user sessions … (warning) in Kali Linux page.
5. Enable sound on Boot
Follow the steps below to fix sound mute in Kali Linux on boot
apt-get install alsa-utils -y
In GNOME Desktop (The default Kali Desktop)
- Right Click on the small volume ICON and select Sound Preferences
- Alternatively, you can also go to Applications > System Tools > Preferences > System Settings > Sound to bring up the same options.
- Use the Output volume slider to ON, shown similar the screenshot above. That’s it you’re done. Close Sound window.
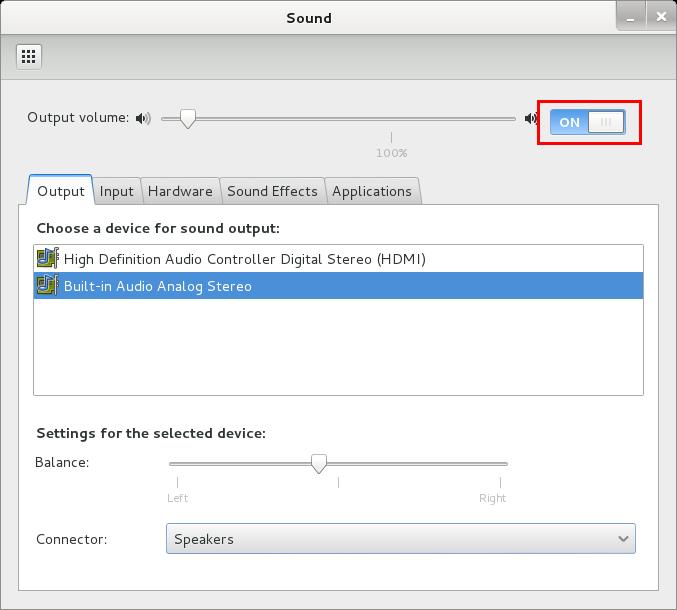
Details and explanations can be found in fixing sound mute in Kali Linux on boot page.
221 comments
Yap! keep the good working…nicely done!
Thanks Bossi. Glad that you found the post useful. Let me know if you have any suggestions and I can include them in the post.
fuck off…
you fuck off bitch what he did to you?stupid asshole
thank you OP for this post
I really have no idea where that random surge of internet rage came from lol.
sahit wel bladu
blackMORE Ops
March 11, 2014 at 6:47 pm
Thank you in advance, I used kali_2.0 and everything is going well. But in my system build-in audio analog stereo was not detected,
please, help me to fix it.
In this same system, I used kali .1.1,0 and all is doing well.
Nt Bd at all
boss you got something valuable skill man keep going
how about installing firefox after purging iceweasel ? is that good ?
n can u post complete guide on installing TOR with proxychains (for terminal ) ?
Is there much difference between Firefox and IceWeasel? I think it wont make much differnces in terms of usability or functionality, (similarly Chrome and Chromium). TOR with proxychains is definitely a great idea… I’ll add it ASAP. Thanks for the suggestions.
Iceweasel is a fork of Firefox. its build on the same code.
It had to do with a legal issue: Firefox is too closely associated with commercial code to satisfy Debian’s administrators–they hesitated to incorporate undesired changes to Firefox, Debian thus was forced by Mozilla to change the names of Firefox, Thunderbird, and Seamonkey. (See Wikipedia: “Mozilla Corporation software rebranded by the Debian project.” Debian is more slow and deliberate concerning changes to the distro.)
For one thing, changing the name to Iceweasel prohibits users from querying Debian developers concerning changes to Firefox. Upon running Iceweasel, “Firefox” and “mozilla” do turn up in error messages, etc., nonetheless.
Such an animal actually does exist: It appears to be similar to a small, white fox.
hi boss, I have a problem and maybe you can helpmi:
attempt to install cuda 5.5 in synaptic and installing never end and had to restart, restarting, I could not log, then try to install cuda as drivers (pressing CTRL + ALT + F1, log, stop kdm or gdm3 service installed. ..) and all was apparently well until at one point asked me to delete the grub and do not know how you do that you can help me?
from here it dobnload (who says RHEL 5.5)
https://developer.nvidia.com/cuda-downloads
observation:
after the alleged fellida installation, startup stop being gray with blue dragon and now is light blue
P.D: sorry if my language is not correct, so I wrote this with the google translator and some of my English comprencion
Hi Anibal,
You’re using a guide that was meant for old Kali (1.0.0 – 1.0.5). For Kali 1.0.6 starting late February, use the following two guides:
Install proprietary NVIDIA driver on Kali Linux
Install NVIDIA driver kernel Module CUDA and Pyrit on Kali Linux
These were released recently and you don’t need to modify grub.cfg file anymore. If you have any leftover changes, revert them back before applying these changes.
Hope it helps. Good luck.
ok teacher, thank you for your attention ¡excellent page!
Bollocks, too late, I did the old one, now I can’t get kali to boot, not even in safe mode, do I need to reinstall??
sory mi gpu is a NVIDIA GeForce 9500 GT
http://www.geforce.com/hardware/desktop-gpus/geforce-9500-gt
your saved my ass bro
thanks man
Glad my guide is helping people. :)
Take me a week to learn what I am going to install… In this topic I learn a lot and now I am having fun using Kali OS. Thank you for heping noob in kali.
Hi … It’s a nice post and really very useful can u guide me through the installation process of ”Transmission” bit torrent client on kali i searched for it but so far i found nothing
Hi sachin,
Kali Linux provides many BitTorrent clients. Use
and choose one.
Then you can install them using
apt-get install package-namecommand.i.e.
listen man 3 things:
1. You rock!! I am a long time Kali user and just found your site today, really great!
2. lazykali is an excellent script that I always use when installing Kali, bleeding edge repos, automatic flash etc., check it out!
3. In your section above regarding Tor, I believe the command to start the service is
service tor start
:) thanks again for the great work, i used well over half of your suggestions and many of the remaining I had already done!
Hi sizzbott,
Thanks for your comment, made my day :)
LazyKali is great but I wanted to show hands-down how to install things … Once someone get’s the hang of it, then yeah… go for LazyKali script. 1 click and voila, all done.
Fixed the command with Tor! Interesting that no one else picked it up.
Cheers,
-BMO
Supppeerrr awesome page….. thanks a lot for this…. i found your page 4 days ago and now am really having fun with Kali..
Thanks once again, Keep up th good work , you are really helping us :-)
i love you, MARRY ME! This is the most useful guide i’ve read in my life. THANKS!
thank you blackMORE …. it’s helpful for newbie like me :D
Hi… I have a Intel® 4500MHD Graphics in my Dell E5400 Laptop and i want to figure out if i should be following the instructions to unlock GPU Processing with this GPU. It supports something call OpenCL, though… It is an older laptop and i’m not sure if i should follow those instructions for NVIDIA because even those this is an Intel card it doesn’t clearly state that it is NVIDIA or supports CUDA. PLEASE HELP!
Hi Jacob,
No, CUDA is for NVIDIA cards, FGLRX for AMD.
Stick with OpenCL but to be honest I haven’t seen anyone successfully managed to use GPU processing on Intel cards. Intel didn’t released Open Source code for their cards as far I am aware of.
You can find out more about your card by running
lspci -vv | grep VGAGood luck,
-BMO
Thanks for your response… I just found out that this Graphics Card has OpenGL v2.1, which if did my research correctly, is newer and a littler better than OpenCL in some small ways.
My big question is will it help improve speed at all (or is it even compatible to use) with Pyrit?
Yep, Got to give you your props man, this is the Shit!!!!!!!
Thanks for the quick reply man. Your articles ROCK!
Thanks a lot, freakback again
Fleischkäääääääääääääääääääääääs
Nice man how can i follow u?
Thanks man! That’s a good work! :D
how do i save the file after pasting it on the terminal
Hi Radio,
You should read this other guide to get more familiar with vi editor.
vi Cheat Sheet – Basic
Good luck,
-BMO
For newer people to linux and more specifically I would suggest using
nano over vi
ctrl c
:x
the control c gets you out of editing mode and :X saves the chnges and exits out
Good information and thank you. Still on Step3 ‘Update, Upgrade, Dist-Upgrade’. You should probably include a warning that it takes forever. Also you might want to include instructions on how to enable the NumLock key so you don’t have to remember to press it every time you log into your user account.
I can’t get the Java installation to work.
Pay attention to the Java version code. You probably didn’t fix the code before running it.
I entered:
tar -xzvf /root/jdk-7u55-linux-x64.tar.gz
mv jdk1.7.0_45 /opt
cd /opt/jdk1.7.0_45
…because the file from your link that I downloaded to the root folder is named jdk-7u55-linux-x64.tar.gz
The response I get is “bash: cd: /opt/jdk1.7.0_45: No such file or directory”
I also tried:
tar -xzvf /root/jdk-7u55-linux-x64.tar.gz
mv jdk1.7.0_55 /opt
cd /opt/jdk1.7.0_55
…but the response I get is “mv: cannot move `jdk1.7.0_55′ to `/opt/jdk1.7.0_55′: Permission denied”
Permission Denied? Is that possibly because I’m not in the root account? I logged into root and it seeemed to work but when I try to verify, the response I receive is “We are unable to verify if Java is currently installed and enabled in your browser.”
On a side note; How do I enter root from the terminal when logged into my non root account?
I don’t know about your 1st question, but you can start a root terminal session by typing “sudo -i” (no quotes) into the terminal. You will probably have to provide the root password
Sorry for hitting you with so much all at once :P
Hi Neobyte,
No worries. You probably tried too many things in one go and lost concentration .. Take a break!!! :) Personally, I usually go and play MMORPG games to divert my mind.
So many question ..I’ll try to answer one at a time (I think you already figured it out)
First issue: “No such file or directory”
The file name here is
jdk-7u55-linux-x64.tar.gz. So you need to change each command like the following:Command in Guide:
Becomes:
(You can copy paste whole commands in a leafpad and use replace 45 with 55).
Why the command is incorrect? It is just not possible for me to maintain 100+ posts along with changing version from multiple vendors. I’ll leave that to readers to figure out.
Second issue: “Permission denied”
I didn’t know you’re using Kali as non-root. All the guides here are written based on Kali default settings which is usually ROOT account user. If you insist using non-root, just add
sudoin-front of each line. So your command will be like this:3rd issue: “How do I enter root from the terminal when logged into my non root account?”
Just use the following command if you’re in
sudoerslistIf you’re not in
sudoerslist, then su yourself:su -and type in the
rootpassword.Hope that helps in someway. But I would suggest to use Kali as root as non-root user would just add more complexity each step. Cheers,
-BMO
I’ve been fooling with Linux and FreeBSD for nearly 20 years–maybe longer: You offer, in tandem, what we note to prove virtually non-existent in this biz–powerful twin talents–erudite tech expertise married to a massive ability to communicate clearly, concisely, and effectively! That proves so welcome and awesome these days–thanks!
(In the future, people noting this site will desire to assist you–in any manner possible! blackmoreops.com: A vibrant oasis–not the usual mere mirage–in today’s tech morass of chiding condescension along with often needless additional complexity, befuddlement, frustration, anxiety, and uncertainty!)
Hi Geoff,
I like the writing style at Null-Byte but I could never write as good as them! To cover my lack of writing skills, I focus on issues/ideas I’ve actually experienced/tried and solved! (afaik). Thanks again for visiting my site and appreciate your positive comment(s). Cheers,
-BMO
I also have additional questions about TOR.
Is TOR in Linux not an actual browser like with Windows for instance or is it integrated with Iceweasel? Seems like the latter. If that’s the case, do you have to enter the “service tor start” and “proxychains iceweasel” commands every time you log in before using Iceweasel in order to browse the web anonymously?
Also I use Firefox and Chromium in Ubuntu. Will these same commands work with those browsers as well?
Yes you’re correct, you have to enable tor and use proxychains command everytime.
I’ve written it that way because prefer control on what I am doing in each step. By using these two commands:
would somewhat show users the background on what they are doing. Otherwise, you’re just using TOR without understanding what it actually does. Using proxychains and tor, you can do so much more, for example:
will use NMAP, but from behind TOR network. Saying that, yes, Firefox and Chromium would work as well with proxychains.
You can see the logs here:
If you want to use TOR as the one and only way, you should be using
Vidaliaas your browser. See the post on installing tor here. That was written by another user in my site, you can choose which way you prefer.But like I said, you then becomes a regular end users who presses a button to accomplish something without understand the mechanism behind it.
Hope that clears it up.