In this guide, I will show how to install NVIDIA driver kernel Module CUDA, replace stock Pyrit, and install Cpyrit. The main problem with new Kali Linux 1.0.7 running Kernel 3.14 was that it broke Pyrit and cudaHashcat. When you try to run pyrit command, you get this error ERROR: could not insert ‘nvidia_uvm’: Invalid argument. I will show how to install all the necessary drivers, modules and also fix this error. At the end of this guide, you will be able to use GPU acceleration for enabled applications such as cudaHashcat, Pyrit, crunch etc. 
This guide replaces the old guides
- How to Install NVIDIA Kernel Module CUDA and Pyrit in Kali Linux
- Install proprietary NVIDIA driver on Kali Linux – NVIDIA Accelerated Linux Graphics Driver
This is part 2 of installing NVIDIA driver kernel Module CUDA and Pyrit on Kali Linux Driver series which was divided into two parts:
- Kali Linux 1.0.7 kernel 3.14 – Install proprietary NVIDIA driver – NVIDIA Accelerated Linux Graphics Driver
- Kali Linux 1.0.7 kernel 3.14 install NVIDIA driver kernel Module CUDA and Pyrit – CUDA, Pyrit and Cpyrit-cuda
You use the first guide to install NVIDIA Driver on Kali Linux. I would assume you followed the first guide and completed all steps there and would like to enable GPU acceleration, (cudahashcat, GPU pass through etc.) on your Kali Linux.
CUDA Toolkit
The NVIDIA® CUDA® Toolkit provides a comprehensive development environment for C and C++ developers building GPU-accelerated applications. The CUDA Toolkit includes a compiler for NVIDIA GPUs, math libraries, and tools for debugging and optimizing the performance of your applications. You’ll also find programming guides, user manuals, API reference, and other documentation to help you get started quickly accelerating your application with GPUs. You can read a lot more here in NVIDIA Developers official webpage:
Prerequisites
Following are the prerequisite before you start following this guide:
NOTE: This guide does not apply to VMWare, VirtualBox users. GPU Acceleration doesn’t work on Virtual environment.
Prerequisite 1: add Official Kali Linux repository.
I’ve added the correct Kali Official repositories and issued the following commands to update, upgrade and dist-upgrade my Kali Linux.
apt-get update && apt-get upgrade -y && apt-get dist-upgrade -y
Prerequisite 2: Install proprietary NVIDIA driver on Kali Linux
I’ve installed the correct official proprietary NVIDIA driver on Kali Linux – NVIDIA Accelerated Linux Graphics Driver using the previous guide:
If you’ve completed both, move to next instruction.
Step 1: Install NVIDIA CUDA toolkit and openCL
At first we need to install NVIDIA CUDA toolkit and NVIDIA openCL
aptitude install nvidia-cuda-toolkit nvidia-opencl-icd
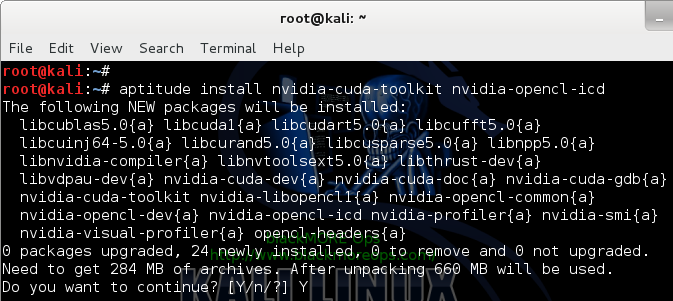
This will install CUDA packages in your Kali Linux. The total package is pretty large including dependencies, (282MB something), you be patient and let it finish.
Step 2: Download Pyrit and Cpyrit
Download Pyrit and Cpyrit from the official website:
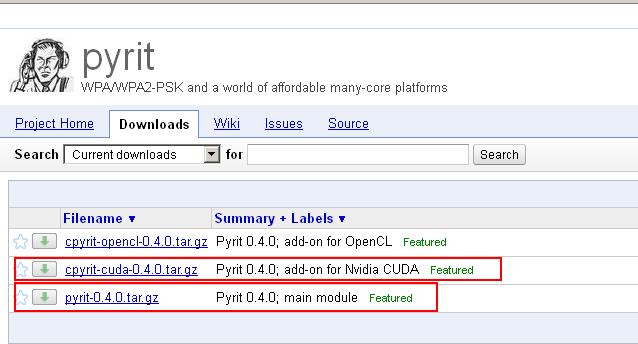
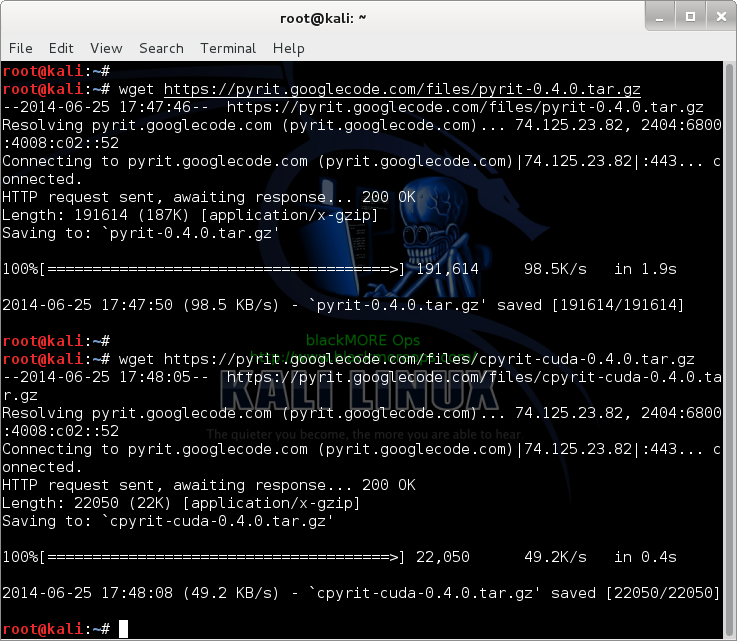
Save them in your /root folder. Alternatively you can just run the wget commands I’ve used below:
wget https://pyrit.googlecode.com/files/pyrit-0.4.0.tar.gz
wget https://pyrit.googlecode.com/files/cpyrit-cuda-0.4.0.tar.gz
Step 3: Install Pyrit
Follow the instructions below to install Pyrit and it’s prerequisites.
Step 3.a: Install Pyrit prerequisites
apt-get install python2.7-dev python2.7-libpcap libpcap-dev

Step 3.b: Remove existing installation of Pyrit
Remove stock Pyrit using the following command:
apt-get remove pyrit
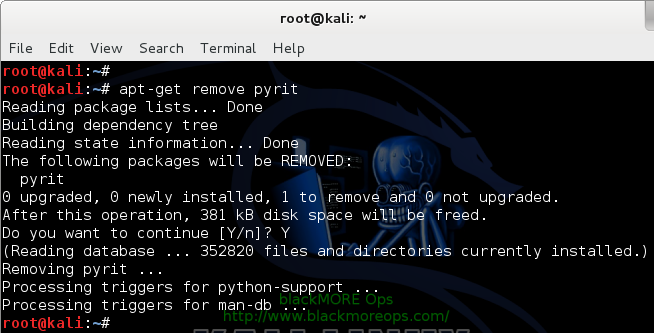
We used to get a message stating that it will also remove kali-linux-full package. Seems on Kali Linux 1.0.7 it’s fixed.
If you are not using a clean install of Kali (not recommended), you may need to issue the following command:
rm -r /usr/local/lib/python2.7/dist-packages/cpyrit/
Step 3.c: Install new Pyrit
Copy paste the following commands to extract downloaded Pyrit in your Kali Linux /root directory
tar -xzf pyrit-0.4.0.tar.gz
cd pyrit-0.4.0
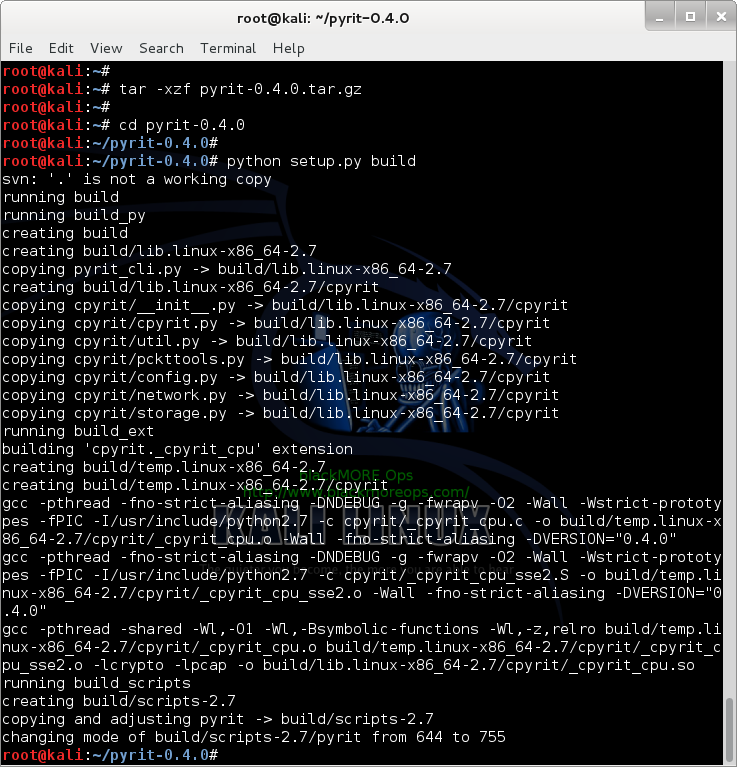
Now build the package
python setup.py build
Once build is complete, you can install Pyrit.
python setup.py install

Up to this point, you shouldn’t receive any errors.
Step 4: Install CPyrit-cuda
Copy paste the following commands to extract downloaded CPyrit-cuda in your Kali Linux /root directory
tar -xzf cpyrit-cuda-0.4.0.tar.gz
cd cpyrit-cuda-0.4.0
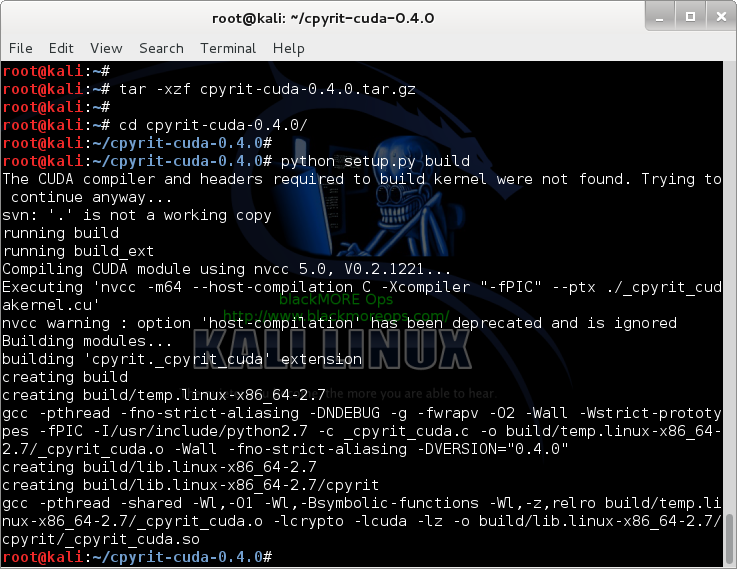
Now build the package
python setup.py build
Once build is complete, you can install CPyrit-cuda.
python setup.py install
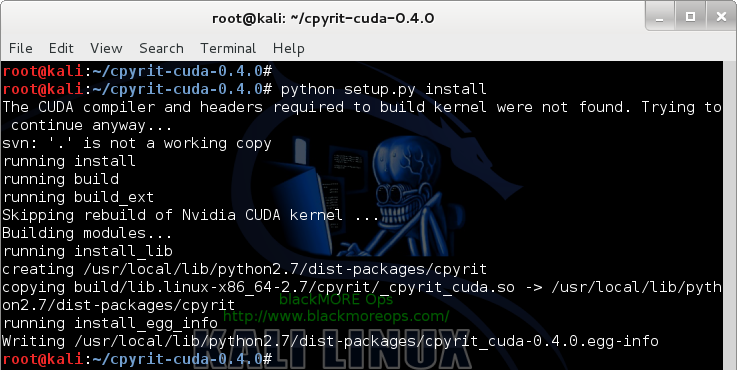
Again, you shouldn’t receive any errors, if there’s error, go back and review each steps.
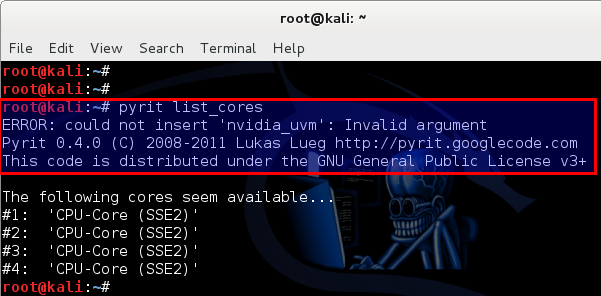
Step 5: Fixing ERROR: could not insert ‘nvidia_uvm’: Invalid argument
Now that we’ve installed NVIDIA driver kernel Module CUDA and Pyrit on Kali Linux, we should be able to test it. The best way to test is by issuing the following command:
pyrit list_cores
This gave me an error ERROR: could not insert ‘nvidia_uvm’: Invalid argument
root@kali:~# pyrit list_cores
ERROR: could not insert ‘nvidia_uvm’: Invalid argument
Pyrit 0.4.0 (C) 2008-2011 Lukas Lueg https://pyrit.googlecode.com
This code is distributed under the GNU General Public License v3+
The following cores seem available…
#1: ‘CPU-Core (SSE2)’
#2: ‘CPU-Core (SSE2)’
#3: ‘CPU-Core (SSE2)’
#4: ‘CPU-Core (SSE2)’
Thankfully, reader Shinri provided us with a fix. A BIG thanks to Shinri who spent time and effort to find the fix and was kind enough to post it back on my website.
Thanks Shinri.
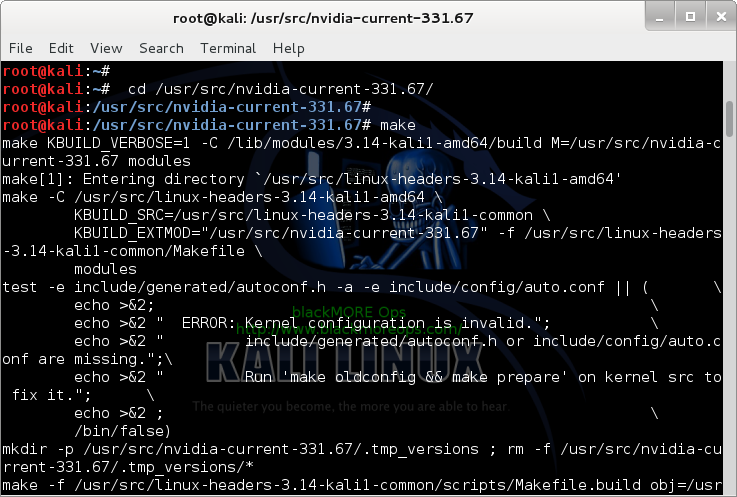
Step 5.a Recompile NVIDIA Driver
First of all you need to recompile NVIDIA driver. Just follow the steps below:
cd /usr/src/nvidia-current-331.67
make
What you’re doing here is going to source directory for NVIDIA current driver and recompiling it. By recompiling, you ensure it’s aligned for your hardware.
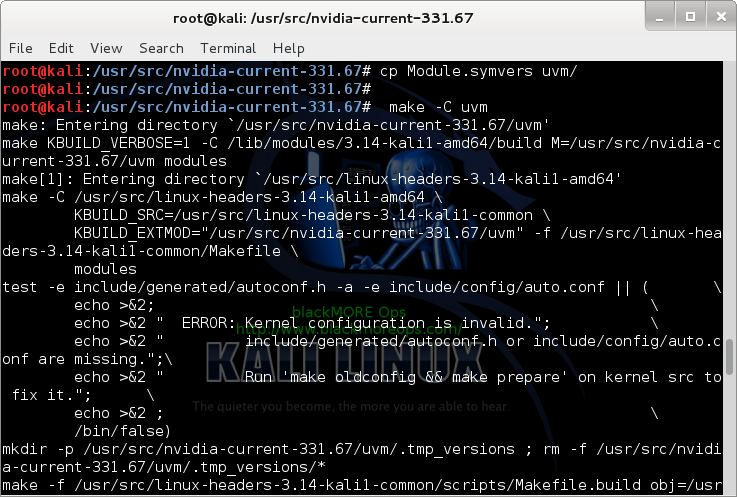
Step 5.b: Copy Module.symvers to UVM and recompile UVM
Now copy the compiled Module.symvers file to UVM folder and recompile UVM.
cp Module.symvers uvm/
make -C uvm
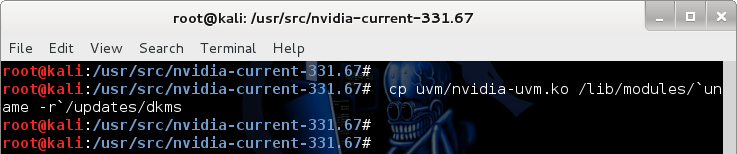
Step 5.c: Copy nvidia-uvm.ko to correct DKMS folder
We’re now very close. Just copy the compiled nvidia-uvm.ko to correct DKMS folder.Use the following command:
cp uvm/nvidia-uvm.ko /lib/modules/`uname -r`/updates/dkms
Those who are interested can read through this really long Debian bug report and envy the hard work done to find this solution.
Debian Bug report logs – #746643
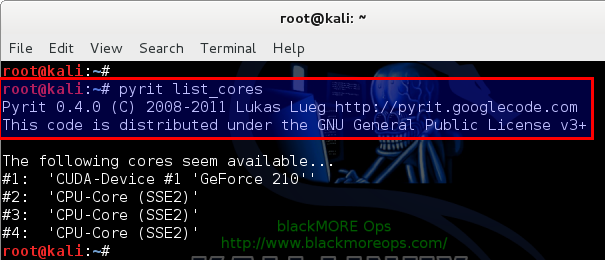
Step 6 – Test Pyrit – It works!
Once you’ve followed Shinri’s solution, recompiled NVIDIA driver, UVM and copied it to correct DKMS folder, pyrit will just work.
root@kali:~# pyrit list_cores
Pyrit 0.4.0 (C) 2008-2011 Lukas Lueg https://pyrit.googlecode.com
This code is distributed under the GNU General Public License v3+

The following cores seem available...
#1:  'CUDA-Device #1 'GeForce 210''
#2:  'CPU-Core (SSE2)'
#3:  'CPU-Core (SSE2)'
#4:  'CPU-Core (SSE2)'
Step 7 – Install oclHashcat (cudaHashcat)
The reason you’ve done all the hard work so that you can use cudaHashcat. I found that Kali 1.0.7 Kernel 3.14 doesn’t install that by default (maybe that was the case in every version). Doesn’t matter, we can just install it quickly.
Use the following command to install OCLhashcat (which contains cudaHashcat too)
apt-get install oclhashcat oclhashcat-plus

Step 8 – Missing cudahashcat in Kali 1.0.9 problem and fix
staticn0de provided a .deb file that you can install manually which installs cudahashcat for you. Link to Original Post below:
I’ve only copy-pasted his instructions below, all credit goes to staticn0de, thank you.
root@kali:~# dpkg -i cudaHashcat-1.30.deb
Selecting previously unselected package cudahashcat-1.30.
(Reading database ... 349321 files and directories currently installed.)
Unpacking cudahashcat-1.30 (from cudaHashcat-1.30.deb) ...
Setting up cudahashcat-1.30 (1.30) ...
root@kali:~# optirun cudahashcat64 -t 32 -a 7 example0.hash ?a?a?a?a example.dict
cudaHashcat v1.30 starting...
I have taken the archive from the hashcat site and modified it under section 6 of their EULA. The deb installs the program is /usr/share/cudahashcat and places scripts in /usr/bin which calls hashcat like any other command.
I’ll upload it tonight for anyone that wants to use it. Provided as is with no expectation it will work and it may cause damages including death and your wife leaving you (tic) but you get the idea.
Weighs in at 172mb
Download link:
Here’s the new download link:
https://mega.co.nz/#!kFMC2RQC!D1ccQYAwsWyGKD0CaV4W7n5Ghtc-YKFFxs7Qj1pgcw0
md5sum = b753c393264b3c40e51f057a96f3f6e9
sha1sum = f4abc533f4ced0f7e9a82255ceecf0333c212fa2
The file is 475MB
staticn0de
Hey guys,
I had no idea blackmoreops had used my deb! must say, I’m pretty chuffed! I’ve always been a fan of his guides.
I’ve made a new deb based on the 1.31 cudahashcat. You can find it below in my thread on the kali forums. The guide was written for users with optimus laptops. Those of you who don’t have optimus, omit the ‘optirun’ prefix of the command to test it.
Thanks again staticn0de.
https://www.mirrorcreator.com/files/WURGDJKL/cudaHashcat-1.30.deb_links
SHA1SUM
f2c0d96c75d1c186b48e11c5b399f3e2ccc5e459
when installed, its called with ‘cudahashcat64‘ for 64bit or ‘cudahashcat32‘ for 32 bit.
This was the most annoying download link … the amount of spams and popups and redirection was appalling.
Note that this is custom package, built by someone else than Kali Dev team and you should use it at your own risk.
Then again, with recent openSSL and Bash blunder, yeah.. use EVERYTHING in Linux at your own risk.
Once all done, run a cudahashcat benchmark
Bug report for missing cudahashcat in Kali 1.0.9
In the meantime, I’ve taken the liberty of reporting this missing cudahashcat as a Bug report.
https://bugs.kali.org/view.php?id=1756
Hopefully, it will be fixed in next release (i.e. Kali v1.0.10).
Conclusion
Pyrit allows to create massive databases, pre-computing part of the IEEE 802.11 WPA/WPA2-PSK authentication phase in a space-time-tradeoff. Exploiting the computational power of Many-Core- and other platforms through ATI-Stream, Nvidia CUDA and OpenCL, it is currently by far the most powerful attack against one of the world’s most used security-protocols.
If you’re reading this post and this helped, PLEASE put a comment “Thanks Shinri” in the comment section. That’s the least we can do.I guess a big thanks goes to staticn0de as well, feel free to post “Thanks staticn0de” if everything works for you.
Comment’s doesn’t require any signin/registration … so help yourself.
Thanks for reading. If this guide helped you to install NVIDIA driver kernel Module CUDA and Pyrit on Kali Linux 1.0.7 kernel 3.14 – CUDA, Pyrit and Cpyrit-cuda, please share this article and follow me in Facebook/Twitter.
Discover more from blackMORE Ops
Subscribe to get the latest posts sent to your email.
99 comments
Thanks Shinri…EXCELENT!!! :D
Thanks Shinri.
/RaLinux
I keep getting “bash: cudahashcat: command not found” at the end. I installed it, but don’t see it installed in the usr/share folder
I see the same thing. Seems like people who have updated to 1.0.9 are having this problem. Been searching for a workaround with no luck.
Hi Borigan,
Did you try it in a fresh 1.0.9 installation? Kali Dev team removed all old packages and that has been a problem for many users. Cheers,
-BMO
ERROR: could not insert ‘nvidia_current’: No such device
Pyrit 0.4.0 (C) 2008-2011 Lukas Lueg https://pyrit.googlecode.com
This code is distributed under the GNU General Public License v3+
The following cores seem available…
#1: ‘CPU-Core (SSE2)’
#2: ‘CPU-Core (SSE2)’
#3: ‘CPU-Core (SSE2)’
#4: ‘CPU-Core (SSE2)’
#5: ‘CPU-Core (SSE2)’
#6: ‘CPU-Core (SSE2)’
#7: ‘CPU-Core (SSE2)’
#8: ‘CPU-Core (SSE2)’
what can i do ???
Did you complete ALL of Step 5?
Oh yeah, and Thanks Shinri!
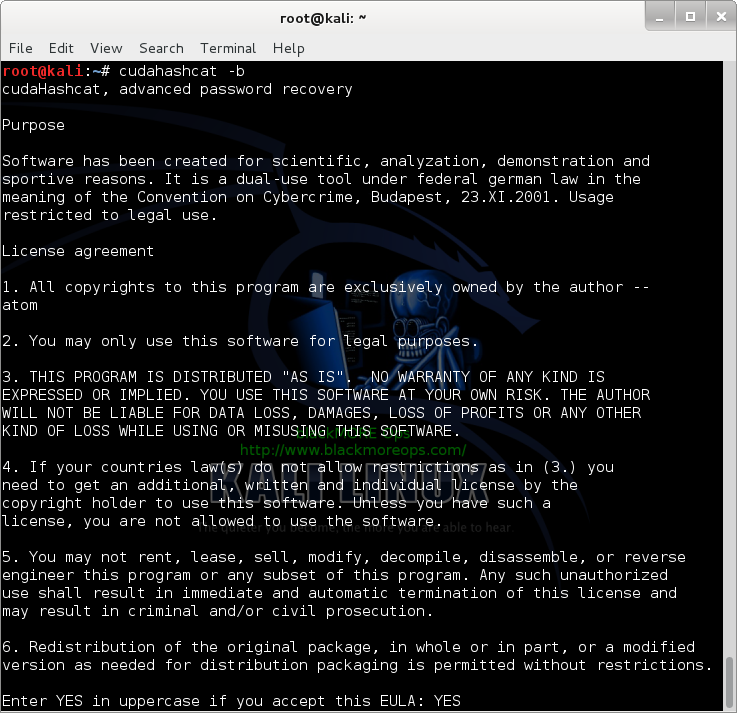
root@kali:~# cudahashcat -b
bash: cudahashcat: Kommando nicht gefunden.
cudahashcat is not working…
oclhashcat -b
See update above.
Step 8 – Missing cudahashcat in Kali 1.0.9 problem and fix
and
Bug report for missing cudahashcat in Kali 1.0.9
Cheers,
-BMO
Hi,
1st of all Thanks for great work to help low skilled ppl like me ;-)
Followed your guide but having 2 probs.
1) pyrit list_cores replies with no such file directory
2a) cudahashcat -b replies with no such command
2b) oclcudahastcat -b works but after writing YES below EULA it replies no AMD/SDS compatible platform. well I ve a nvida card and followed the nvidia guide very close.
can some help me out ?
problem 1) solved
problem 2) still reply with “ERROR: No AMD/SDS compatible platform found” curios ..
Hi sven,
What’s your output for
lspci | grep VGA*? Cheers,-BMO
Go here… https://hashcat.net/oclhashcat/ and take… oclHashcat for NVidia. This file in reality is cudaHashcat ( #:a lot of faulty names here!!! ).. Download and extract the file.. Go to the extracted folder and locate either… cudaHashcat64.bin or… cudaHashcat32.bin, depending on the OS you ‘re running.. Open a command prompt and drag and drop the file there.. BOOM!!
For me next command runs just fine.. making the bench..
‘/root/cudaHashcat-1.30/cudaHashcat64.bin’ -b
I ve downloaded all packages in /root.. Yours directory may vary.. I hope that helps.. :)
Team, here is the error that I am having after the complete fix from Shinri. Let me know what I am missing.
Thanks in advance,
Traceback (most recent call last):
File “/usr/local/bin/pyrit”, line 6, in
pyrit_cli.Pyrit_CLI().initFromArgv()
File “/usr/local/lib/python2.7/dist-packages/pyrit_cli.py”, line 117, in initFromArgv
func(self, **options)
File “/usr/local/lib/python2.7/dist-packages/pyrit_cli.py”, line 293, in list_cores
with cpyrit.cpyrit.CPyrit() as cp:
File “/usr/local/lib/python2.7/dist-packages/cpyrit/cpyrit.py”, line 440, in __init__
self.cores.append(CUDACore(queue=self, dev_idx=dev_idx))
File “/usr/local/lib/python2.7/dist-packages/cpyrit/cpyrit.py”, line 245, in __init__
_cpyrit_cuda.CUDADevice.__init__(self, dev_idx)
SystemError: CUDA_ERROR_NO_BINARY_FOR_GPU
..
Before I followed this guide I was getting this
Pyrit 0.4.0 (C) 2008-2011 Lukas Lueg https://pyrit.googlecode.com
This code is distributed under the GNU General Public License v3+
The following cores seem available…
#1: ‘CPU-Core(SSE2)’
#2: ‘CPU-Core (SSE2)’
Now I get this.
Pyrit 0.4.0 (C) 2008-2011 Lukas Lueg https://pyrit.googlecode.com
This code is distributed under the GNU General Public License v3+
The following cores seem available…
#1: ‘CUDA-Device #1 ‘GeForce GTS 250”
#2: ‘CPU-Core (SSE2)’
Why did one of my cores disapper on my CPU. I had to reinstall Kali clean after I mucked up grub so bad I could neither get into Kali or Windows 7. Yeap dual boot.
This is my lscpu.
Architecture: x86_64
CPU op-mode(s): 32-bit, 64-bit
Byte Order: Little Endian
CPU(s): 2
On-line CPU(s) list: 0,1
Thread(s) per core: 1
Core(s) per socket: 2
Socket(s): 1
NUMA node(s): 1
Vendor ID: AuthenticAMD
CPU family: 16
Model: 6
Stepping: 2
CPU MHz: 800.000
BogoMIPS: 6028.01
Virtualization: AMD-V
L1d cache: 64K
L1i cache: 64K
L2 cache: 1024K
NUMA node0 CPU(s): 0,1
Also should I only see 1 cuda core on the GTS 250? Any help appreciated. Great article as well. The only one I could find to get me up and running. If you can please send me some info at my email, [email protected], I would really appreciate it. Thanks
Calvin,
1 core disappears as it’s used for running Linux. It doesn’t really disappear but when when you run cudahashcat, most of your system resources are tied to cuda, you need at least 1 free CPU-Core to run Linux.
See other’s post above, similar outputs. Cheers,
-BMO
uname -a ===> Linux kali 3.14-kali1-amd64 #1 SMP Debian 3.14.5-1kali1 (2014-06-07) x86_64 GNU/Linux
laptop detailed info ===> https://www.asus.com/Notebooks_Ultrabooks/N76VJ/specifications/
I’ve followed your guide as well as quite a few others out there, have not been able to get one successful install of my NVidia card :/
I’m still a linux neewbie. I followed all the directions and everything whent great untill:
root@kali:~# optirun cudahashcat64 -t 32 -a 7 example0.hash ?a?a?a?a example.dict
I get this when I try and run it: bash: optirun: command not found.
Did I miss something or screw something up? I am guessing this is the command I need since I am on a 64bit system.
I think I have it figured out. I needed to call cudahashcat64 to start the service and then cudahashcat64 -b to run the benchmark. Awesome write up blackMORE Ops and thks to staticn0de for the fix. I have been trying to make this work for 3 days now and this is the only write up that did it for me.
Thanks Shinri & Thanks staticn0de – You both are awesome!!
Thanks Shinri .. Thanks staticn0de
Gre8 Job at all ….
Thank you all very much…
Thanks Shinri & staticn0de and ofc. Mr blackMORE
The cudaHashcat download at https://www.mirrorcreator.com/files/WURGDJKL/cudaHashcat-1.30.deb_links now downloads a .exe file, not a .deb. aaarg.
Thanks staticn0de and Shinri!!
same problem for cudaHashcat as jim’s…:
The cudaHashcat download at https://www.mirrorcreator.com/files/WURGDJKL/cudaHashcat-1.30.deb_links now downloads a .exe file, not a .deb.
Sorry about using mirror creator, its awful. Check the thread blackMORE linked. I’ve uploaded the new 1.31 deb to a non-awful host.
thank you very much….is working for me and solved bugs…
Thanks Shinri
and thnx to staticn0de
You’re welcome.
Thanks blackMore Ops, this was very helpful indeed. I did however got stuck at the last step with staticn0de instructions as they are not as clear as yours. I managed to download and install the .deb file, but the second command “optirun cudahashcat64 -t 32 -a 7 example0.hash ?a?a?a?a example.dict” I kind of didn’t know what to do with that, any thoughts will be appreciated.
blackMORE Ops, this guide was very helpful, but please note the comment below that your link to staticn0de’s deb package points now to a malicious windows file.
thank you very much for your guide , wouldnt have done it without this excellent guide
thanks but look what I got:
ERROR: could not insert ‘nvidia_current’: No such device
Pyrit 0.4.0 (C) 2008-2011 Lukas Lueg https://pyrit.googlecode.com
This code is distributed under the GNU General Public License v3+
The following cores seem available…
#1: ‘CPU-Core (SSE2)’
I am on Virtualbox and I wonder if this is the problem here? Otherwise, please help!
Thanks a ton load for your work Shinri!! Really appreciate it.
I am, however, facing a problem near the end of the tutorial. I’m using Kali 1.0.9 and hence had to download and install the .deb file provided in the link. After this, when I try to do a benchmark using the command “cudahashcat64 -b”, it gives me an error stating –
“/usr/bin/cudahashcat64: line 2: ./cudaHashcat64.bin: cannot execute binary file”
Could you kindly guide me on solving this?
Thanks.
Thanks mate. 3rd tutorial of yours I have tried and all worked perfect.