In this guide, I will show how to install NVIDIA driver kernel Module CUDA, replace stock Pyrit, and install Cpyrit.At the end of this guide, you will be able to use GPU acceleration for enabled applications such as cudaHashcat, Pyrit, crunch etc. 
This guide replaces the old guide
This is part 2 of installing NVIDIA driver kernel Module CUDA and Pyrit on Kali Linux Driver series which was divided into two parts:
- Install proprietary NVIDIA driver on Kali Linux – NVIDIA Accelerated Linux Graphics Driver
- Install NVIDIA driver kernel Module CUDA and Pyrit on Kali Linux – CUDA, Pyrit and Cpyrit-cuda
You use the first guide to install NVIDIA Driver on Kali Linux. I would assume you followed the first guide and completed all steps there and would like to enable GPU acceleration, (cudahashcat, GPU pass through etc.) on your Kali Linux.
Table of Contents
CUDA Toolkit
The NVIDIA® CUDA® Toolkit provides a comprehensive development environment for C and C++ developers building GPU-accelerated applications. The CUDA Toolkit includes a compiler for NVIDIA GPUs, math libraries, and tools for debugging and optimizing the performance of your applications. You’ll also find programming guides, user manuals, API reference, and other documentation to help you get started quickly accelerating your application with GPUs. You can read a lot more here in NVIDIA Developers official webpage:
Prerequisites
Following are the prerequisite before you start following this guide:
Prerequisite 1: add Official Kali Linux repository.
I’ve added the correct Kali Official repositories and issued the following commands to update, upgrade and dist-upgrade my Kali Linux.
apt-get update && apt-get upgrade -y && apt-get dist-upgrade -y
Prerequisite 2: Install proprietary NVIDIA driver on Kali Linux
I’ve installed the correct official proprietary NVIDIA driver on Kali Linux – NVIDIA Accelerated Linux Graphics Driver using the previous guide:
If you’ve completed both, move to next instruction.
Step 1: Install NVIDIA CUDA toolkit and openCL
At first we need to install NVIDIA CUDA toolkit and NVIDIA openCL
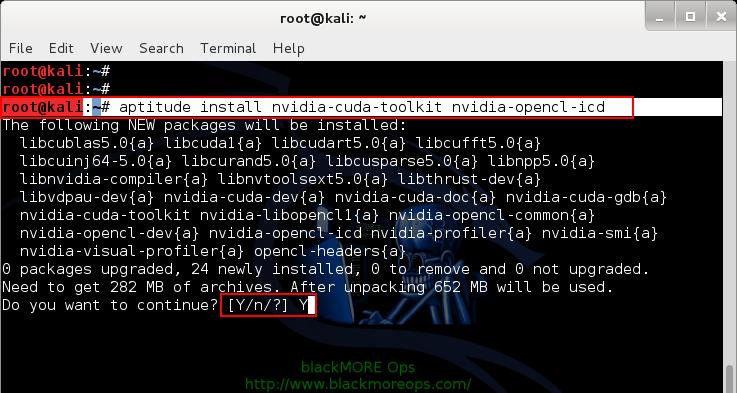
aptitude install nvidia-cuda-toolkit nvidia-opencl-icd
This will install CUDA packages in your Kali Linux. The total package is pretty large including dependencies, (282MB something), you be patient and let it finish.
Step 2: Download Pyrit and Cpyrit
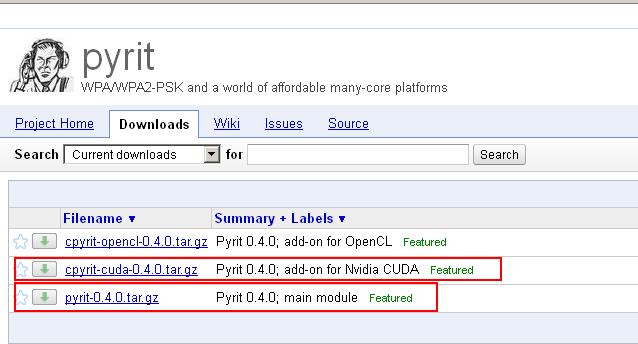
Download Pyrit and Cpyrit from the official website:
Save them in your /root folder.
Step 3: Install Pyrit
Follow the instructions below to install Pyrit and it’s prerequisites.
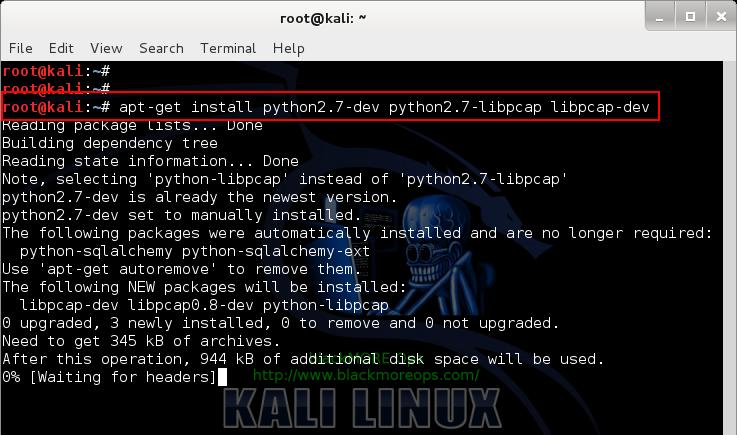
Step 3.a: Install Pyrit prerequisites
apt-get install python2.7-dev python2.7-libpcap libpcap-dev
Step 3.b: Remove existing installation of Pyrit
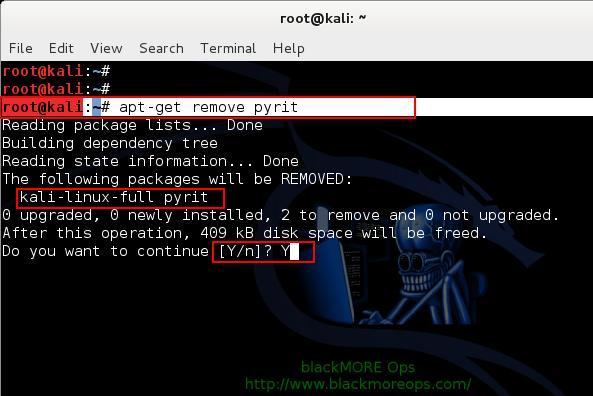
Remove stock Pyrit using the following command:
apt-get remove pyrit
You get a message stating that it will also remove kali-linux-full package. It actually doesn’t. All it does updating Kali repo and remove Pyrit. Finish removing Pyrit.
If you are not using a clean install of Kali (not recommended), you may need to issue the following command:
rm -r /usr/local/lib/python2.7/dist-packages/cpyrit/
Step 3.c: Install new Pyrit
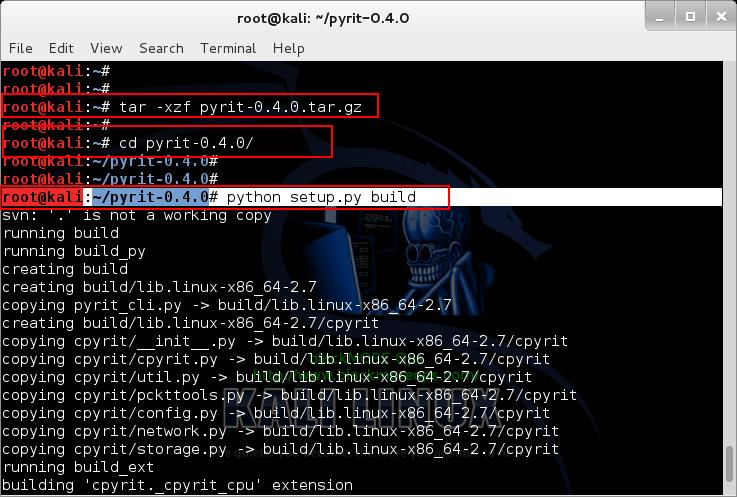
Copy paste the following commands to extract downloaded Pyrit in your Kali Linux /root directory
tar -xzf pyrit-0.4.0.tar.gz
cd pyrit-0.4.0
Now build the package
python setup.py build
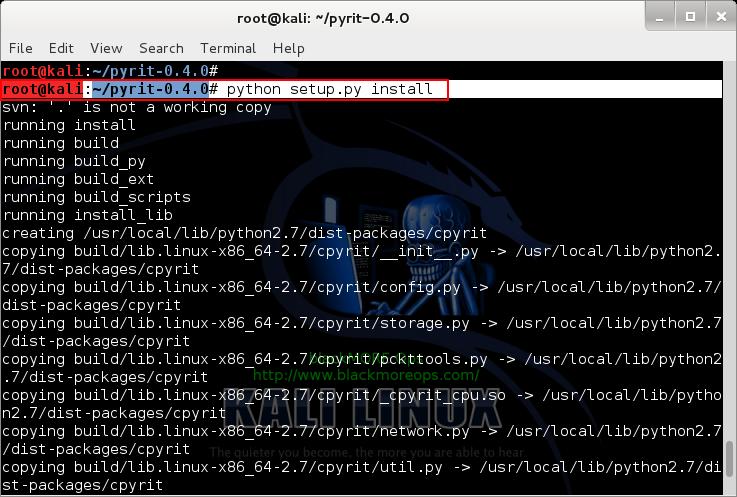
Once build is complete, you can install Pyrit.
python setup.py install
Up to this point, you shouldn’t receive any errors.
Step 4: Install CPyrit-cuda
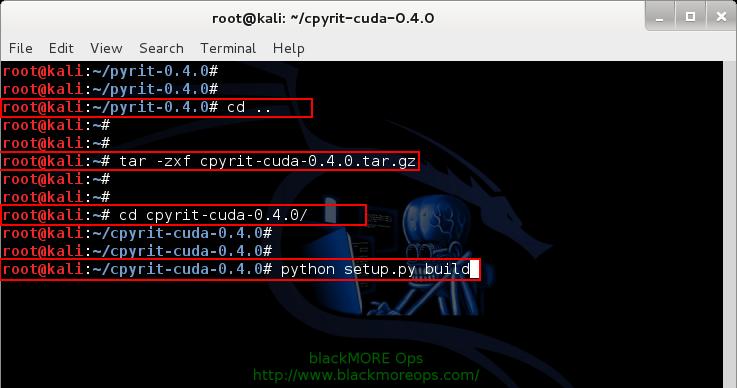
Copy paste the following commands to extract downloaded CPyrit-cuda in your Kali Linux /root directory
tar -xzf cpyrit-cuda-0.4.0.tar.gz
cd cpyrit-cuda-0.4.0
Now build the package
python setup.py build
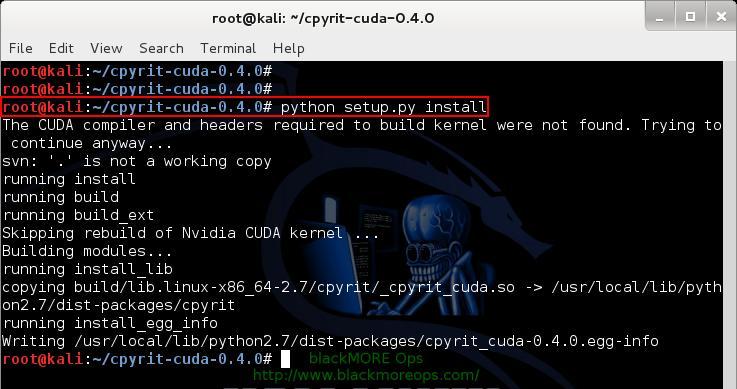
Once build is complete, you can install CPyrit-cuda.
python setup.py install
Again, you shouldn’t receive any errors, if there’s error, go back and review each steps.
Step 5: Testing and troubleshooting
Now that we’ve installed NVIDIA driver kernel Module CUDA and Pyrit on Kali Linux, we should be able to test it. The best way to test is by issuing the following command:
pyrit list_cores
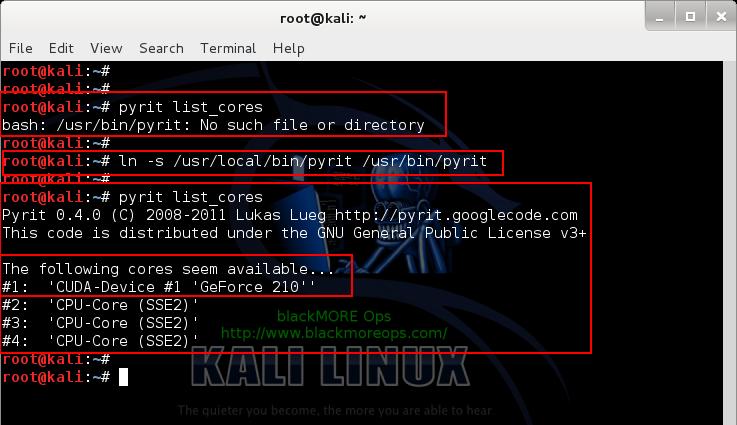
This gave me an error “ bash: /usr/bin/pyrit: No such file or directory “.
It seems this Pyrit puts its binaries in wrong folder than you’d expect. The actual path for Pyrit is now /usr/local/bin/pyrit
Step 5.a Softlink them or add path to profile
There’s two different ways you can resolve it. You can either softlink or add this /usr/local/bin/ path to your profile. Choice is again yours.
Step 5.a.i: Softlinking
ln -s /usr/local/bin/pyrit /usr/bin/pyrit
Step 5.a.ii: Add path
If you want only to specific user edit ~/.bash_profile or ~/.bashrc and put there
export PATH=$PATH:/usr/local/bin
If you want for all users edit /etc/profile and scroll down until you see something like
PATH="/bin:/usr/bin:/sbin:/usr/sbin" export PATH
Append to the end /usr/local/bin. it will be
PATH="/bin:/usr/bin:/sbin:/usr/sbin:/usr/local/bin"
and Finally
Once you’ve either Softlinked or added the correct path to your profile, then following is what you get
root@kali:~# pyrit list_cores
Pyrit 0.4.0 (C) 2008-2011 Lukas Lueg https://pyrit.googlecode.com
This code is distributed under the GNU General Public License v3+

The following cores seem available...
#1:  'CUDA-Device #1 'GeForce 210''
#2:  'CPU-Core (SSE2)'
#3:  'CPU-Core (SSE2)'
#4:  'CPU-Core (SSE2)'
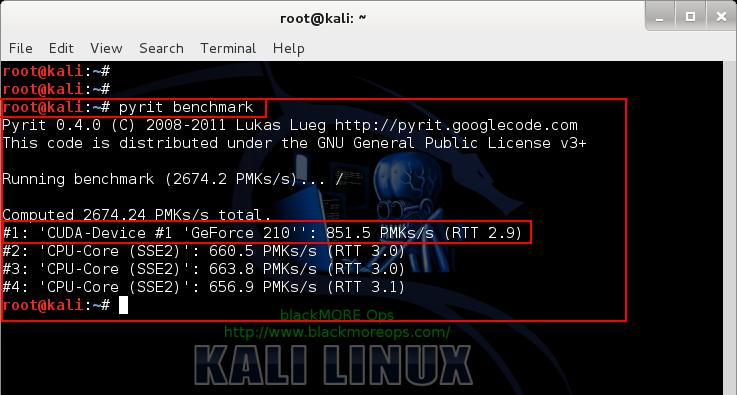
and of course I did a benchmark with my GeForce 210 card:
root@kali:~# pyrit benchmark
Pyrit 0.4.0 (C) 2008-2011 Lukas Lueg https://pyrit.googlecode.com
This code is distributed under the GNU General Public License v3+

Running benchmark (2744.1 PMKs/s)... -

Computed 2744.11 PMKs/s total.
#1: 'CUDA-Device #1 'GeForce 210'': 853.1 PMKs/s (RTT 3.0)
#2: 'CPU-Core (SSE2)': 648.1 PMKs/s (RTT 2.8)
#3: 'CPU-Core (SSE2)': 647.6 PMKs/s (RTT 2.9)
#4: 'CPU-Core (SSE2)': 658.5 PMKs/s (RTT 3.0)
root@kali:~#
Conclusion
Pyrit allows to create massive databases, pre-computing part of the IEEE 802.11 WPA/WPA2-PSK authentication phase in a space-time-tradeoff. Exploiting the computational power of Many-Core- and other platforms through ATI-Stream, Nvidia CUDA and OpenCL, it is currently by far the most powerful attack against one of the world’s most used security-protocols.
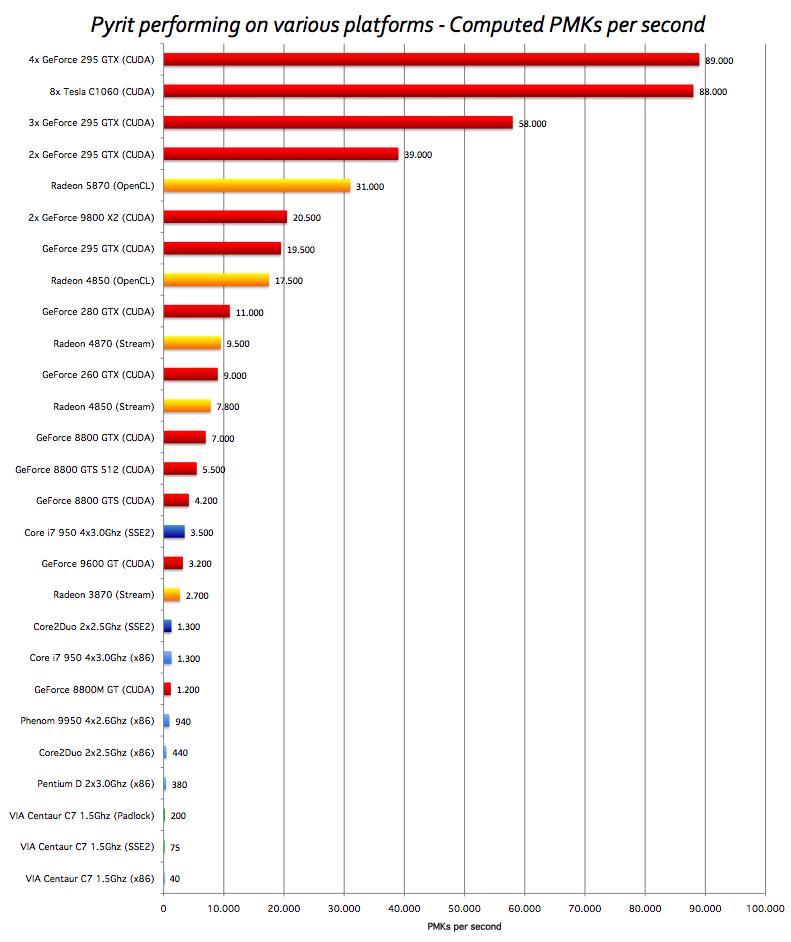
Here’s a great benchmark done with Pyrit and CUDA for different GPU’s
Thanks for reading. If this guide helped you to install NVIDIA driver kernel Module CUDA and Pyrit on Kali Linux – CUDA, Pyrit and Cpyrit-cuda, please share this article and follow me in Facebook/Twitter.
ah and don’t forget to show off your Pyrit Benchmark. 😉


92 comments
hello friend, would be a good idea to a tutorial on how to install kde desktop full from their original repositories, as well , is always the last vercion and to install ” Muon ” , the new package manager for KDE 4, since it is better and more complete than synaptic, and I see something done but it is not working well, tell me there held packages : (
and another if it works posifle Module CUDA, and Cpyrit Pyrit with nvidia cuda – drivers , downloaded from official nvidia page , since in this way the latest driver vercion obtained and can be installed and config – invidia so set the plate at will … for those who know visually not do otherwise like me 🙂
I leave a sample of my source.list
#
#deb cdrom:[Debian GNU/Linux 7.0 _Kali_ – Official Snapshot amd64 LIVE/INSTALL Binary 20140108-17:05]/ kali contrib main non-free
#deb cdrom:[Debian GNU/Linux 7.0 _Kali_ – Official Snapshot amd64 LIVE/INSTALL Binary 20140108-17:05]/ kali contrib main non-free
## Kali Regular repositories
deb https://repo.kali.org/kali kali main non-free contrib
deb https://security.kali.org/kali-security kali/updates main contrib non-free
## Kali Source repositories
deb-src https://repo.kali.org/kali kali main non-free contrib
deb-src https://security.kali.org/kali-security kali/updates main contrib non-free
## Debian Stable
deb https://ftp.us.debian.org/debian/ stable main contrib non-free
deb-src https://ftp.us.debian.org/debian/ stable main contrib non-free
##Kde
deb https://proindi.de/zevenos/neptune/repo/ sid main
deb https://proindi.de/zevenos/neptune/kde-repo/ sid main
lack google , java ( already vercion 8) and flash
Your product is excellent and very complete , thank you for your contributions to this we started is linux
PS: sorry if my English is not correct is that I use google translator and some of my knowledge
Hi Anibal,
Thanks for your recommendations. I will try to do as much I can by end on June as after that, I’ll be too busy with Football World Cup 🙂
I’ll leave a list of errors that is showing me that fences knowing that you are getting
Obj https://dl.google.com stable Release.gpg
Obj https://ftp.us.debian.org stable Release.gpg
Obj https://repo.kali.org kali Release.gpg
Obj https://dl.google.com stable Release.gpg
Obj https://ppa.launchpad.net precise Release.gpg
Obj https://proindi.de sid Release.gpg
Obj https://ftp.us.debian.org stable Release
Obj https://repo.kali.org kali Release
Obj https://dl.google.com stable Release
Obj https://ppa.launchpad.net precise Release
Obj https://repo.kali.org kali/main Sources
Obj https://proindi.de sid Release.gpg
Obj https://ftp.us.debian.org stable/main Sources
Obj https://dl.google.com stable Release
Obj https://repo.kali.org kali/non-free Sources
Obj https://security.kali.org kali/updates Release.gpg
Obj https://ppa.launchpad.net precise/main Sources
Obj https://ftp.us.debian.org stable/contrib Sources
Obj https://proindi.de sid Release
Obj https://repo.kali.org kali/contrib Sources
Obj https://ftp.us.debian.org stable/non-free Sources
Obj https://proindi.de sid Release
Obj https://security.kali.org kali/updates Release
Obj https://security.kali.org kali/updates/main Sources
Obj https://security.kali.org kali/updates/contrib Sources
Obj https://security.kali.org kali/updates/non-free Sources
W: impossible to get https://dl.google.com/linux/deb/dists/stable/Release Unable to find expected entry ‘main/binary-1386/Packages’ in Release file (Wrong sources.list entry or malformed file)
W: impossible to get https://ftp.us.debian.org/debian/dists/stable/Release Unable to find expected entry ‘main/binary-1386/Packages’ in Release file (Wrong sources.list entry or malformed file)
W: impossible to get https://repo.kali.org/kali/dists/kali/Release Unable to find expected entry ‘main/binary-1386/Packages’ in Release file (Wrong sources.list entry or malformed file)
W: impossible to get https://dl.google.com/linux/chrome/deb/dists/stable/Release Unable to find expected entry ‘main/binary-1386/Packages’ in Release file (Wrong sources.list entry or malformed file)
W: impossible to get https://ppa.launchpad.net/webupd8team/java/ubuntu/dists/precise/Release Unable to find expected entry ‘main/binary-1386/Packages’ in Release file (Wrong sources.list entry or malformed file)
W: impossible to get https://proindi.de/zevenos/neptune/repo/dists/sid/Release Unable to find expected entry ‘main/binary-1386/Packages’ in Release file (Wrong sources.list entry or malformed file)
W: impossible to get https://proindi.de/zevenos/neptune/kde-repo/dists/sid/Release Unable to find expected entry ‘main/binary-1386/Packages’ in Release file (Wrong sources.list entry or malformed file)
W: impossible to get https://security.kali.org/kali-security/dists/kali/updates/Release Unable to find expected entry ‘main/binary-1386/Packages’ in Release file (Wrong sources.list entry or malformed file)
E: Some index files failed to download. They have been ignored, or old ones used instead.
and my final list of repositories
#
#deb cdrom:[Debian GNU/Linux 7.0 _Kali_ – Official Snapshot amd64 LIVE/INSTALL Binary 20140108-17:05]/ kali contrib $
#deb cdrom:[Debian GNU/Linux 7.0 _Kali_ – Official Snapshot amd64 LIVE/INSTALL Binary 20140108-17:05]/ kali contrib $
## Kali Regular repositories
deb https://repo.kali.org/kali kali main non-free contrib
deb https://security.kali.org/kali-security kali/updates main contrib non-free
## Kali Source repositories
deb-src https://repo.kali.org/kali kali main non-free contrib
deb-src https://security.kali.org/kali-security kali/updates main contrib non-free
## Debian Stable
deb https://ftp.us.debian.org/debian/ stable main contrib non-free
deb-src https://ftp.us.debian.org/debian/ stable main contrib non-free
##Kde
deb https://proindi.de/zevenos/neptune/repo/ sid main
deb https://proindi.de/zevenos/neptune/kde-repo/ sid main
##Google Chrome
deb https://dl.google.com/linux/deb/ stable main#
##Java 8
deb https://ppa.launchpad.net/webupd8team/java/ubuntu precise main
deb-src https://ppa.launchpad.net/webupd8team/java/ubuntu precise main
Only keep Kali repo and try again. Your errors got nothing to do with Kali or this guide, just incorrect entries in
Sources.listfile.mmm… and what would be wrong?
everything worked fine until you add the repository kde, not dry but the problem persists
Please help set up a server on AWS CUDA
I’ve tried everything and CUDA does not appear
The following cores seem available…
#1: ‘CPU-Core (SSE2)’
#2: ‘CPU-Core (SSE2)’
#3: ‘CPU-Core (SSE2)’
#4: ‘CPU-Core (SSE2)’
#5: ‘CPU-Core (SSE2)’
#6: ‘CPU-Core (SSE2)’
#7: ‘CPU-Core (SSE2)’
#8: ‘CPU-Core (SSE2)’
root@ip-172-31-29-87:~#
root@ip-172-31-29-87:~# nvidia-smi -q | head
==============NVSMI LOG==============
Timestamp : Sun Jun 21 18:24:41 2015
Driver Version : 340.29
Attached GPUs : 1
GPU 0000:00:03.0
Product Name : GRID K520
Product Brand : Grid
root@ip-172-31-29-87:~#
if you get
xxx@xxxxx:~/cpyrit-cuda-0.4.0# pyrit list_cores
ERROR: could not insert ‘nvidia_uvm’: Invalid argument
Pyrit 0.4.0 (C) 2008-2011 Lukas Lueg https://pyrit.googlecode.com
This code is distributed under the GNU General Public License v3+
The following cores seem available…
#1: ‘CPU-Core (SSE2)’
#2: ‘CPU-Core (SSE2)’
#3: ‘CPU-Core (SSE2)’
#4: ‘CPU-Core (SSE2)’
#5: ‘CPU-Core (SSE2)’
#6: ‘CPU-Core (SSE2)’
#7: ‘CPU-Core (SSE2)’
#8: ‘CPU-Core (SSE2)’
try this
cd /usr/src/nvidia-current-331.67
make
cp Module.symvers uvm/
make -C uvm
cp uvm/nvidia-uvm.ko /lib/modules/`uname -r`/updates/dkms
this method save my day
https://bugs.debian.org/cgi-bin/bugreport.cgi?bug=746643
Hi Shinri,
Thanks for posting this. I haven’t encountered a similar issue yet, but I’m sure many users had and this sure will help them.
-BMO
I can’t reply to Shinri, while I can reply to every other commenter, how come?
blackmoreops, i folow your tuto and i get this error :
:~# pyrit list_cores
ERROR: could not insert ‘nvidia_uvm’: Invalid argument
Pyrit 0.4.0 (C) 2008-2011 Lukas Lueg https://pyrit.googlecode.com
This code is distributed under the GNU General Public License v3+
The following cores seem available…
#1: ‘CPU-Core (SSE2)’
#2: ‘CPU-Core (SSE2)’
#3: ‘CPU-Core (SSE2)’
#4: ‘CPU-Core (SSE2)’
But with the commands of Shinri i get this:
:/# pyrit list_cores
Pyrit 0.4.0 (C) 2008-2011 Lukas Lueg https://pyrit.googlecode.com
This code is distributed under the GNU General Public License v3+
The following cores seem available…
#1: ‘CUDA-Device #1 ‘GeForce 8500 GT”
#2: ‘CPU-Core (SSE2)’
#3: ‘CPU-Core (SSE2)’
#4: ‘CPU-Core (SSE2)’
but thank you 2 all works fine now , you saved my day … or rather … the breaking Dawn
🙂
Thank you so much for this, this was the only error I hit during the whole thing and even google wasn’t showing how to fix it, glad I scrolled down and read all the comments!
Also thank you blackMORE Ops for the guide! it worked great. from 420 PMKs/s to 27496 PMKs/s with my GTX480 🙂
I just updated my Kali box and got this problem, Thank you for the quick fix! Also Google Chrome stopped working so I uninstalled and reinstalled… no success. Then I used the lazy kali script to install it and it worked fine. Not sure what the real problem was, but I thought I’d mention it. Thanks again for the helpful work!
Thanks ALOT shinri you save my week !
god bless you
Thank You!
Mine was nvidia-current-319.82
so i tried to do this but i could not :/ please help me
It worked until these 2 commands
cd /usr/src/nvidia-current-319.82
make
but got error in these steps
root@SarthaKJ:/usr/src/nvidia-current-319.82# cp Module.symvers uvm/
cp: cannot create regular file `/uvm/’: Not a directory
make -C uvm
cp uvm/nvidia-uvm.ko /lib/modules/`uname -r`/updates/dkms
…
Please help me
Hi sarthak,
I am doing a fresh install on my Desktop this weekend, so stay tuned. I haven’t had any issues upgrading to Kali v1.0.7 from v1.0.6. With all the posts floating around, it might be something to do with a fresh installation and this weekend I will try it. BTW,
It seems you’re missing a folder/content ..
cp Module.symvers uvm/. Maybe create the folder and retry?Fucking legend
Shinri, you saved my day to. I encountered the same problem with my GTX Titan Black
thanks, worked great, after I applied the fix mentioned by Shinri, probably related to a minor difference in the newer driver since the guide was written …
You gotta love open source community. . 🙂 thanks guys.
5yr old laptop minus the network client
root@kali:~# pyrit benchmark
Pyrit 0.4.0 (C) 2008-2011 Lukas Lueg https://pyrit.googlecode.com
This code is distributed under the GNU General Public License v3+
Running benchmark (1884.0 PMKs/s)… |
Computed 1884.01 PMKs/s total.
#1: ‘CUDA-Device #1 ‘GeForce 9600M GT”: 1535.9 PMKs/s (RTT 2.9)
#2: ‘CPU-Core (SSE2)’: 495.2 PMKs/s (RTT 3.0)
#3: ‘Network-Clients’: 0.0 PMKs/s (RTT 0.0)
to blackMORE Ops :
Thanks a bun Bud!
Your site is really helping me out to learn, cant wait for more stuff, take care
Hi blackMORE
Thank you for everything you have given us.
My Pyrit Benchmark :
Running benchmark (1673.9 PMKs/s)… /
Computed 1673.93 PMKs/s total.
#1: ‘CPU-Core (SSE2)’: 436.8 PMKs/s (RTT 2.9)
#2: ‘CPU-Core (SSE2)’: 434.4 PMKs/s (RTT 3.0)
#3: ‘CPU-Core (SSE2)’: 428.6 PMKs/s (RTT 3.0)
#4: ‘CPU-Core (SSE2)’: 429.3 PMKs/s (RTT 2.9)
^ I don’t see: ‘CUDA-Device’ :\
……………………………………………………………………..
I use Kali 1.07 + Bumbelee I have 2 Card ~
> i Can’t install Nvidia CUDA V6.0.37 (cuda_6.0.37_linux_64.run)
Here the problem :
root@kali:~/Desktop#./cuda_6.0.37_linux_64.run
gzip: stdin: unexpected end of file
Extraction failed.
Ensure there is enough space in /tmp
Signal caught, cleaning up
How increase tmp size ?
I tried with several solutions > But no result.
When install the oldest version
No problem L!ke Ensure there is enough space in /tmp
……………..
root@kali:exit
; )
I have thesame problem with tmp size. Have you find any solution?
hi admin, i have problem at step 5 when i type :
pyrit list_cores
my result is :
root@X:~# pyrit list_cores
ERROR: could not insert ‘nvidia_uvm’: Invalid argument
Pyrit 0.4.0 (C) 2008-2011 Lukas Lueg https://pyrit.googlecode.com
This code is distributed under the GNU General Public License v3+
The following cores seem available…
#1: ‘CPU-Core (SSE2)’
#2: ‘CPU-Core (SSE2)’
#3: ‘CPU-Core (SSE2)’
#4: ‘CPU-Core (SSE2)’
#5: ‘CPU-Core (SSE2)’
#6: ‘CPU-Core (SSE2)’
#7: ‘CPU-Core (SSE2)’
#8: ‘CPU-Core (SSE2)’
root@X:~# ln -s /usr/local/bin/pyrit /usr/bin/pyrit
ln: failed to create symbolic link `/usr/bin/pyrit’: File exists
and my /etc/profile like this:
# /etc/profile: system-wide .profile file for the Bourne shell (sh(1))
# and Bourne compatible shells (bash(1), ksh(1), ash(1), …).
if [ “`id -u`” -eq 0 ]; then
PATH=”/usr/local/sbin:/usr/local/bin:/usr/sbin:/usr/bin:/sbin:/bin”
else
PATH=”/usr/local/bin:/usr/bin:/bin:/usr/local/games:/usr/games”
fi
export PATH
if [ “$PS1” ]; then
if [ “$BASH” ] && [ “$BASH” != “/bin/sh” ]; then
# The file bash.bashrc already sets the default PS1.
# PS1=’\h:\w\$ ‘
if [ -f /etc/bash.bashrc ]; then
. /etc/bash.bashrc
fi
else
if [ “`id -u`” -eq 0 ]; then
PS1=’# ‘
else
PS1=’$ ‘
fi
fi
fi
# The default umask is now handled by pam_umask.
# See pam_umask(8) and /etc/login.defs.
if [ -d /etc/profile.d ]; then
for i in /etc/profile.d/*.sh; do
if [ -r $i ]; then
. $i
fi
done
unset i
fi
i dont know what to do next,
so when i use cudahashcat to crack password it warned that command not found
please help me
Go To Shinri Comment.
He solve the problem.
—————————–
For The Problem
“ln: failed to create symbolic link `/usr/bin/pyrit’: File exists”
Do You Remove Pyrit Before and installed Again.
Even the “Shinri” solution did not work :(((((((
I did every steps correctly. But still it shows only CPUs not GPU :/
PLEASE HELP ME !
Thank you 🙂
_______________________________________________________
i have kali 1.0.7, nVidia GT 755M on Lenovo ideapad Y410P Laptop
try the new version here, tell me if it fixes your problem:
https://github.com/JPaulMora/Pyrit
thanks!
Thanks BO, great guide! And Shinri, thank you for your fix!!
I’m up and running on 1.0.7, everything is looking good! But I can’t seem to run cudahashcat? What am I missing? (I am using sudo to issue the command :p) – command not found
Where should I be able to find it in the file system?
lspci -nn | grep VGA
02:00.0 VGA compatible controller [0300]: NVIDIA Corporation Device [10de:1184] (rev a1)
03:00.0 VGA compatible controller [0300]: NVIDIA Corporation Device [10de:1184] (rev a1)
lsmod | grep nvidia
nvidia_uvm 33145 0
nvidia 10651813 57 nvidia_uvm
i2c_core 24265 2 i2c_i801,nvidia
pyrit list_cores
Pyrit 0.4.0 (C) 2008-2011 Lukas Lueg https://pyrit.googlecode.com
This code is distributed under the GNU General Public License v3+
The following cores seem available…
#1: ‘CUDA-Device #1 ‘GeForce GTX 770”
#2: ‘CUDA-Device #2 ‘GeForce GTX 770”
#3: ‘CPU-Core (SSE2)’
#4: ‘CPU-Core (SSE2)’
#5: ‘CPU-Core (SSE2)’
#6: ‘CPU-Core (SSE2)’
#7: ‘CPU-Core (SSE2)’
#8: ‘CPU-Core (SSE2)’
Benchmark
Pyrit 0.4.0 (C) 2008-2011 Lukas Lueg https://pyrit.googlecode.com
This code is distributed under the GNU General Public License v3+
Running benchmark (56443.1 PMKs/s)… –
Computed 56443.09 PMKs/s total.
#1: ‘CUDA-Device #1 ‘GeForce GTX 770”: 27540.6 PMKs/s (RTT 2.9)
#2: ‘CUDA-Device #2 ‘GeForce GTX 770”: 28899.8 PMKs/s (RTT 2.9)
#3: ‘CPU-Core (SSE2)’: 560.7 PMKs/s (RTT 2.9)
#4: ‘CPU-Core (SSE2)’: 546.2 PMKs/s (RTT 3.1)
#5: ‘CPU-Core (SSE2)’: 501.8 PMKs/s (RTT 3.1)
#6: ‘CPU-Core (SSE2)’: 556.5 PMKs/s (RTT 3.0)
#7: ‘CPU-Core (SSE2)’: 549.2 PMKs/s (RTT 3.0)
#8: ‘CPU-Core (SSE2)’: 517.5 PMKs/s (RTT 3.0)
One other thing is gpu temp monitoring, I’m trying to use lm-sensors, do you have it working with gpu or is there something better?
Hi Eeek,
You need to install CUDAHashcat (i.e. the actual package name is oclhashcat). Here’s how you install it:
Step 7 – Install oclHashcat (cudaHashcat)
Apart from that, your benchmark is AWESOME! Wish I could get my hands on a rig like that!!! Try some of the dictionary based attacks and see how your card works .. Cheers,
-BMO
Thanks BMO, thought I was being a Pratt haha. I’ll post some real world results for ya, I whacked my WiFi code at the end of a stripped down rockyou list (8-63, I’m an Engineer, my passphrase is pretty sick, metachar in middle of string) and I saw over 60k. I’m a pc gamer (obv), so I’ll keep you in mind when I upgrade again 😉
Hi
To Eeek, I ve got nearly the same hardware as you ( core i7 4790K with SLI dual GTX770 with kali 1.0.9) and mine reachs 46000 PMK/s per GPU,(total of 92000 )
honestly I were expecting more , around 60000 to 75000 PMK/s since on my old 9600GT/Athlon64 x2 3800 performs 4000 PMK/s with only 64 cores
And as I saw GPU computation power increase linearly with # of cores at a rate of appx. 40 to 45 PMK/s per core.
Maybe Blackmore ops can give more explaination on this ?
Tnx.
I have followed the provided instructions to the letter and everything seemed to have gone well, well … almost that is
After installing a whole load of Nvidia stuff and Cuda, Pyrit and Cpyrit, my reward for all the “hard work” is this:
root@kali:~# pyrit list_cores
>>>>>>ERROR: could not insert ‘nvidia_uvm’: Invalid argument<<<<<<< 6.22 followed by all Win versions, so I’m not completely ignorant
I was kind of hoping for an easy solution for a known issue but haven’t found a solution yet, the last “solution” started off by removing my Nvidia alternative drivers so … well you know … reinstall ‘m all over again
That’s when I decided to post my problem together with my benchmark, but without gtx 550 ti results of course
root@kali:~# pyrit benchmark
>>>>>>ERROR: could not insert ‘nvidia_uvm’: Invalid argument<<<<<<<<<
Pyrit 0.4.0 (C) 2008-2011 Lukas Lueg https://pyrit.googlecode.com
This code is distributed under the GNU General Public License v3+
Running benchmark (4189.2 PMKs/s)… \
Computed 4189.22 PMKs/s total.
#1: 'CPU-Core (SSE2)': 741.2 PMKs/s (RTT 3.0)
#2: 'CPU-Core (SSE2)': 743.2 PMKs/s (RTT 3.0)
#3: 'CPU-Core (SSE2)': 737.9 PMKs/s (RTT 2.7)
#4: 'CPU-Core (SSE2)': 736.6 PMKs/s (RTT 3.0)
#5: 'CPU-Core (SSE2)': 741.0 PMKs/s (RTT 3.0)
#6: 'CPU-Core (SSE2)': 734.9 PMKs/s (RTT 3.0)
These sad results aren't really encouraging, please help
Ok, found the reply box ;P
edit: I must have “mutilated” a small part of my comment and just have to correct it (slightly OCD)
“6.22 followed by all Win versions, so I’m not completely ignorant” should be:
“As a kid I got a Sinclair ZX-Spectrum (16k ram and a 3.5 Mhz cpu ;-D) for my 13th or 14th birthday (at that time it was considered hi-tech)
In the following 30+ years, Atari’s, Commodores, MSX’s (Philips?) and what not, followed
I know (knew?) more dialects of Basic than I can remember, and when the PC became affordable I learned everything about ms-dos 2.11 > 6.22 followed by all versions of Windows, so I’m not completely ignorant
I couldn’t find an input box to leave a proper reply to Shinri since he posted a working solution to
>>>>>>”ERROR: could not insert ‘nvidia_uvm’: Invalid argument”<<<<<<<<<<
When I click reply it appears there's no field to post my reply
@Shinri Anyway, your solution made my day
Also, of course, thanks a million to BlackMore . ops for these 2 excellent and comprehensive installation guides, I'm sure I'll use many of your other howto's for a long time to come
Benchmark:
root@kali:/# pyrit benchmark
Pyrit 0.4.0 (C) 2008-2011 Lukas Lueg https://pyrit.googlecode.com
This code is distributed under the GNU General Public License v3+
Running benchmark (16155.1 PMKs/s)… –
Computed 16155.13 PMKs/s total.
#1: 'CUDA-Device #1 'GeForce GTX 550 Ti'': 14007.6 PMKs/s (RTT 2.8)
#2: 'CPU-Core (SSE2)': 637.5 PMKs/s (RTT 3.0)
#3: 'CPU-Core (SSE2)': 647.3 PMKs/s (RTT 3.0)
#4: 'CPU-Core (SSE2)': 649.1 PMKs/s (RTT 3.0)
#5: 'CPU-Core (SSE2)': 659.2 PMKs/s (RTT 3.0)
#6: 'CPU-Core (SSE2)': 645.9 PMKs/s (RTT 3.0)
One question though
100 why do "pyrit list_cores" as well as "pyrit benchmark" show only 5 out of 6 cpu cores?
200 Or could it be that, since Asrock 870 extreme3 (not R2.0) mobo can handle 6 core cpu's, that it registers/treats the gpu as 1 of 6 cpu cores?
300 If 200=false then 100 😉
it only shows 5/6 cores on purpose, pyrit uses one CPU per GPU to prepare / feed data, its the default behavior, you can limit the number of CPU’s its using, but any GUI will be unresponsive …. the more PMK’s you GPU can process, the more CPU cycles it uses, it can spill over more than one 4GHZ CPU before 60,000 PMK/s
Hi there,
Got pretty frustrated with the whole problem. I got everything to work so far…except the last line “cp uvm/nvidia-uvm.ko /lib/modules/`uname -r`/updates/dkms” returns me “cp: cannot create regular file `/lib/modules/3.14-kali1-amd64/updates/dkms’: No such file or directory” I guess I might have to create the file or directory manually by am I right?
Thanks in advance
Dilyan,
Correct, you are following a slightly older post. Follow this new one:
Kali Linux 1.0.7 kernel 3.14 install NVIDIA driver kernel Module CUDA and Pyrit – CUDA, Pyrit and Cpyrit-cuda
Good luck.
-BMO
Omg,
I tried the benchmark with my Titan Black and was flabergasted:
Pyrit 0.4.0 (C) 2008-2011 Lukas Lueg https://pyrit.googlecode.com
This code is distributed under the GNU General Public License v3+
Running benchmark (61885.2 PMKs/s)… |
Computed 61885.25 PMKs/s total.
#1: ‘CUDA-Device #1 ‘GeForce GTX TITAN Black”: 64466.2 PMKs/s (RTT 2.0)
#2: ‘CPU-Core (SSE2)’: 1053.9 PMKs/s (RTT 3.0)
#3: ‘CPU-Core (SSE2)’: 1061.5 PMKs/s (RTT 2.9)
#4: ‘CPU-Core (SSE2)’: 1086.6 PMKs/s (RTT 3.0)
😐
Like the others, thank you blackMORE Ops and Shinri for the fix.
New 5960X & X99 & SLI system, stock clocking:
root@kaleeje:/# lspci -nn | grep VGA
01:00.0 VGA compatible controller [0300]: NVIDIA Corporation Device [10de:1187] (rev a1)
02:00.0 VGA compatible controller [0300]: NVIDIA Corporation Device [10de:1187] (rev a1)
root@kaleeje:/# pyrit list_cores
Pyrit 0.4.0 (C) 2008-2011 Lukas Lueg https://pyrit.googlecode.com
This code is distributed under the GNU General Public License v3+
The following cores seem available…
#1: ‘CUDA-Device #1 ‘GeForce GTX 760”
#2: ‘CUDA-Device #2 ‘GeForce GTX 760”
#3: ‘CPU-Core (SSE2)’
#4: ‘CPU-Core (SSE2)’
#5: ‘CPU-Core (SSE2)’
#6: ‘CPU-Core (SSE2)’
#7: ‘CPU-Core (SSE2)’
#8: ‘CPU-Core (SSE2)’
#9: ‘CPU-Core (SSE2)’
#10: ‘CPU-Core (SSE2)’
#11: ‘CPU-Core (SSE2)’
#12: ‘CPU-Core (SSE2)’
#13: ‘CPU-Core (SSE2)’
#14: ‘CPU-Core (SSE2)’
#15: ‘CPU-Core (SSE2)’
#16: ‘CPU-Core (SSE2)’
root@kaleeje:/# pyrit benchmark
Pyrit 0.4.0 (C) 2008-2011 Lukas Lueg https://pyrit.googlecode.com
This code is distributed under the GNU General Public License v3+
Running benchmark (50336.8 PMKs/s)… /
Computed 50336.78 PMKs/s total.
#1: ‘CUDA-Device #1 ‘GeForce GTX 760”: 23669.6 PMKs/s (RTT 2.9)
#2: ‘CUDA-Device #2 ‘GeForce GTX 760”: 23873.0 PMKs/s (RTT 2.9)
#3: ‘CPU-Core (SSE2)’: 790.9 PMKs/s (RTT 3.0)
#4: ‘CPU-Core (SSE2)’: 462.0 PMKs/s (RTT 2.8)
#5: ‘CPU-Core (SSE2)’: 603.6 PMKs/s (RTT 3.0)
#6: ‘CPU-Core (SSE2)’: 603.2 PMKs/s (RTT 3.0)
#7: ‘CPU-Core (SSE2)’: 732.3 PMKs/s (RTT 3.0)
#8: ‘CPU-Core (SSE2)’: 548.8 PMKs/s (RTT 3.2)
#9: ‘CPU-Core (SSE2)’: 501.8 PMKs/s (RTT 2.9)
#10: ‘CPU-Core (SSE2)’: 845.9 PMKs/s (RTT 2.8)
#11: ‘CPU-Core (SSE2)’: 593.2 PMKs/s (RTT 3.0)
#12: ‘CPU-Core (SSE2)’: 603.3 PMKs/s (RTT 3.0)
#13: ‘CPU-Core (SSE2)’: 449.1 PMKs/s (RTT 3.0)
#14: ‘CPU-Core (SSE2)’: 549.9 PMKs/s (RTT 3.2)
#15: ‘CPU-Core (SSE2)’: 602.9 PMKs/s (RTT 3.0)
#16: ‘CPU-Core (SSE2)’: 607.6 PMKs/s (RTT 3.0)
Great tut’s, could not have gotten this far so easily with out these pages & posts.
Smigen
Thank you!!! Excellent Tutorial, keep up the good work:)
i to was getting the same error shinri was having, his post about how to fix it made it all work should definitly be in the tutorial, thanks guys i new to this and it all helped me get by and install everything smoothly
:~# pyrit list_cores
ERROR: could not insert ‘nvidia_uvm’: Invalid argument
Pyrit 0.4.0 (C) 2008-2011 Lukas Lueg https://pyrit.googlecode.com
This code is distributed under the GNU General Public License v3+
The following cores seem available…
#1: ‘CPU-Core (SSE2)’
#2: ‘CPU-Core (SSE2)’
#3: ‘CPU-Core (SSE2)’
#4: ‘CPU-Core (SSE2)’
now i get with shinris fix
root@kali:~# pyrit list_cores
Pyrit 0.4.0 (C) 2008-2011 Lukas Lueg https://pyrit.googlecode.com
This code is distributed under the GNU General Public License v3+
The following cores seem available…
#1: ‘CUDA-Device #1 ‘GeForce GT 540M”
#2: ‘CPU-Core (SSE2)’
#3: ‘CPU-Core (SSE2)’
#4: ‘CPU-Core (SSE2)’
and benchmarks also went up, thanks again and keep up the good work
Thank you! I followed your previous Install proprietary NVIDIA driver on Kali Linux – NVIDIA Accelerated Linux Graphics Driver and it displayed the blank screen. I researched a lot and decided to ignore to NVidia Driver and focus on CUDA installation following your this chapter and it works!
root@kali:~/cpyrit-cuda-0.4.0# pyrit benchmark
Pyrit 0.4.0 (C) 2008-2011 Lukas Lueg https://pyrit.googlecode.com
This code is distributed under the GNU General Public License v3+
Running benchmark (5462.6 PMKs/s)… |
Computed 5462.63 PMKs/s total.
#1: ‘CUDA-Device #1 ‘GeForce GT 635M”: 4676.5 PMKs/s (RTT 2.9)
#2: ‘CPU-Core (SSE2)’: 395.9 PMKs/s (RTT 2.9)
#3: ‘CPU-Core (SSE2)’: 387.2 PMKs/s (RTT 3.0)
#4: ‘CPU-Core (SSE2)’: 403.4 PMKs/s (RTT 3.0)
root@kali:~/cpyrit-cuda-0.4.0# lspci | grep VGA
00:02.0 VGA compatible controller: Intel Corporation 3rd Gen Core processor Graphics Controller (rev 09)
01:00.0 VGA compatible controller: NVIDIA Corporation Device 0de3 (rev a1)
however lspci | grep VGA, it does not show NVIDIA brand name. but never mind as long as pyrit runs on GPU
Hello.
I wonder if you can help me. I am trying these procedures (part 1 & part 2) with kali and gforce gtx 980. I cannot get this to work correctly and was wondering if you know the proper procedure for installing and using the gtx 980 and pyrit + cuda. Do you have a procedure for this. Thanks!
Hello! I have been following all of your tutorials on what to do after a fresh kali install and this is the first problem that I have come across. I have an nvidia 750 ti and everything in this tutorial has gone smoothly until the “pyrit list_cores” command. My output is…
ERROR: could not insert ‘nvidia_uvm’: Invalid argument
Pyrit 0.4.0 (C) 2008-2011 Lukas Lueg https://pyrit.googlecode.com
This code is distributed under the GNU General Public License v3+
The following cores seem available…
#1: ‘CPU-Core (SSE2)’
#2: ‘CPU-Core (SSE2)’
#3: ‘CPU-Core (SSE2)’
#4: ‘CPU-Core (SSE2)’
What do you recommend?
Didn’t see this was already answered in another comment thanks!
Pyrit 0.4.0 (C) 2008-2011 Lukas Lueg https://pyrit.googlecode.com
This code is distributed under the GNU General Public License v3+
Running benchmark (36681.2 PMKs/s)… –
Computed 36681.20 PMKs/s total.
#1: ‘CUDA-Device #1 ‘GeForce GTX 750 Ti”: 35064.9 PMKs/s (RTT 2.8)
#2: ‘CPU-Core (SSE2)’: 1199.7 PMKs/s (RTT 3.0)
#3: ‘CPU-Core (SSE2)’: 1231.7 PMKs/s (RTT 3.0)
#4: ‘CPU-Core (SSE2)’: 1244.7 PMKs/s (RTT 3.1)
Nice. Now you will never forget. Congratulations on making it work.
For those who are struggling, keep trying, it always works at the end and once done, you will never forget or feel helpless next time. Cheers,
– BMO
Computed 75812.53 PMKs/s total.
#1: ‘CUDA-Device #1 ‘GeForce GTX 970”: 76211.9 PMKs/s (RTT 1.7)
#2: ‘CPU-Core (SSE2)’: 710.4 PMKs/s (RTT 2.9)
#3: ‘CPU-Core (SSE2)’: 698.5 PMKs/s (RTT 2.9)
#4: ‘CPU-Core (SSE2)’: 710.7 PMKs/s (RTT 3.0)
#5: ‘CPU-Core (SSE2)’: 705.1 PMKs/s (RTT 2.9)
#6: ‘CPU-Core (SSE2)’: 707.5 PMKs/s (RTT 2.9)
#7: ‘CPU-Core (SSE2)’: 714.8 PMKs/s (RTT 2.9)
#8: ‘CPU-Core (SSE2)’: 698.3 PMKs/s (RTT 2.9)
All your base are belong to us.
linus, what procedure did you use to get your Geforce GTX 970 to work with kali and pyrit? I have tried just about every tutorial out there, even this one to get my Geforce GTX 980 to work with no luck! I would appreciate it very much if you could explain to me the procedure to get it to work, thanks.
Computed 24260.66 PMKs/s total.
#1: ‘CUDA-Device #1 ‘GeForce GTX 870M”: 22051.3 PMKs/s (RTT 2.8)
#2: ‘CPU-Core (SSE2)’: 562.1 PMKs/s (RTT 3.0)
#3: ‘CPU-Core (SSE2)’: 562.1 PMKs/s (RTT 3.0)
#4: ‘CPU-Core (SSE2)’: 561.9 PMKs/s (RTT 3.0)
#5: ‘CPU-Core (SSE2)’: 568.0 PMKs/s (RTT 3.0)
#6: ‘CPU-Core (SSE2)’: 562.1 PMKs/s (RTT 3.0)
#7: ‘CPU-Core (SSE2)’: 562.0 PMKs/s (RTT 3.0)
#8: ‘CPU-Core (SSE2)’: 562.2 PMKs/s (RTT 3.0)
root@jok3R:~# pyrit benchmark
Pyrit 0.4.0 (C) 2008-2011 Lukas Lueg https://pyrit.googlecode.com
This code is distributed under the GNU General Public License v3+
Running benchmark (5525.5 PMKs/s)… –
Computed 5525.47 PMKs/s total.
#1: ‘CUDA-Device #1 ‘GeForce 8800 GT”: 5436.3 PMKs/s (RTT 2.8)
#2: ‘CPU-Core (SSE2)’: 641.5 PMKs/s (RTT 3.0)
root@jok3R:~#
pyrit benchmark
Pyrit 0.4.0 (C) 2008-2011 Lukas Lueg https://pyrit.googlecode.com
This code is distributed under the GNU General Public License v3+
Running benchmark (3889.1 PMKs/s)… \
Computed 3889.13 PMKs/s total.
#1: ‘CUDA-Device #1 ‘GeForce GT 610”: 2963.2 PMKs/s (RTT 2.8)
#2: ‘CPU-Core (SSE2)’: 407.7 PMKs/s (RTT 3.0)
#3: ‘CPU-Core (SSE2)’: 412.3 PMKs/s (RTT 3.0)
#4: ‘CPU-Core (SSE2)’: 413.4 PMKs/s (RTT 3.0)
Computed 121397.62 PMKs/s total.
#1: ‘CUDA-Device #1 ‘GeForce GTX 980”: 86842.2 PMKs/s (RTT 1.5)
#2: ‘CUDA-Device #2 ‘GeForce GTX 770”: 29292.5 PMKs/s (RTT 3.0)
#3: ‘CPU-Core (SSE2)’: 748.5 PMKs/s (RTT 3.0)
#4: ‘CPU-Core (SSE2)’: 729.1 PMKs/s (RTT 3.0)
#5: ‘CPU-Core (SSE2)’: 744.1 PMKs/s (RTT 3.0)
#6: ‘CPU-Core (SSE2)’: 751.2 PMKs/s (RTT 3.0)
#7: ‘CPU-Core (SSE2)’: 744.5 PMKs/s (RTT 3.0)
#8: ‘CPU-Core (SSE2)’: 742.0 PMKs/s (RTT 3.0)
#9: ‘CPU-Core (SSE2)’: 728.2 PMKs/s (RTT 3.0)
#10: ‘CPU-Core (SSE2)’: 744.8 PMKs/s (RTT 3.0)
#11: ‘CPU-Core (SSE2)’: 738.3 PMKs/s (RTT 3.0)
#12: ‘CPU-Core (SSE2)’: 739.7 PMKs/s (RTT 3.0)
Hi Blackmore,
Will this guide work on Kali 1.10? Just curious. Your 1.08 install nvidia drivers does work on 1.10 also. Only difference was the PCI address.
Anyway thanks for your guides, Linux noobs like me really appreciate them
Got brave and tried it.
Only problem was the python part. Kali 1.10 already comes with higher python ver 2.73. So because I’m a noob and didnt know if I could skip that step, I just installed older python. Then continued to follow the guide. It worked, mostly.
Only thing is I’m getting random freezing especially at startup. Freezing seems to get better over time. Mostly annoying but usable. Probably caused by a conflict Blackmore’s new guide will fix.
root@kali:~# pyrit benchmark
Pyrit 0.4.0 (C) 2008-2011 Lukas Lueg https://pyrit.googlecode.com
This code is distributed under the GNU General Public License v3+
Running benchmark (33713.0 PMKs/s)… –
Computed 33712.99 PMKs/s total.
#1: ‘CUDA-Device #1 ‘GeForce GTX 580M”: 16701.7 PMKs/s (RTT 2.9)
#2: ‘CUDA-Device #2 ‘GeForce GTX 580M”: 16615.8 PMKs/s (RTT 2.9)
#3: ‘CPU-Core (SSE2)’: 427.6 PMKs/s (RTT 3.2)
#4: ‘CPU-Core (SSE2)’: 433.2 PMKs/s (RTT 3.4)
#5: ‘CPU-Core (SSE2)’: 434.3 PMKs/s (RTT 3.2)
#6: ‘CPU-Core (SSE2)’: 450.8 PMKs/s (RTT 3.3)
#7: ‘CPU-Core (SSE2)’: 443.7 PMKs/s (RTT 3.1)
#8: ‘CPU-Core (SSE2)’: 430.8 PMKs/s (RTT 3.2)
Thanks blackmore, looking forward to official kali 1.10/cuda guide.
Pyrit 0.4.0 (C) 2008-2011 Lukas Lueg https://pyrit.googlecode.com
This code is distributed under the GNU General Public License v3+
Running benchmark (32356.8 PMKs/s)… \
Computed 32356.75 PMKs/s total.
#1: ‘CUDA-Device #1 ‘GeForce GTX 570”: 31953.8 PMKs/s (RTT 2.8)
#2: ‘CPU-Core (SSE2)’: 917.8 PMKs/s (RTT 3.1)
#3: ‘CPU-Core (SSE2)’: 892.7 PMKs/s (RTT 3.0)
#4: ‘CPU-Core (SSE2)’: 909.5 PMKs/s (RTT 3.1)
Did you manage to get cudahashcat work as well?
Thanks for the tutorial. These are PMKs for the following laptop:
Lenovo ThinkPad W530
32 GB ram
Intel Core i7-3940XM @ 3.00GHzx8
Ubuntu 15.04
Not too shabby for a laptop.
Pyrit 0.4.0 (C) 2008-2011 Lukas Lueg https://pyrit.googlecode.com
This code is distributed under the GNU General Public License v3+
Running benchmark (10236.5 PMKs/s)… –
Computed 10236.46 PMKs/s total.
#1: ‘CUDA-Device #1 ‘Quadro K2000M”: 8132.8 PMKs/s (RTT 2.8)
#2: ‘CPU-Core (SSE2)’: 430.5 PMKs/s (RTT 3.3)
#3: ‘CPU-Core (SSE2)’: 432.6 PMKs/s (RTT 3.2)
#4: ‘CPU-Core (SSE2)’: 428.0 PMKs/s (RTT 3.2)
#5: ‘CPU-Core (SSE2)’: 445.1 PMKs/s (RTT 3.3)
#6: ‘CPU-Core (SSE2)’: 432.9 PMKs/s (RTT 3.2)
#7: ‘CPU-Core (SSE2)’: 423.6 PMKs/s (RTT 3.3)
#8: ‘CPU-Core (SSE2)’: 425.6 PMKs/s (RTT 3.3)
How can I fix?
lspci -nn | grep VGA
01:00.0 VGA compatible controller [0300]: NVIDIA Corporation Device [10de:1187]
had me worried but even though it says that …. it works your tutorial is great thanks a million
pyrit benchmark
Pyrit 0.4.0 (C) 2008-2011 Lukas Lueg https://pyrit.googlecode.com
This code is distributed under the GNU General Public License v3+
Running benchmark (27322.1 PMKs/s)… –
Computed 27322.05 PMKs/s total.
#1: ‘CUDA-Device #1 ‘GeForce GTX 760”: 24507.5 PMKs/s (RTT 2.8)
#2: ‘CPU-Core (SSE2)’: 672.5 PMKs/s (RTT 3.0)
#3: ‘CPU-Core (SSE2)’: 674.9 PMKs/s (RTT 3.0)
#4: ‘CPU-Core (SSE2)’: 689.6 PMKs/s (RTT 2.9)
#5: ‘CPU-Core (SSE2)’: 685.9 PMKs/s (RTT 3.0)
#6: ‘CPU-Core (SSE2)’: 667.7 PMKs/s (RTT 3.0)
#7: ‘CPU-Core (SSE2)’: 685.9 PMKs/s (RTT 3.0)
#8: ‘CPU-Core (SSE2)’: 683.8 PMKs/s (RTT 3.0)
^^^
just wish i knew how to backup so if anything happens i can reinstall to this point where all is good plz help if anyone has link been searching for ways for few days
root@alien-sana:~# pyrit benchmark
Pyrit 0.4.0 (C) 2008-2011 Lukas Lueg https://pyrit.googlecode.com
This code is distributed under the GNU General Public License v3+
Running benchmark (82806.5 PMKs/s)… |
Computed 82806.46 PMKs/s total.
#1: ‘OpenCL-Device ‘GeForce GTX 690”: 43786.3 PMKs/s (RTT 2.9)
#2: ‘OpenCL-Device ‘GeForce GTX 690”: 43728.8 PMKs/s (RTT 2.8)
#3: ‘CPU-Core (SSE2)’: 722.6 PMKs/s (RTT 3.2)
#4: ‘CPU-Core (SSE2)’: 761.8 PMKs/s (RTT 2.8)
#5: ‘CPU-Core (SSE2)’: 735.8 PMKs/s (RTT 3.0)
#6: ‘CPU-Core (SSE2)’: 671.8 PMKs/s (RTT 3.0)
#7: ‘CPU-Core (SSE2)’: 670.6 PMKs/s (RTT 3.0)
#8: ‘CPU-Core (SSE2)’: 773.0 PMKs/s (RTT 3.0)
root@alien-sana:~# lspci -nn | grep VGA
04:00.0 VGA compatible controller [0300]: NVIDIA Corporation GK104 [GeForce GTX 690] [10de:1188] (rev a1)
root@alien-sana:~# uname -a
Linux alien-sana 4.0.0-kali1-amd64 #1 SMP Debian 4.0.4-1+kali2 (2015-06-03) x86_64 GNU/Linux
Thank you for the tutorial
kali:~# pyrit benchmark
Pyrit 0.4.0 (C) 2008-2011 Lukas Lueg https://pyrit.googlecode.com
This code is distributed under the GNU General Public License v3+
Running benchmark (10021.2 PMKs/s)… \
Computed 10021.22 PMKs/s total.
#1: ‘CUDA-Device #1 ‘GeForce GTX 460M”: 9427.3 PMKs/s (RTT 2.8)
#2: ‘CPU-Core (SSE2)’: 416.2 PMKs/s (RTT 2.9)
#3: ‘CPU-Core (SSE2)’: 415.4 PMKs/s (RTT 2.9)
#4: ‘CPU-Core (SSE2)’: 426.4 PMKs/s (RTT 3.0)
Any idea why I get the error when building it?
root@localhost:~/pyrit-0.4.0# python setup.py build
svn: E155007: ‘/root/pyrit-0.4.0’ is not a working copy
running build
running build_py
running build_ext
building ‘cpyrit._cpyrit_cpu’ extension
x86_64-linux-gnu-gcc -pthread -DNDEBUG -g -fwrapv -O2 -Wall -Wstrict-prototypes -fno-strict-aliasing -D_FORTIFY_SOURCE=2 -g -fstack-protector-strong -Wformat -Werror=format-security -fPIC -I/usr/include/python2.7 -c cpyrit/_cpyrit_cpu.c -o build/temp.linux-x86_64-2.7/cpyrit/_cpyrit_cpu.o -Wall -fno-strict-aliasing -DVERSION=”0.4.0″
cpyrit/_cpyrit_cpu.c:35:26: fatal error: openssl/hmac.h: No such file or directory
#include <openssl/hmac.h>
^
compilation terminated.
error: command ‘x86_64-linux-gnu-gcc’ failed with exit status 1
I also have the same error trying to build pyrit on Kali Linux 2.0 with kernel 4.0.0-kali1-amd64.
Same here
I am also having this issue!
I had the same issue.
This solves it:
apt-get install libssl-dev
apt-get install linux-headers-$(uname -r)
Thanks Cypone! It worked! 😀
root@kali:~# pyrit benchmark
Pyrit 0.4.0 (C) 2008-2011 Lukas Lueg https://pyrit.googlecode.com
This code is distributed under the GNU General Public License v3+
Running benchmark (84597.3 PMKs/s)… |
Computed 84597.32 PMKs/s total.
#1: ‘CUDA-Device #1 ‘GeForce GTX 970”: 87705.5 PMKs/s (RTT 1.4)
#2: ‘CPU-Core (SSE2)’: 999.4 PMKs/s (RTT 3.0)
#3: ‘CPU-Core (SSE2)’: 1032.8 PMKs/s (RTT 2.9)
#4: ‘CPU-Core (SSE2)’: 1018.6 PMKs/s (RTT 2.9)
i5 2400@3.6Ghz +GTX 970 results.
Thank you, this fixed my issue!
Hi Cypone,
Looks like others were having same issue and your fix worked for them as well. Thanks for sharing. Cheers,
-BMO
Running benchmark (3662.1 PMKs/s)… /
Computed 3662.13 PMKs/s total.
#1: ‘CUDA-Device #1 ‘NVS 4200M”: 2709.9 PMKs/s (RTT 2.8)
#2: ‘CPU-Core (SSE2)’: 433.7 PMKs/s (RTT 3.1)
#3: ‘CPU-Core (SSE2)’: 429.3 PMKs/s (RTT 3.3)
#4: ‘CPU-Core (SSE2)’: 468.4 PMKs/s (RTT 3.2)
First try! Also did this on my Macbook pro with your ati tutorial and ended very very well 🙂 First try for both! Hoping to get into the 10,000pmk range after hashcat! Thanks again Blackmoreops! You rock the kali world to the core!! These current benchmarks on my I7 Lenovo thinkpad t420s NVS4200 Nvidia laptop. !!! If anyone needs personal help feel free to ask me also, this site is a great help!
Here, try my maintained version and tell me what you think:
https://github.com/JPaulMora/Pyrit
thanks!
root@admin:~/cpyrit-cuda-0.4.0# pyrit list_cores
Pyrit 0.4.0 (C) 2008-2011 Lukas Lueg https://pyrit.googlecode.com
This code is distributed under the GNU General Public License v3+
The following cores seem available…
#1: ‘CUDA-Device #1 ‘GeForce GTX 760”
#2: ‘CPU-Core (SSE2)’
#3: ‘CPU-Core (SSE2)’
#4: ‘CPU-Core (SSE2)’
#5: ‘CPU-Core (SSE2)’
#6: ‘CPU-Core (SSE2)’
Thanks man, when building the python files for pyrit I was getting an error. Did a little research and ran this line:
apt-get install libssl-dev python-dev python-scapy
For me some reason I needed the python-scapy, after that it worked perfect. Hope this helps anyone who had my problem.
Very nice upgrade. I’ve added my nvidia quadro K600 display card’s processing power to an Intel XEON E-3 CPU in a Lenovo Thinkstation. I was at about 5300 PMKs/sec with just the 8 core CPU, but adding the GPU in has pushed it up to 8066 PMKs/sec so far in a brute-force test. I had python build errors, initially, and was then able to review comments at the pyrit website, where I discovered nvidia-toolkit and libssl-dev were missing prerequisites. Also, a tip- watch your “/” filesystem space. If you’re on a usb key like me, KALI may have undersized it. The NVIDIA components eat up space. I had to resize logical volumes and filesystems, so that install of libssl-dev could proceed.
Curious question… just began fiddling with the new “Sana” version of Kali 2.0 and am wondering which of the two to download from the Cuda Toolkit page… for Ubuntu 15.04 or 14.04? Sorry n00b question. I’m just not sure where “Sana” falls or how to find that out. Cheers!
help please, bit of a noob here, everything seemed to have installed ok but on checking the cores i get this
ure release.
Building modules…
building ‘cpyrit._cpyrit_cuda’ extension
creating build
creating build/temp.linux-x86_64-2.7
x86_64-linux-gnu-gcc -pthread -DNDEBUG -g -fwrapv -O2 -Wall -Wstrict-prototypes -fno-strict-aliasing -D_FORTIFY_SOURCE=2 -g -fstack-protector-strong -Wformat -Werror=format-security -fPIC -I/usr/include/python2.7 -c _cpyrit_cuda.c -o build/temp.linux-x86_64-2.7/_cpyrit_cuda.o -Wall -fno-strict-aliasing -DVERSION=”0.4.0″
creating build/lib.linux-x86_64-2.7
creating build/lib.linux-x86_64-2.7/cpyrit
x86_64-linux-gnu-gcc -pthread -shared -Wl,-O1 -Wl,-Bsymbolic-functions -Wl,-z,relro -fno-strict-aliasing -DNDEBUG -g -fwrapv -O2 -Wall -Wstrict-prototypes -D_FORTIFY_SOURCE=2 -g -fstack-protector-strong -Wformat -Werror=format-security -Wl,-z,relro -D_FORTIFY_SOURCE=2 -g -fstack-protector-strong -Wformat -Werror=format-security build/temp.linux-x86_64-2.7/_cpyrit_cuda.o -lcrypto -lcuda -lz -o build/lib.linux-x86_64-2.7/cpyrit/_cpyrit_cuda.so
root@kali:~/cpyrit-cuda-0.4.0# sudo python setup.py install
The CUDA compiler and headers required to build kernel were not found. Trying to continue anyway…
svn: E155007: ‘/root/cpyrit-cuda-0.4.0’ is not a working copy
running install
running build
running build_ext
Skipping rebuild of Nvidia CUDA kernel …
Building modules…
running install_lib
copying build/lib.linux-x86_64-2.7/cpyrit/_cpyrit_cuda.so -> /usr/local/lib/python2.7/dist-packages/cpyrit
running install_egg_info
Removing /usr/local/lib/python2.7/dist-packages/cpyrit_cuda-0.4.0.egg-info
Writing /usr/local/lib/python2.7/dist-packages/cpyrit_cuda-0.4.0.egg-info
root@kali:~/cpyrit-cuda-0.4.0# pyrit list_cores
bash: pyrit: command not found
root@kali:~/cpyrit-cuda-0.4.0#
Hi you all,
here’s my result for 9800 gtx+ (standard oc version)
Pyrit 0.4.0 (C) 2008-2011 Lukas Lueg https://pyrit.googlecode.com
This code is distributed under the GNU General Public License v3+
Running benchmark (4056.5 PMKs/s)… /
Computed 4056.53 PMKs/s total.
#1: ‘CUDA-Device #1 ‘GeForce 9800 GTX+”: 1869.8 PMKs/s (RTT 2.8)
#2: ‘CPU-Core (SSE2)’: 798.9 PMKs/s (RTT 3.0)
#3: ‘CPU-Core (SSE2)’: 801.1 PMKs/s (RTT 3.0)
#4: ‘CPU-Core (SSE2)’: 799.9 PMKs/s (RTT 3.0)
If you have to change the graphic card nvidia => nvidia
you have nothing to do except changing drivers version if needed.
Thanks for this tutorial.
Running benchmark (9318.3 PMKs/s)…
Computed 9318.25 PMKs/s total.
#1: ‘CUDA-Device #1 ‘Quadro K3000M”: 6825.1 PMKs/s (RTT 2.8)
#2: ‘CPU-Core (SSE2)’: 468.8 PMKs/s (RTT 3.1)
#3: ‘CPU-Core (SSE2)’: 457.9 PMKs/s (RTT 3.1)
#4: ‘CPU-Core (SSE2)’: 442.5 PMKs/s (RTT 3.2)
#5: ‘CPU-Core (SSE2)’: 451.1 PMKs/s (RTT 3.2)
#6: ‘CPU-Core (SSE2)’: 472.6 PMKs/s (RTT 3.1)
#7: ‘CPU-Core (SSE2)’: 457.0 PMKs/s (RTT 3.0)
#8: ‘CPU-Core (SSE2)’: 458.1 PMKs/s (RTT 3.2)
which GPU are you using?
Hi, thanks for the tutorial.. Worked perfectly.
Here is my benchmark
root@M0nst3r:~/cpyrit-cuda-0.4.0# pyrit benchmark
Pyrit 0.4.0 (C) 2008-2011 Lukas Lueg https://pyrit.googlecode.com
This code is distributed under the GNU General Public License v3+
Running benchmark (7862.9 PMKs/s)… /
Computed 7862.87 PMKs/s total.
#1: ‘CUDA-Device #1 ‘Quadro 600”: 5930.2 PMKs/s (RTT 2.8)
#2: ‘CPU-Core (SSE2)’: 394.2 PMKs/s (RTT 2.9)
#3: ‘CPU-Core (SSE2)’: 396.0 PMKs/s (RTT 2.9)
#4: ‘CPU-Core (SSE2)’: 389.3 PMKs/s (RTT 3.1)
#5: ‘CPU-Core (SSE2)’: 400.1 PMKs/s (RTT 3.1)
#6: ‘CPU-Core (SSE2)’: 410.6 PMKs/s (RTT 3.0)
#7: ‘CPU-Core (SSE2)’: 377.2 PMKs/s (RTT 3.0)
#8: ‘CPU-Core (SSE2)’: 404.7 PMKs/s (RTT 2.9)
Cheers
which GPU are you using ? I have GTX 970 but ur benchmark is alot higher than me… am I running with problems?
mine 5092.4 PMKs/s
For most recent information you have to go to see the web and on world-wide-web
I found this site as a best website for newest updates.
I installed pyrit and cpyrit this link: https://github.com/JPaulMora/Pyrit
But CUDA device don’t show up.
Any help?
Thank’s
root@kali:~# pyrit list_cores
Pyrit 0.5.1 (C) 2008-2011 Lukas Lueg – 2015 John Mora
https://github.com/JPaulMora/Pyrit
This code is distributed under the GNU General Public License v3+
The following cores seem available…
#1: ‘CPU-Core (SSE2/AES)’
#2: ‘CPU-Core (SSE2/AES)’
#3: ‘CPU-Core (SSE2/AES)’
#4: ‘CPU-Core (SSE2/AES)’
#5: ‘CPU-Core (SSE2/AES)’
#6: ‘CPU-Core (SSE2/AES)’
#7: ‘CPU-Core (SSE2/AES)’
#8: ‘CPU-Core (SSE2/AES)’
For all those who were getting errors installing pyit on latest Kali 2016 release
here is the fix
no doubt it is an amazing tutorial and thanks for posting such tutorials but one or more commands seems to be not working with latest version of Kali
like
step 3..a
apt-get install python2.7-dev python2.7-libpcap libpcap-dev
if you give this command you will get an error
root@emrys:/home/merlin# apt-get install python2.7-libpcap
Reading package lists… Done
Building dependency tree
Reading state information… Done
E: Unable to locate package python2.7-libpcap
E: Couldn’t find any package by glob ‘python2.7-libpcap’
E: Couldn’t find any package by regex ‘python2.7-libpcap’
……………….
so if you skip installing it you will get an error later when building pyrit
root@emrys:~/pyrit-0.4.0# python setup.py build
svn: E155007: ‘/root/pyrit-0.4.0’ is not a working copy
running build
running build_py
creating build
creating build/lib.linux-x86_64-2.7
copying pyrit_cli.py -> build/lib.linux-x86_64-2.7
creating build/lib.linux-x86_64-2.7/cpyrit
copying cpyrit/__init__.py -> build/lib.linux-x86_64-2.7/cpyrit
copying cpyrit/cpyrit.py -> build/lib.linux-x86_64-2.7/cpyrit
copying cpyrit/util.py -> build/lib.linux-x86_64-2.7/cpyrit
copying cpyrit/pckttools.py -> build/lib.linux-x86_64-2.7/cpyrit
copying cpyrit/config.py -> build/lib.linux-x86_64-2.7/cpyrit
copying cpyrit/network.py -> build/lib.linux-x86_64-2.7/cpyrit
copying cpyrit/storage.py -> build/lib.linux-x86_64-2.7/cpyrit
running build_ext
building ‘cpyrit._cpyrit_cpu’ extension
creating build/temp.linux-x86_64-2.7
creating build/temp.linux-x86_64-2.7/cpyrit
x86_64-linux-gnu-gcc -pthread -DNDEBUG -g -fwrapv -O2 -Wall -Wstrict-prototypes -fno-strict-aliasing -Wdate-time -D_FORTIFY_SOURCE=2 -g -fdebug-prefix-map=/build/python2.7-EkQe1J/python2.7-2.7.12=. -fstack-protector-strong -Wformat -Werror=format-security -fPIC -I/usr/include/python2.7 -c cpyrit/_cpyrit_cpu.c -o build/temp.linux-x86_64-2.7/cpyrit/_cpyrit_cpu.o -Wall -fno-strict-aliasing -DVERSION=”0.4.0″
cpyrit/_cpyrit_cpu.c:35:26: fatal error: openssl/hmac.h: No such file or directory
#include
^
compilation terminated.
error: command ‘x86_64-linux-gnu-gcc’ failed with exit status 1
so these errors wont let you go forward.
……………………………………….
after searching for few minutes I found a solution and it worked too well
here is the fix
you just have to install these packages instead of the old python packages which gave errors earlier
apt-get install python2.7-dev libssl-dev zlib1g-dev libpcap-dev
it will install required packages and after that
go back to pyrit directory i.e cd /pyrit-0.4.0
now give the command aand it will be working
root@emrys:~/pyrit-0.4.0# python setup.py build
svn: E155007: ‘/root/pyrit-0.4.0’ is not a working copy
running build
running build_py
running build_ext
building ‘cpyrit._cpyrit_cpu’ extension
x86_64-linux-gnu-gcc -pthread -DNDEBUG -g -fwrapv -O2 -Wall -Wstrict-prototypes -fno-strict-aliasing -Wdate-time -D_FORTIFY_SOURCE=2 -g -fdebug-prefix-map=/build/python2.7-EkQe1J/python2.7-2.7.12=. -fstack-protector-strong -Wformat -Werror=format-security -fPIC -I/usr/include/python2.7 -c cpyrit/_cpyrit_cpu.c -o build/temp.linux-x86_64-2.7/cpyrit/_cpyrit_cpu.o -Wall -fno-strict-aliasing -DVERSION=”0.4.0″
x86_64-linux-gnu-gcc -pthread -DNDEBUG -g -fwrapv -O2 -Wall -Wstrict-prototypes -fno-strict-aliasing -Wdate-time -D_FORTIFY_SOURCE=2 -g -fdebug-prefix-map=/build/python2.7-EkQe1J/python2.7-2.7.12=. -fstack-protector-strong -Wformat -Werror=format-security -fPIC -I/usr/include/python2.7 -c cpyrit/_cpyrit_cpu_sse2.S -o build/temp.linux-x86_64-2.7/cpyrit/_cpyrit_cpu_sse2.o -Wall -fno-strict-aliasing -DVERSION=”0.4.0″
x86_64-linux-gnu-gcc -pthread -shared -Wl,-O1 -Wl,-Bsymbolic-functions -Wl,-z,relro -fno-strict-aliasing -DNDEBUG -g -fwrapv -O2 -Wall -Wstrict-prototypes -Wdate-time -D_FORTIFY_SOURCE=2 -g -fdebug-prefix-map=/build/python2.7-EkQe1J/python2.7-2.7.12=. -fstack-protector-strong -Wformat -Werror=format-security -Wl,-z,relro -Wdate-time -D_FORTIFY_SOURCE=2 -g -fdebug-prefix-map=/build/python2.7-EkQe1J/python2.7-2.7.12=. -fstack-protector-strong -Wformat -Werror=format-security build/temp.linux-x86_64-2.7/cpyrit/_cpyrit_cpu.o build/temp.linux-x86_64-2.7/cpyrit/_cpyrit_cpu_sse2.o -lcrypto -lpcap -o build/lib.linux-x86_64-2.7/cpyrit/_cpyrit_cpu.so
running build_scripts
creating build/scripts-2.7
copying and adjusting pyrit -> build/scripts-2.7
changing mode of build/scripts-2.7/pyrit from 644 to 755
root@emrys:~/pyrit-0.4.0#
I hope this helps 🙂
Im running with Nvidia GTX 970 and Intel i7 4770K 16GB DDR3
the benchmark on my system is giving this result
root@emrys:~# pyrit list_cores
Pyrit 0.4.0 (C) 2008-2011 Lukas Lueg https://pyrit.googlecode.com
This code is distributed under the GNU General Public License v3+
The following cores seem available…
#1: ‘CPU-Core (SSE2)’
#2: ‘CPU-Core (SSE2)’
#3: ‘CPU-Core (SSE2)’
#4: ‘CPU-Core (SSE2)’
#5: ‘CPU-Core (SSE2)’
#6: ‘CPU-Core (SSE2)’
#7: ‘CPU-Core (SSE2)’
#8: ‘CPU-Core (SSE2)’
root@emrys:~# pyrit benchmark
Pyrit 0.4.0 (C) 2008-2011 Lukas Lueg https://pyrit.googlecode.com
This code is distributed under the GNU General Public License v3+
Running benchmark (5092.4 PMKs/s)… |
Computed 5092.38 PMKs/s total.
#1: ‘CPU-Core (SSE2)’: 654.2 PMKs/s (RTT 3.0)
#2: ‘CPU-Core (SSE2)’: 661.5 PMKs/s (RTT 3.0)
#3: ‘CPU-Core (SSE2)’: 657.0 PMKs/s (RTT 3.0)
#4: ‘CPU-Core (SSE2)’: 653.0 PMKs/s (RTT 3.0)
#5: ‘CPU-Core (SSE2)’: 659.7 PMKs/s (RTT 3.0)
#6: ‘CPU-Core (SSE2)’: 662.1 PMKs/s (RTT 2.9)
#7: ‘CPU-Core (SSE2)’: 662.3 PMKs/s (RTT 3.0)
#8: ‘CPU-Core (SSE2)’: 663.4 PMKs/s (RTT 3.0)
root@emrys:~#
Isnt it slow ? I mean a card like GTX 970 which was launched last year , it only gives 5092.4 PMKs/s , which should be alot higher than this..
while panda br and monster in earlier comments have higher benchmark than me…. can somone please explain it to me ?
It’s not picking up CUDA, so only CPU core’s are used.
Hey,
Thanks so much fro this post! I’m so glad to see that there is a tutorial available for the installation process! I find these programs very helpful with organizing business data.
Best,
Dennis