It seems there’s lots of confusion on what is the correct way to install VirtualBox guest additions packages on Kali Linux. Unfortunately, there’s only one way to do it! So if you’re not following the steps below, you won’t be able to use Kali Linux is full screen properly (seamless windows) and shared clipboard or drag n’drop will not work. I’ve actually posted this in a separate post with detailed step by step instructions showing how to install Kali Linux on VirtualBox. But even on that post, I’ve seen many users getting confused and it seems creating a separate post about correct way to install VirtualBox Guest additions packages on Kali Linux is the way to go.
This post will fix or resolve the following issues:
- Can’t make Kali Linux run in full screen on VirtualBox
- Can’t enable shared folder on Kali Linux running on VirtualBox.
- Shared clipboard not working on Kali Linux on VirtualBox.
- Kali Linux on VirtualBox is slow and not responding. It freezes!
- Mouse integration is not working on Kali Linux on VirtualBox.
- Kali Linux on VirtualBox doesn’t detect your display resolution properly.
While we are at it, I will also include the instructions on how to create a shared folder so that you can copy paste contents between your host and guest operating system.
Table of Contents
Correct way to install VirtualBox Guest Additions packages on Kali Linux
I guess the most annoying issue in a VirtualBox is when you are not able to make it fullscreen and even if you’re able to, it just wont play nicely. Following are the exact steps you need to follow to install VirtualBox guest additions packages on Kali Linux and fix these issue.
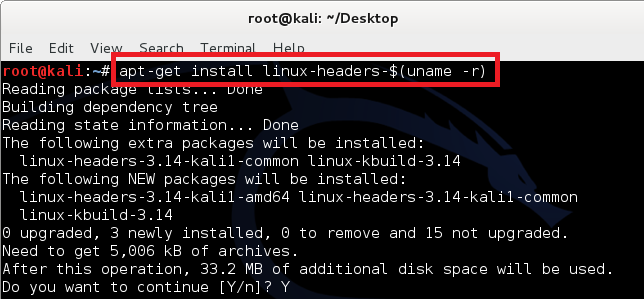
Step 1: Install dependencies
One thing to note is that you need to have the correct repositories added before any of these would work. Once you’ve added the correct and official repositories, just update your package manager.
apt-get update
apt-get upgrade -y
apt-get dist-upgrade -y
Update 24/04/2015: As Violatedsmurf pointed out in the comments section, it’s better off doing update, upgrade and dist-upgrade before installing headers. It’s because if you’ve installed an older Kali Linux version, correct Linux headers might not be available in the repo anymore.
Install all the dependencies by running the following command:
apt-get install linux-headers-$(uname -r) -y
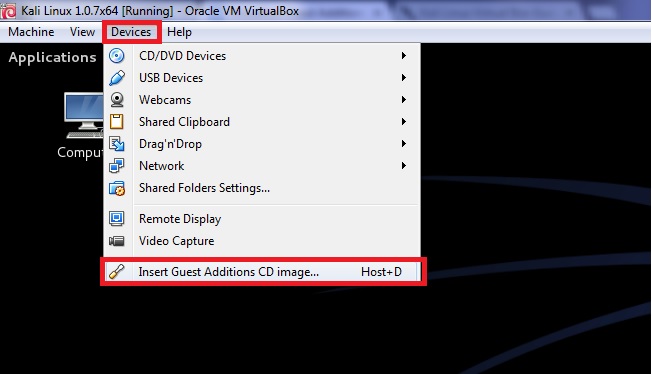
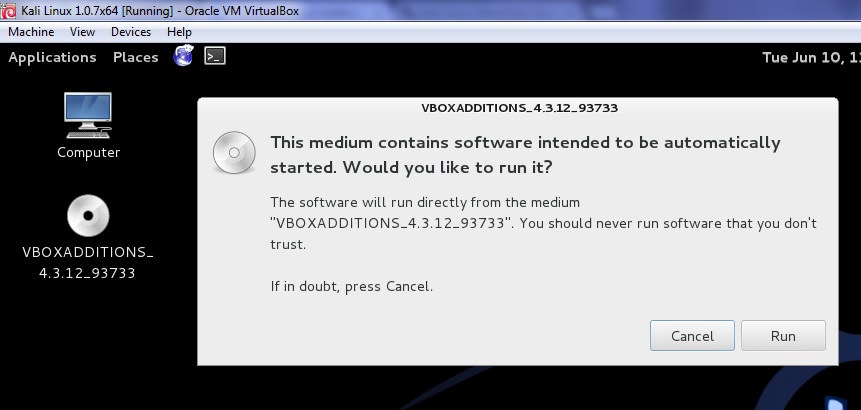
Step 2: Mount VirtualBox Guest Additions drive
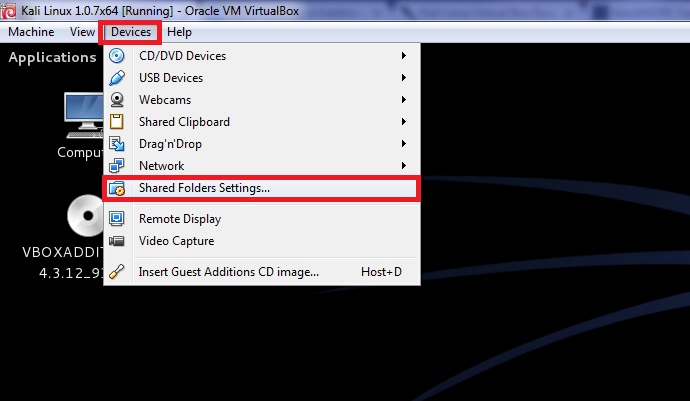
From device menu on your VirtualBox, click on Install VirtualBox guest additions option (while you’re running Kali Linux) and you’ll see a CD/DVD drive is mounted.
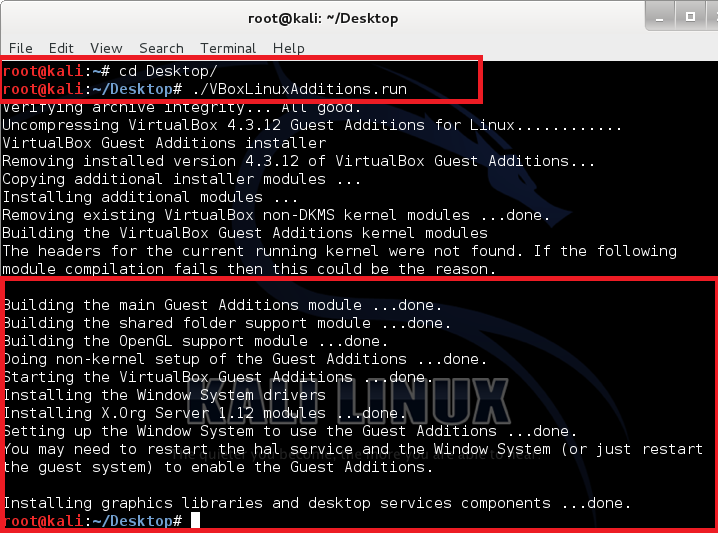
Step 3: Copy and install the package
Copy the VBoxLinuxAdditions.run file from the drive to the root directory using following command
cp /media/cdrom/VBoxLinuxAdditions.run /root/Desktop/
cd /root/Desktop/
Make it executable:
chmod 755 /root/VBoxLinuxAdditions.run
Install it:
./VBoxLinuxAdditions.run
Once you’ve installed VirtualBox Guest Additions package, reboot Kali Linux.
reboot
In the screenshot above, note all the …done. messages. When you see these, you know it was a successful installation.
Now you will have Kali Linux running on full screen on your VirtualBox.
Creating Shared Folders with the Host System
In order to share folders on your host system with your Kali Linux VirtualBox, there are a few short steps that needs to be completed.
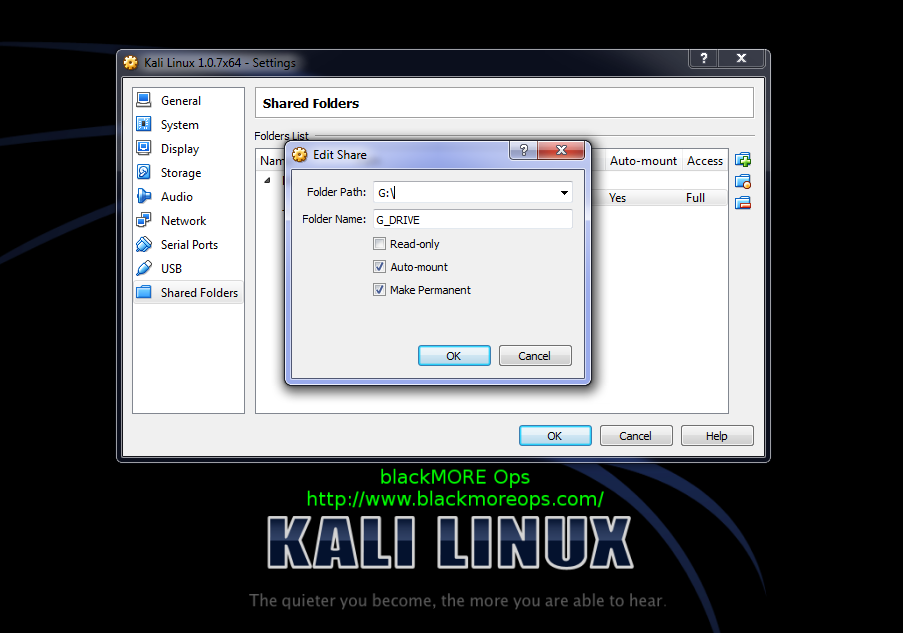
Step 4: Add a folder/drive to Shared Folder Settings
From the VirtualBox Manager, select your Kali Linux VirtualBox instance and click on the ‘Shared Folders Settings’ link in the right window pane. This will launch a pop up window for adding shared folders. Within this window click the icon to add a folder.
Step 5: Auto-mount and Make permanent your shared folder
In the Folder Path text box, provide the path to the folder you would like to share, or click the drop-down arrow to browse your host system for the path. Select the check boxes that allow for ‘Auto-mount’ and ‘Make Permanent’ and click the OK button both times when prompted.
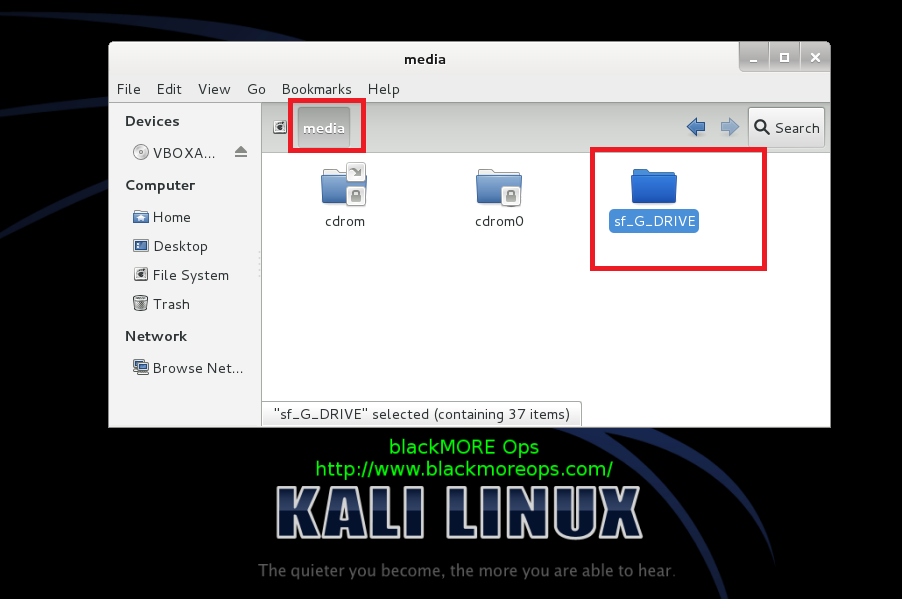
Your shared folders will now be available in the media directory. You can create a bookmark or link for easier access to the directory.
Conclusion
Thanks for reading. If you’ve found it useful, please share. Comment if you need help or discuss options.
83 comments
Hi there i gets a problem “Building the main Geust Additions module….fail” and it said ” check out /var/log/Vboxadd-install.log to find where it went wrong” please help me
Do aless /var/log/Vboxadd-install.log to see what was in that log file. I am assuming it is an issue with your repositories and you didn’t manage to install the headers properly. Either way, that log file will tell what went wrong.
I used your own repository …. I opend the file with leafpad nd it said “”””
/tmp/vbox.0/Makefile.include.header:97: *** Error: unable to find the sources of your current Linux kernel. Specify KERN_DIR= and run Make again. Stop.
Creating user for the Guest Additions.
Creating udev rule for the Guest Additions kernel module.
/tmp/vbox.0/Makefile.include.header:97: *** Error: unable to find the sources of your current Linux kernel. Specify KERN_DIR= and run Make again. Stop.
Creating user for the Guest Additions.
Creating udev rule for the Guest Additions kernel module.”””””
please help
ok i’ve just solved thnx any awya ;)
How did you resolve the issue? …
i have the same issue with you so tell me exactly what you did to resolve yours please, i am newbie so consider telling me theasy way i can understand
I have exactly the same text in my log file…
Awesome! I had built a custom ISO in Kali and could not get it out of the VM to transfer it to a USB and the USB was not being seen. I will do it this way tonight.
Thanks for that mate. Good instructions. Just wanted to let you know you’ve got a type on the apt-get install linux-header…textbox…
It should read apt-get install linux-headers-$(uname -r) -y. Currently, you’ve left the ‘s’ out of ‘headers’. Fortunately, your screenshot is right though, so it’s not rocket science to figure out what’s going wrong. :)
I have not heard back from Esseed Deese on what was done to solve the issue of:
Quote from above *******
/tmp/vbox.0/Makefile.include.header:97: *** Error: unable to find the sources of your current Linux kernel. Specify KERN_DIR= and run Make again. Stop.
Creating user for the Guest Additions.
Creating udev rule for the Guest Additions kernel module.
/tmp/vbox.0/Makefile.include.header:97: *** Error: unable to find the sources of your current Linux kernel. Specify KERN_DIR= and run Make again. Stop.
Creating user for the Guest Additions.
Creating udev rule for the Guest Additions kernel module.”””””
End-quote *******
I did follow every step exactly — at least I am pretty sure I did (multiple times) and still got the same error. Esseed Deese said that he/she fixed it but never said how…
Could someone please jump in and tell me what to do….
Thank you in advance
Hi Roger. Have you tried following the steps listed here? – http://www.blackmoreops.com/2013/10/30/add-official-kali-linux-repositories/
No I haven’t. I had to move on to another project. But, I will be returning to this one very soon.
Thank you so much for your suggestion. I will definitely be posting my results back here when I get to this next week.
My current project is turning a MacBook Pro 5.5 (mid. 2009) into a stand alone Kali workstation. It’s quite a project to work around the Mac’s EFI deviations. :)
I am restarting this project today. I will be back here with the results in about an hour (or so)…
Ok. Got Virtual Additions installed! Woohoo!
It did give me a warning during the .run execution, stating that it did not have the headers for the current kernel (I tried it with 1.0.8) however, it still installed correctly.
I don’t know if this makes a difference, but I created the shared folder while the machine was running. It did indeed create the folder etc., however when I go to access it I get an error stating that I do not have permission to view it.
I tried to remedy the situation by going to /media and doing a chmod -R 775 on the shared folder — did not work. I will undo the share from within the running vm, shutdown and create it from the VM Control Panel and see if that works…
Nope. I created a new shared folder in the VM Control Panel with a different name, made it auto-mount, permanent, and verified that under access it says ‘full’. I then booted into Kali and I can see the folder under /media/sf_kalishare
Note: When I installed, I kept the root passwords blank and created a user with a pw. I use sudo -i to get to root when I need to. VBoxLinuxAdditions.run was copied to ~/Desktop and run from there without error.
That shouldn’t cause me any access permissions should it?
The share is on an NTFS volume (an external 3TB USB drive)… Would the fact that the share is NTFS make a difference?
Duh! I forgot to add myself to the vboxsf group!!
sudo usermod -aG vboxsf $(whoami)
Oh well.
Anyway, thank you all very much for all of your time and effort in getting this out to everyone.
It works great if you do it right! lol :)
Maybe a line added to the text in the instructions above will help others who forget the same thing…
RoadRunner
San Antonio, TX
That’s a nice find. I always use Linux as root, so I never had similar issues. Thanks for posting back with a solution. I’m sure many will find it useful (specially those who read the comments section ;) )
“apt-get install linux-header-$(uname -r) -y”
It’s apt-get install linux-headers-$(uname -r) -y
You’re right. This is the second time I’ve seen wordpress stripping ‘s’ from a command. I’ll fix it up. Thanks.
holy crap thank you blackMore
Hi, since you moved it to Desktop, it should be:
chmod 755 /root/Desktop/VBoxLinuxAdditions.run
Thanks for the howto!
Very good job both this tutorial and the kali linux installation i think the ones who can’t make it with this here better don’t bother anymore working with such things…
Any thougths about how to boot an OS inside Virtualbox from a Live USB? Appears to me VB only accepts CD Live! am I wrong!
I installed guest additions along these lines: opened CD to see files. Drag and dropped the VBoxLinuxAdditions.run file to my desktop. Right clicked and went to properties. Went to permissions and checkboxed “executable” closed and double clicked. Then at dialog box chose “run in terminal”
It think u made a typing error >:
chmod 755 /root/VBoxLinuxAdditions.run
Instead of
chmod 755 /root/Desktop/VBoxLinuxAdditions.run
Anyway … Great tutorial
I have problem when I type : apt-get install linux-headers-$(uname -r) -y
It send me this :
Reading package lists . . . Done
Building dependency tree
Reading state information. . . Done
E: Unable to locate package linux-headers-3-kali -686-pae
E: Couldn’t fin any package by regex ‘linux-headers-3.14-kali -686 -pae’
Please help…I’m so close to finish :)
Hey Koma, i got the same problem i dont know what to do whit this issue.
you need to update your repos and do a dist-upgrade to fix that issue
me too have you found a solution?
Your tut saved another kitten! Thanks a mil.
shouldn’t “chmod 755 /root/VBoxLinuxAdditions.run” be “chmod 755 /root/Desktop/VBoxLinuxAdditions.run” ?
Minor typo/omission in step 3: VBox additions… is copied to /root/Desktop but make executable step is run from just /root/. I had to cd to /root/Desktop to get it to work.
When I run “./VBoxLinuxAdditions.run” to install it I got this:
Verifying archive integrity…Error in MD5 checksums: be6522289234d3480cd7f69763f66cf0 is different from 01104cd81fe49c455a21840044a9f8bd
Please help me
I have the same problem also and I don’t know what to do.
You need to mount the iso like this (not with the magic “Mount archive”):
mount -o loop VBoxGuestAdditions.iso myFolder
Thanks for the dist-upgrade tip.
P.S. The copy and chmod is unnecessary. Just run it with bash:
bash /pathtoinstaller.run
-Tres
I know this post is almost a year old, but great work. This should be added to the “20 things to do after installing” post, as number 1. This makes virtualbox much easier to work with. It is not as straightforward as VMware player. Thanks!
worked perfectly on mid 2009 macbook pro running virtualbox and the latest kali iso. That said, after install and run, there is the cd on the desktop and run file on the desktop as well. I ejected the cd and deleted the file on the desktop (because I’m ocd and like a clean desktop.) After doing so and rebooting, the system when back to crappy resolution. I reinstalled and everything is now good to go again. My question is, do I need to keep the cd and run file on the desktop?
Hey
You have a nice website. Your contents are extremely easy to read. I have a quick question.
I am using BootCamp on top of Macintosh. I have partitioned it 50/50. However, now I am running out of space on my BootCamp. The main reason is I am running virtual box there. And the virtual box has tons of materials that I just can not delete at the moment. What is the way to retrieve space from Macintosh space and give it to BootCamp?
Hi, i did all the steps and i did have the ability to change resolution but ican’t copy and paste. help me please
my shared folder still unavailable on media. What shoul I do?
Hey seems here i got error with upgrading. anyone can help?
hello everyone. i had a problem, i use “apt-get install linux-headers-$(uname -r) -y” and the result is :
Reading package lists… Done
Building dependency tree
Reading state information… Done
E: Unable to locate package linux-headers-4.0.0-kali1-686-pae
E: Couldn’t find any package by regex ‘linux-headers-4.0.0-kali1-686-pae’
and i cant insert a guest additions cd image in my guest machine virtual box.
How can i fix it now?
Thanks everyone
Its a really Good tutorial, But have some issues.
First helping “HIUE”
This error: E: Unable to locate package linux-headers-4.0.0-kali1-686-pae
Can be fixed easy, you just need to open this file ! ” /etc/apt/sources.list”
and paste this:
#Regular repositories
deb http://http.kali.org/kali sana main non-free contrib
deb http://security.kali.org/kali-security sana/updates main contrib non-free
#Source repositories
deb-src http://http.kali.org/kali sana main non-free contrib
deb-src http://security.kali.org/kali-security sana/updates main contrib non-free
and write
apt-get clear
apt-get update
apt-get upgrade
apt-get dist-upgrade
after this just follow the tutorial below.
But this directory is wrong : chmod 755 /root/VBoxLinuxAdditions.run
the correct is : chmod 755 /root/Desktop/VBoxLinuxAdditions.run
Hope its help (: i spend some hours doing it …
thanksReally helped I was doing this for a project where I was making a hacked version of pokemon go where you can make poke stops for everyone, walk across the map with arrow keys, and summon pokemon for your friends to catch by the click of a button. When done I will give download link works on all OS’s took me 1 year!!! And counting so im proud to be this close to finishing.
When I typed in chmod 755 /root/VBoxLinuxAdditions.run I was given the error: chmod: cannot acces ‘/root/VBoxLinuxAdditions.run’: No such file or directory
However, upon using the command chmod 775 /root/Desktop/VBoxLinuxAdditions.run I was able to proceed as described. Which makes sense since the directory is set as /root/Desktop/ in the previous step, thus omitting /Desktop/ from the path attempts to execute from an incomplete path.
Maybe update the steps presented so other users don’t encounter the same error.
oops, that should say chmod 755 /root/DesktopVBoxLinuxAdditions.run
775 was a typo
God Dammit!
chmod 755 /root/Desktop/VBoxLinuxAdditions.run
Now you know how I feel writing these guides. Welcome to the club!
http://magicofubuntu.blogspot.in/2015/10/guest-additions-problem-in-virtualbox.html
Hi
I am running a Debian 8 x64 (fully updated) host machine.
I have two guests running…
Kali 2.0 x86 (fully updated)
Debian 8 x86 (fully updated)
All I had to do was install the “virtualbox-guest-dkms” packages in both guests, and voila! Everything worked…, Full Screen mode, Shared folders… and so and so on!!
Thought I might just share the knowledge :)
P.S. I am very new to Debian, Just migrated last week after 8 years of openSUSE. So feel free to correct me if you think I missed something.
Sorry,
Made a mistake :-P
The package is ‘virtualbox-guest-utils’ NOT ‘virtualbox-guest-dkms’
my kali is version 1.1.0
error when i type apt-get install linux-headers-$(uname -r)
E: Unable to locate package linux-headers-3-kali -686-pae
E: Couldn’t fin any package by regex ‘linux-headers-3.14-kali -686 -pae’
i tried apt-get dist-upgrade -y but didn’t work ;( plz halp
Thanks for the tutorial! Worked perfectly…. no problems at all!
So I did everything here but for some reason whenever I run Kali without the Guess additions iso in the virtual drive it takes me to the emergency mode terminal. Only way to get to Kali is to always have the iso in the drive.
2016…Works like a Charm. Kali 2016.1 works well with this.
how to prevent virtual box from sleeping or stopping. When I work on some other things online, I come back to vb and I have to resign in and the updates stop working.
Same problem…
Thank you!!
When I try “apt-get upgrade -y”
It takes a really long time (like 2 or 3 hours) and it stop working, when it get back, send me this message “Error: Timeout was reached.”
I ignore this and continue the updates. I type “apt-get dist-upgrade -y” it goes okay, but when I try “apt-get install linux-headers-$(uname -r) -y” it shows me the message “Unable to locate package […]”. Just like I didn’t upgrade…
(Sorry my bad english).
I think you’re running old version of Kali. Did you had this error with Kali 2016.2?
Yes, blackMORE Ops, Kali 2016.2.
I got it. But when I reboot it doesn’t start. When I select Linux 4.6.0 it does start, but without the upgrades. When I try 4.7.0 it does not.
I don’t know if I am describing my problem properly… English is not so easy for me :P.
But thank you anyway, I’ll try again later.
Can you double-check your
sources.listfile with this guide i.e. Kali rolling repositories.Restart after your do an upgrade/dist-upgrade so that you are in the new Kernel. Good luck,
-BMO
Thank you, I got it on another laptop.
root@kali:~# apt-get install linux-headers-$(uname -r) -y
Reading package lists… Done
Building dependency tree
Reading state information… Done
E: Unable to locate package linux-headers-4.6.0-kali1-amd64
E: Couldn’t find any package by glob ‘linux-headers-4.6.0-kali1-amd64’
E: Couldn’t find any package by regex ‘linux-headers-4.6.0-kali1-amd64’
root@kali:~#
hi
@blackmoreops .i followed your tut .everything installed i am using kali rolling .but i dont know why my shared drive is not shown in media folder. ..need your help .best regards
Building the main gues addition module…… Fail!
What should I do?
I checked the log but it’s so confusing
I hit this when I attempt to run the install of linux-headers:
E: Unable to locate package linux-headers-4.7.0-kali1-amd64
E: Couldn’t find any package by glob ‘linux-headers-4.7.0-kali1-amd64’
E: Couldn’t find any package by regex ‘linux-headers-4.7.0-kali1-amd64’
my environment
———-
root@kali:~# cat /etc/*{release,version}
DISTRIB_ID=Kali
DISTRIB_RELEASE=kali-rolling
DISTRIB_CODENAME=kali-rolling
DISTRIB_DESCRIPTION=”Kali GNU/Linux Rolling”
PRETTY_NAME=”Kali GNU/Linux Rolling”
NAME=”Kali GNU/Linux”
ID=kali
VERSION=”2016.2″
VERSION_ID=”2016.2″
ID_LIKE=debian
ANSI_COLOR=”1;31″
HOME_URL=”http://www.kali.org/”
SUPPORT_URL=”http://forums.kali.org/”
BUG_REPORT_URL=”http://bugs.kali.org/”
Kali Linux Rolling
root@kali:~# uname -a
Linux kali 4.7.0-kali1-amd64 #1 SMP Debian 4.7.6-1kali1 (2016-10-17) x86_64 GNU/Linux
sources.list
———-
deb http://http.kali.org/kali kali-rolling main non-free contrib
==> deb-src http://http.kali.org/kali kali-rolling main non-free contrib
uncommented the above deb-src line and saved.
root@kali:~# sudo apt-get update
root@kali:~# sudo apt-get upgrade -y
root@kali:~# sudo apt-get dist-upgrade -y
I tee’d the output of the 3 previous commands and searched them for errors/failures – no hits..
root@kali:~# sudo apt-get install linux-headers-$(uname -r)
Reading package lists… Done
Building dependency tree
Reading state information… Done
E: Unable to locate package linux-headers-4.7.0-kali1-amd64
E: Couldn’t find any package by glob ‘linux-headers-4.7.0-kali1-amd64’
E: Couldn’t find any package by regex ‘linux-headers-4.7.0-kali1-amd64’
———-
root@kali:~# apt-cache search linux-headers-
aufs-dkms – DKMS files to build and install aufs
linux-headers-4.8.0-kali1-all – All header files for Linux 4.8 (meta-package)
linux-headers-4.8.0-kali1-all-amd64 – All header files for Linux 4.8 (meta-package)
linux-headers-4.8.0-kali1-amd64 – Header files for Linux 4.8.0-kali1-amd64
linux-headers-4.8.0-kali1-common – Common header files for Linux 4.8.0-kali1
linux-headers-4.8.0-kali1-common-rt – Common header files for Linux 4.8.0-kali1-rt
linux-headers-4.8.0-kali1-rt-amd64 – Header files for Linux 4.8.0-kali1-rt-amd64
linux-headers-amd64 – Header files for Linux amd64 configuration (meta-package)
linux-headers-rt-amd64 – Header files for Linux rt-amd64 configuration (meta-package)
linux-libc-dev-alpha-cross – Linux Kernel Headers for development (for cross-compiling)
linux-libc-dev-arm64-cross – Linux Kernel Headers for development (for cross-compiling)
linux-libc-dev-armel-cross – Linux Kernel Headers for development (for cross-compiling)
linux-libc-dev-armhf-cross – Linux Kernel Headers for development (for cross-compiling)
linux-libc-dev-hppa-cross – Linux Kernel Headers for development (for cross-compiling)
linux-libc-dev-m68k-cross – Linux Kernel Headers for development (for cross-compiling)
linux-libc-dev-mips-cross – Linux Kernel Headers for development (for cross-compiling)
linux-libc-dev-mips64-cross – Linux Kernel Headers for development (for cross-compiling)
linux-libc-dev-mips64el-cross – Linux Kernel Headers for development (for cross-compiling)
linux-libc-dev-mipsel-cross – Linux Kernel Headers for development (for cross-compiling)
linux-libc-dev-powerpc-cross – Linux Kernel Headers for development (for cross-compiling)
linux-libc-dev-powerpcspe-cross – Linux Kernel Headers for development (for cross-compiling)
linux-libc-dev-ppc64-cross – Linux Kernel Headers for development (for cross-compiling)
linux-libc-dev-ppc64el-cross – Linux Kernel Headers for development (for cross-compiling)
linux-libc-dev-s390x-cross – Linux Kernel Headers for development (for cross-compiling)
linux-libc-dev-sh4-cross – Linux Kernel Headers for development (for cross-compiling)
linux-libc-dev-sparc64-cross – Linux Kernel Headers for development (for cross-compiling)
I’m not a linux person, but it appears the linux-headers install is looking for 4.7.0 and the cache search indicates it finds 4.8.0.
Did I cause an inconsistency somewhere along the way? I do have snapshots from each step from install forward if that will help me right my wrong.
Appreciate any direction.. Mark
vbox 5.1.8 r111374 (qt5.5.1)
Hello Mark,
You need to restart after you do apt-get upgrade so that you’re in the new Kernel. Then you can install the correct header. Also a second issue sometimes happen is when Kali dev team doesn’t add the new Kernel Headers (but kernel is added). In that case, I would add Debian repo, install new kernel-header and then remove Debian repo.
Appreciate the details troubleshooting steps and info you provided. Helps heaps. Hope the above comment helps and resolves your issue. Cheers,
-BMO
./VBoxLinuxAdditions.run
Verifying archive integrity… All good.
Uncompressing VirtualBox 5.1.8 Guest Additions for Linux………..
VirtualBox Guest Additions installer
Removing installed version 5.1.8 of VirtualBox Guest Additions…
Copying additional installer modules …
Installing additional modules …
vboxadd.sh: Building Guest Additions kernel modules.
Failed to set up service vboxadd, please check the log file
/var/log/VBoxGuestAdditions.log for details.
Help….
View Log :
====================
Created symlink /etc/systemd/system/multi-user.target.wants/vboxadd.service → /lib/systemd/system/vboxadd.service.
vboxadd.sh: failed: Look at /var/log/vboxadd-install.log to find out what went wrong.
vboxadd.sh: failed: Please check that you have gcc, make, the header files for your Linux kernel and possibly perl installed..
Created symlink /etc/systemd/system/multi-user.target.wants/vboxadd-service.service → /lib/systemd/system/vboxadd-service.service.
Created symlink /etc/systemd/system/multi-user.target.wants/vboxadd-x11.service → /lib/systemd/system/vboxadd-x11.service.
====================
Info :
uname -a :
Linux (user) 4.6.0-kali1-686-pae #1 SMP Debian 4.6.4-1kali1 (2016-07-21) i686 GNU/Linux
uname -r
4.6.0-kali1-686-pae
How to fix it ?
Please help
Please check that you have gcc, make, the header files for your Linux kernel and possibly perl installed.
Please Tomas how do we have gcc, and how to make a haeder files for your linux? Please help me am new in linux platform. thx
THANK YOU!!! Spent a LOT of time trying to accomplish this, followed your instructions to the letter. Worked flawlessly!
Tank you, brother!
Hello Dear
I’m facing this error
root@kali:~/Desktop# ./VBoxLinuxAdditions.run
Verifying archive integrity… All good.
Uncompressing VirtualBox 5.1.14 Guest Additions for Linux………..
VirtualBox Guest Additions installer
Removing installed version 5.1.14 of VirtualBox Guest Additions…
Copying additional installer modules …
Installing additional modules …
vboxadd.sh: Building Guest Additions kernel modules.
Failed to set up service vboxadd, please check the log file
/var/log/VBoxGuestAdditions.log for details.
Hi Im getting this error as well:
root@kali:~/Desktop# ./VBoxLinuxAdditions.run
Verifying archive integrity… All good.
Uncompressing VirtualBox 5.1.14 Guest Additions for Linux………..
VirtualBox Guest Additions installer
Removing installed version 5.1.14 of VirtualBox Guest Additions…
Copying additional installer modules …
Installing additional modules …
vboxadd.sh: Building Guest Additions kernel modules.
Failed to set up service vboxadd, please check the log file
/var/log/VBoxGuestAdditions.log for details.
try this:
apt-get install libelf-dev
and then reboot
Anyone have a solution to this problem? Seems common…
Failed to set up service vboxadd, please check the log file
i’ve got the same error – “Failed to set up service vboxadd, please check the log file”
I am getting a black screen after installation & after rebooting may I know how to over come this.twice I installed & checked.
those using newer version, use this to install “virtualbox-guest-x11”.
The official Guest Addition from the Device menu didn’t work for me too.
But “virtualbox-guest-x11” works for me.
Your step to Insert Guest Additions CD image fixed my problem. Ultimately the addition failed, but it did update the version of VBoxGuessAdditions to 5.2.6 for my Ubuntu18.04 VM. I then rebooted the VM and my shared folder issue was resolved. Seems like I needed to use an updated version of the VBoxGuessAdditions. Previous version was 5.1.18. Thank you !