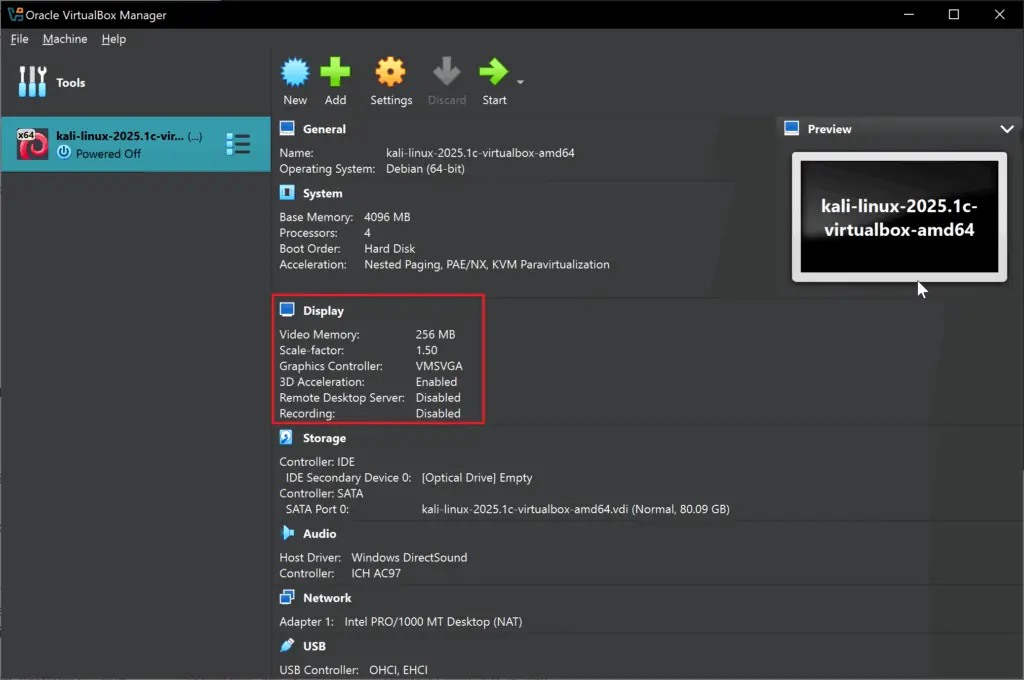
If you’ve ever tried to increase VirtualBox video memory through the settings menu, you’ll know it stops at 128MB. This can be frustrating when your virtual machine feels sluggish or won’t display properly at higher resolutions. The good news is you can actually push VirtualBox video memory up to 256MB using a simple command.

After running the VBoxManage command, the VirtualBox settings confirm the video memory has been successfully increased from 128MB to 256MB
VirtualBox deliberately limits the GUI to 128MB to prevent less experienced users from accidentally allocating too much memory. However, if you know what you’re doing, there’s an easy workaround using VirtualBox’s built-in command line tool.
Table of Contents
Why You Might Want More Video Memory
More VirtualBox video memory means smoother graphics, better screen resolutions, and less choppy performance when you’re moving windows around or watching videos. If you’re running a modern Linux distribution like Kali or a recent version of Windows, that extra video memory can make a real difference to how responsive everything feels.
The Simple Fix
Here’s how to bump your VirtualBox video memory up to the maximum 256 MB. You’ll need to shut down your virtual machine first – this won’t work while it’s running.
Find Your VirtualBox Installation
Open Command Prompt as Administrator and navigate to where VirtualBox is installed:
cd "C:\Program Files\Oracle\VirtualBox"
Check Your VM Names
First, let’s see what Vbox machines you have:
VBoxManage.exe list vms
You’ll see something like:
"kali-linux-2025.1c-virtualbox-amd64" {16f1y6b7-ey99-4cf7-bb7a-xet210xya812}
Copy the exact name (including quotes if they’re there) because you’ll need it for the next step.
Increase the Video Memory
Now here’s the magic command that increases VirtualBox video memory to 256 MB:
VBoxManage.exe modifyvm "your-vm-name-here" --vram 256
Using the example above, it would look like:
VBoxManage.exe modifyvm "kali-linux-2025.1c-virtualbox-amd64" --vram 256

The complete command sequence: first listing available VMs, then using VBoxManage to set video memory to 256MB
Video Memory: Sets the size of the memory provided by the virtual graphics card available to the guest, in MB. As with the main memory, the specified amount will be allocated from the host’s resident memory. Based on the amount of video memory, higher resolutions and color depths may be available.
VirtualBox Manager will show a warning if the amount of video memory is too small to be able to switch the VM into full screen mode. The minimum value depends on the number of virtual monitors, the screen resolution and the color depth of the host display as well as on the use of 3D acceleration and 2D video acceleration. A rough estimate is (color depth / 8) x vertical pixels x horizontal pixels x number of screens = number of bytes. Extra memory may be required if display acceleration is used.
No restart required for your host computer, just start up your virtual machine and you’ll have double the VirtualBox video memory.
What to Expect
When you fire up your VM again, everything should feel noticeably smoother. You can verify the change worked by going back into the VirtualBox settings – the video memory slider will now show 256MB instead of being stuck at 128MB. If you ever want to change it back or set it to something in between, just run the same command with a different number. You can set VirtualBox video memory to any value between 16 MB and 256 MB, though anything less than 128MB will probably make things worse, not better. This little trick has saved me frustrations with sluggish virtual machines, and it’s much easier than most people think!
That’s it, Enjoy!

