 This guide explains how to install proprietary “NVIDIA Accelerated Linux Graphics Driver” or NVIDIA driver on Kali Linux system. If you are using Kali Linux and have NVIDIA graphics card then most likely you are using open source NVIDIA driver
 nouveau. You can see it by lsmod | grep nouveau command. nouveau driver works quite well, but if you want to use 3D acceleration feature or want to use GPU based applications (such as CUDA and GPU pass through) then you need to install proprietary NVIDIA driver. The proprietary “NVIDIA Accelerated Linux Graphics Driver” provides optimized hardware acceleration of OpenGL applications via a direct-rendering X server. It is a binary-only Xorg driver requiring a Linux kernel module for its use. The first step is to fully update your Kali Linux system and make sure you have the kernel headers installed.
This guide replaces the old guide
Where you had to download NVIDIA Driver (CUDA) manually and edit grub.cfg file to make everything work. Because it will be a long guide, I had to divide it into two parts:
- Install proprietary NVIDIA driver on Kali Linux – NVIDIA Accelerated Linux Graphics Driver
- Install NVIDIA driver kernel Module CUDA and Pyrit on Kali Linux – CUDA, Pyrit and Cpyrit-cuda
You use the first guide to install NVIDIA Driver. If you want GPU acceleration, (cudahashcat, GPU pass through etc.) keep reading and follow the second guide to complete your installation. I’ve included as much details I can, including troubleshooting steps and checks but I would like to hear your part of the story, so leave a comment with your findings and issues.
Table of Contents
The new NVIDIA Driver
The new Linux binary NVIDIA drivers nvidia-kernel-dkms builds the NVIDIA Xorg binary kernel module needed by NVIDIA driver, using DKMS. Provided that you have the kernel header packages installed, the kernel module will be built for your running kernel and automatically rebuilt for any new kernel headers that are installed. The binary NVIDIA drivers provide optimized hardware acceleration of OpenGL applications via a direct-rendering X Server for graphics cards using NVIDIA chip sets. AGP, PCIe, SLI, TV-out and flat panel displays are also supported. NVIDIA Added support for the following GPU including fixing some issues: (existing GPU’s are already supported).
- GeForce GT 710
- GeForce 825M
- Fixed a regression that prevented NVIDIA-installer from cleaning up directories created as part of the driver installation.
- Added a new X configuration option “InbandStereoSignaling” to enable/disable DisplayPort in-band stereo signaling.
- Fixed a bug that caused PBO downloads of cube map faces to retrieve incorrect data.
- Fixed a bug in NVIDIA-installer that resulted in spurious error messages when opting out of installing the NVIDIA kernel module or source files for the kernel module.
- Added experimental support for ARGB GLX visuals when Xinerama and Composite are enabled at the same time on X.Org xserver 1.15.
See the details about this driver in NVIDIA official website:
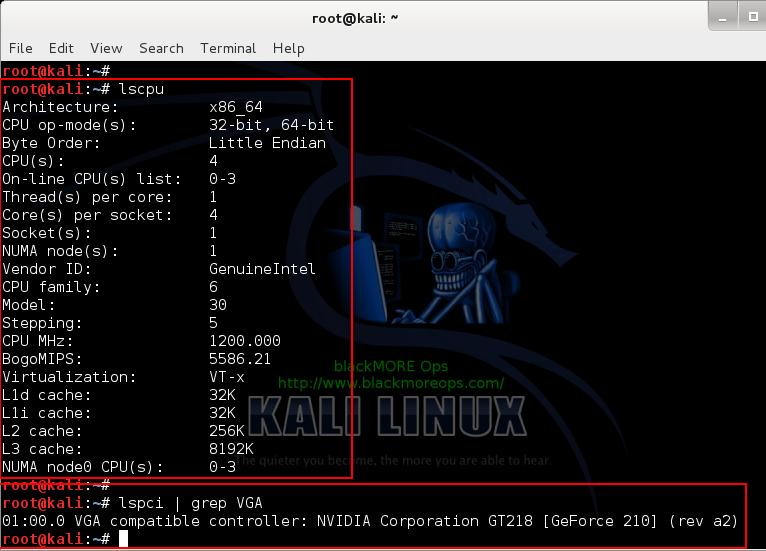
Debian Linux usually ports that Official Driver to fit it’s requirements. The NVIDIA driver graphics processing unit (GPU) series/codename of an installed video card can usually be identified using the lspci command. For example:
lspci -nn | grep VGA
My settings
My PC got the following configuration:
I’ve installed everything in a brand new Kali Linux 1.0.6 installation, fully updated and upgraded. Before you do anything, you of course add the Official Kali Linux repository. Once I’ve added the correct Kali Official repositories, I’ve issued the following commands to update, upgrade and dist-upgrade my Kali Linux.
apt-get update && apt-get upgrade -y && apt-get dist-upgrade -y
If you’ve completed this part, move on to the next instruction.
Step 1: Install Linux headers
Install Linux headers as those will be required to build NVIDIA Driver modules.
aptitude -r install linux-headers-$(uname -r)
Where -r means install all recommended packages as well. 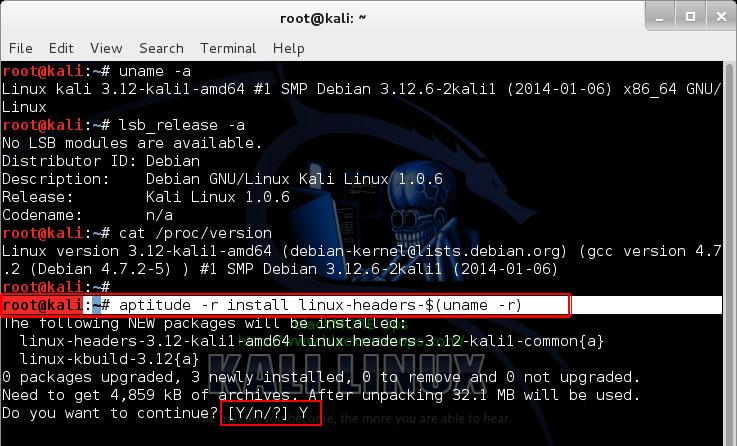
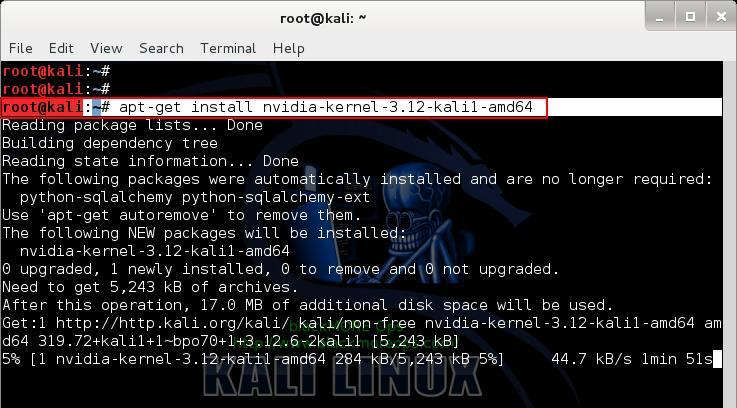
Step 2: Install NVIDIA Kernel
Next I installed NVIDIA Kernel
apt-get install nvidia-kernel-$(uname -r)
93 comments
I follow everything but got a blackscreen. Removing xorg.conf solves the blackscreen but the nvidia drivers don’t seem to be working.
Note: I have 2 gfx cards (unable to disable the integrated intel card thru BIOS)
glxinfo gives: Xlib: extension “GLX” missing on display “:0.0”.
Error: couldn’t find RGB GLX visual or fbconfig
Xorg.log: (EE) No devices detected
no screens found
***Please help
Hi Leo,
I haven’t tested my configs against SLI (I got 1 PC with GTX210 and another with GTX460 card .. no SLI). I can’t remember exactly, but there were few posts in Arch Linux forum and old BackTrack Forum about how to make SLI work.
If you however manage to make this work, can you post it in the comments section and I will add it as part of the post. In that way this info will be preserved for you or the next user who is searching. Thanks.
My question is, if this tutorial works on kalilinux installed on vmware? or do I need to install Kalilinux on my hard drive? because in my virtual machine it does not work at all. thanks.
No, GPU acceleration doesn’t (and NEVER will) work on VM. You MUST install in HDD. Another option could be persistent USB installation but that can be tricky at times.
yup ,dude it’s already there..https://docs.kali.org/general-use/install-nvidia-drivers-on-kali-linux
The Kali install protocolfor the NVIDIA CUDA drivers doesn’t work as I have tried it. This is a bug and I added it to the bug list in Kali.org. I am posting this as of 5/2/2018 and let’s see how long it will take Kali to fix this issue. Many are just using the CPU with the –forced command which comes up with sketchy results.
blackMORE Ops….I recently had an assignment to use HashCat in Kali Linux and nothing I could find worked and I did get the black screen of death that even adjusting memory and cores couldn’t fix. This process worked at some point in Kali because some videos I have seen are dated around 2013 and it worked fine then. There must have been a package that was released where some coding error occurred. I did post this as a bug on the Kali site because frankly I have seen many references to it but no one including Kali has addressed it to promote a real fix. It seems someone has to awaken the Kali gods and get them to address this…and it is definitely worthwhile to create an update to this blog. Any updates or responses would be great.
I will follow the instructions in this post….the link from the Kali NVIDIA CUDA driver page do not work.
I received the following when trying the above instructions:
root@kali:~# aptitude -r install linux-headers-$(uname -r)
bash: aptitude: command not found
root@kali:~# uname -a
Linux kali 4.15.0-kali2-amd64 #1 SMP Debian 4.15.11-1kali1 (2018-03-21) x86_64 GNU/Linux
root@kali:~# lsb_release -a
No LSB modules are available.
Distributor ID: Kali
Description: Kali GNU/Linux Rolling
Release: kali-rolling
Codename: kali-rolling
root@kali:~# cat /proc/version
Linux version 4.15.0-kali2-amd64 ([email protected]) (gcc version 7.3.0 (Debian 7.3.0-11)) #1 SMP Debian 4.15.11-1kali1 (2018-03-21)
root@kali:~# aptitude -r install linux-headers-$(uname -r)
bash: aptitude: command not found
root@kali:~# apt-get install nvidia-kernel-$(uname -r)
Reading package lists… Done
Building dependency tree
Reading state information… Done
E: Unable to locate package nvidia-kernel-4.15.0-kali2-amd64
E: Couldn’t find any package by glob ‘nvidia-kernel-4.15.0-kali2-amd64’
E: Couldn’t find any package by regex ‘nvidia-kernel-4.15.0-kali2-amd64’
root@kali:~# aptitude install nvidia-kernel-dkms
bash: aptitude: command not found
root@kali:~# aptitude install nvidia-xconfig
bash: aptitude: command not found
root@kali:~#
Thanks a million! Been pulling my hair out trying to figure out how to get it right. This guide should be on the Kali website.
Hi untamedrogueBrendon,
Glad my guide worked for you. Cheers.
Администратор пожалуйста помоги мне!
У меня Kali Linux (VMware).
Мой алтернативный адаптер по умолчанию Gallium 0.4 on llvmpipe.
Возможно ли что бы был по умолчанию NVIDIA адаптер?
И будет ли работать CUDA?
Если есть возможность то помоги пожалуйста)
Administrator please help me!
I Kali Linux (VMware).
My adapter is an alternate default Gallium 0.4 on llvmpipe.
Is it possible that there was a default NVIDIA adapter?
And will it work CUDA?
If you can help then please)
VMware is not supported. You must install Kali Linux. CUDA works when you install Kali Linux in hard drive.
thank you all earned)
why is the official website of kali linux does not have what you need, enter the command “aptitude install nvidia-xconfig” in the terminal, which would be set up automatically “xconfig”
thanks for the help) I cross out)
Необходимо установить Кали Linux на жестком диске, чтобы иметь возможность использовать проприетарные драйвера NVIDIA. VMWare не поддерживается.
## First time I used Google Translate to post a comment in Russian .. Either way hope it helped you.
Do I need to repeat all the steps if I use bootable USB?
Hello there,i’ve install drivers,fully update Kali and after creating\recreating xorg.conf and restart – GUI dont startup.
In console “dmesg” dont show any troubles with VGA devices,this fixed by deleting file xorg.conf (I know how to read),but is there a way to configure drivers?
I’ve notebook with 610M. Nvidia site said that it’s supporting CUDA.
Also after installing Nvidia drivers and BEFORE creating xorg.conf – is driver already working?Because i dont have “nouveau” show up after suggested command.
Thank you for the great tips and tutorials that you write here. I have a question for you: Is there a way to install bumblebee in Kali Linux? I have an Intel Corei5 based notebook with a NIVIDIA GEFORCE GTX 660M and wish to have the ability to turn on/off this card when I need to do this. Thank you for your attention.
Hi, I have a question, I have tried numerous times on installing NVidia Graphics for my new notebook which is ASUS X552CL which is having so called ‘hybrid’ graphic cards which is combination of Intel HD 4000 and NVidia GT 710M (Optimus and CUDA technology). I’ve tried so many times installing, reformating and uninstalling since last year. But now I find this new solution on your site which is very well written, can I use the same installation guide and install it? Because everytime I follow the tutorial on the official kali documentation I failed and the nvidia is not installed and direct rendering is always disabled therefore I can’t get any 3D acceleration. And also do I need to install “bumblebee” to play let’s say some 3D accelerated games?
Im still having problems with the nvidia-settings. It removes the driver once installed , did you ever get the chance to document your tinkering.
Nothing yet mate, it seems NVIDIA doesn’t want you to keep both. I saw your post in Kali forum, looks like the community doesn’t have a workable solution either! If I find something, I will post ASAP. Cheers,
-BMO
I’ve done every step but when i go glxinfo | grep -i “direct rendering” it gives me this:
Xlib: extension “GLX” missing on display “:0.0”.
Xlib: extension “GLX” missing on display “:0.0”.
Xlib: extension “GLX” missing on display “:0.0”.
Xlib: extension “GLX” missing on display “:0.0”.
Xlib: extension “GLX” missing on display “:0.0”.
Error: couldn’t find RGB GLX visual or fbconfig
Xlib: extension “GLX” missing on display “:0.0”.
Xlib: extension “GLX” missing on display “:0.0”.
Xlib: extension “GLX” missing on display “:0.0”.
Xlib: extension “GLX” missing on display “:0.0”.
Xlib: extension “GLX” missing on display “:0.0”.
Xlib: extension “GLX” missing on display “:0.0”.
Xlib: extension “GLX” missing on display “:0.0”.
when i try to join in blackscreen appears, when i remove xorg.conf it goes good but pyrit list_cores dont give me NVIDIA
(sry about my english btw)
thanks very much, worked like a charm, once I read it properly anyway :), plz note that when doing the install over SSH, the glxinfo command will fail, because your ‘screen’ is not a screen, but in my instance it worked fine, I just had to go to the other side of the building to work that out ( lazy! )
Hallo, in my home i have one external HD that i have a kali installation.I wont to run pyrit with CUDA so i need to install drivers,I like to boot from other pc’s too.May have for example another nvidia card lets say 9800 (mine is 9600,so drivers must be for this card) but if i blacklist gallium, will be able to boot with this external disk on other machines ??
on my fourth kali install in three hours, ( thats four separate machines ), the fourth one came up with the blinking cursor no GUI issue, problem quickly resolved by telling the motherboard in the BIOS to initialize the device in the PEG slot before the internal ( IGX ), usually if xconfig fails to setup correctly, its because its mis-interpreted the screens on the pc …. good luck
Hello i am getting a black screen here are my logs and x.conf
[ 1738.534]
X.Org X Server 1.12.4
Release Date: 2012-08-27
[ 1738.534] X Protocol Version 11, Revision 0
[ 1738.534] Build Operating System: Linux 3.11-2-amd64 x86_64 Debian
[ 1738.534] Current Operating System: Linux debian 3.14-kali1-amd64 #1 SMP Debian 3.14.5-1kali1 (2014-06-07) x86_64
[ 1738.534] Kernel command line: BOOT_IMAGE=/vmlinuz-3.14-kali1-amd64 root=/dev/mapper/kali-root ro quiet nouveau.modeset=0 apparmor=1 security=apparmor
[ 1738.534] Build Date: 17 December 2013 07:37:58PM
[ 1738.534] xorg-server 2:1.12.4-6+deb7u2 (Julien Cristau )
[ 1738.534] Current version of pixman: 0.26.0
[ 1738.534] Before reporting problems, check https://wiki.x.org
to make sure that you have the latest version.
[ 1738.534] Markers: (–) probed, (**) from config file, (==) default setting,
(++) from command line, (!!) notice, (II) informational,
(WW) warning, (EE) error, (NI) not implemented, (??) unknown.
[ 1738.534] (==) Log file: “/var/log/Xorg.1.log”, Time: Wed Jun 11 16:42:42 2014
[ 1738.535] (==) Using system config directory “/usr/share/X11/xorg.conf.d”
[ 1738.535] (==) No Layout section. Using the first Screen section.
[ 1738.535] (==) No screen section available. Using defaults.
[ 1738.535] (**) |–>Screen “Default Screen Section” (0)
[ 1738.535] (**) | |–>Monitor “”
[ 1738.535] (==) No monitor specified for screen “Default Screen Section”.
Using a default monitor configuration.
[ 1738.535] (==) Automatically adding devices
[ 1738.535] (==) Automatically enabling devices
[ 1738.535] (WW) The directory “/usr/share/fonts/X11/cyrillic” does not exist.
[ 1738.535] Entry deleted from font path.
[ 1738.535] (WW) The directory “/usr/share/fonts/X11/100dpi/” does not exist.
[ 1738.535] Entry deleted from font path.
[ 1738.535] (WW) The directory “/usr/share/fonts/X11/75dpi/” does not exist.
[ 1738.535] Entry deleted from font path.
[ 1738.535] (WW) The directory “/usr/share/fonts/X11/100dpi” does not exist.
[ 1738.535] Entry deleted from font path.
[ 1738.535] (WW) The directory “/usr/share/fonts/X11/75dpi” does not exist.
[ 1738.535] Entry deleted from font path.
[ 1738.535] (WW) The directory “/var/lib/defoma/x-ttcidfont-conf.d/dirs/TrueType” does not exist.
[ 1738.535] Entry deleted from font path.
[ 1738.535] (==) FontPath set to:
/usr/share/fonts/X11/misc,
/usr/share/fonts/X11/Type1,
built-ins
[ 1738.535] (==) ModulePath set to “/usr/lib/xorg/modules”
[ 1738.535] (II) The server relies on udev to provide the list of input devices.
If no devices become available, reconfigure udev or disable AutoAddDevices.
[ 1738.535] (II) Loader magic: 0x7fc441e6bae0
[ 1738.535] (II) Module ABI versions:
[ 1738.535] X.Org ANSI C Emulation: 0.4
[ 1738.535] X.Org Video Driver: 12.1
[ 1738.535] X.Org XInput driver : 16.0
[ 1738.535] X.Org Server Extension : 6.0
[ 1738.537] (–) PCI:*(0:2:0:0) 10de:08a3:106b:00d3 rev 162, Mem @ 0x92000000/16777216, 0x80000000/268435456, 0x90000000/33554432, I/O @ 0x00001000/128, BIOS @ 0x????????/131072
[ 1738.537] (WW) Open ACPI failed (/var/run/acpid.socket) (No such file or directory)
[ 1738.537] (II) LoadModule: “extmod”
[ 1738.537] (II) Loading /usr/lib/xorg/modules/extensions/libextmod.so
[ 1738.537] (II) Module extmod: vendor=”X.Org Foundation”
[ 1738.537] compiled for 1.12.4, module version = 1.0.0
[ 1738.537] Module class: X.Org Server Extension
[ 1738.537] ABI class: X.Org Server Extension, version 6.0
[ 1738.537] (II) Loading extension SELinux
[ 1738.537] (II) Loading extension MIT-SCREEN-SAVER
[ 1738.537] (II) Loading extension XFree86-VidModeExtension
[ 1738.537] (II) Loading extension XFree86-DGA
[ 1738.537] (II) Loading extension DPMS
[ 1738.537] (II) Loading extension XVideo
[ 1738.537] (II) Loading extension XVideo-MotionCompensation
[ 1738.537] (II) Loading extension X-Resource
[ 1738.537] (II) LoadModule: “dbe”
[ 1738.538] (II) Loading /usr/lib/xorg/modules/extensions/libdbe.so
[ 1738.538] (II) Module dbe: vendor=”X.Org Foundation”
[ 1738.538] compiled for 1.12.4, module version = 1.0.0
[ 1738.538] Module class: X.Org Server Extension
[ 1738.538] ABI class: X.Org Server Extension, version 6.0
[ 1738.538] (II) Loading extension DOUBLE-BUFFER
[ 1738.538] (II) LoadModule: “glx”
[ 1738.538] (II) Loading /usr/lib/xorg/modules/extensions/libglx.so
[ 1738.556] (II) Module glx: vendor=”NVIDIA Corporation”
[ 1738.556] compiled for 4.0.2, module version = 1.0.0
[ 1738.556] Module class: X.Org Server Extension
[ 1738.556] (II) NVIDIA GLX Module 331.79 Sat May 17 23:58:32 PDT 2014
[ 1738.556] (II) Loading extension GLX
[ 1738.556] (II) LoadModule: “record”
[ 1738.556] (II) Loading /usr/lib/xorg/modules/extensions/librecord.so
[ 1738.556] (II) Module record: vendor=”X.Org Foundation”
[ 1738.556] compiled for 1.12.4, module version = 1.13.0
[ 1738.556] Module class: X.Org Server Extension
[ 1738.556] ABI class: X.Org Server Extension, version 6.0
[ 1738.556] (II) Loading extension RECORD
[ 1738.556] (II) LoadModule: “dri”
[ 1738.556] (II) Loading /usr/lib/xorg/modules/extensions/libdri.so
[ 1738.556] (II) Module dri: vendor=”X.Org Foundation”
[ 1738.556] compiled for 1.12.4, module version = 1.0.0
[ 1738.556] ABI class: X.Org Server Extension, version 6.0
[ 1738.556] (II) Loading extension XFree86-DRI
[ 1738.556] (II) LoadModule: “dri2″
[ 1738.556] (II) Loading /usr/lib/xorg/modules/extensions/libdri2.so
[ 1738.557] (II) Module dri2: vendor=”X.Org Foundation”
[ 1738.557] compiled for 1.12.4, module version = 1.2.0
[ 1738.557] ABI class: X.Org Server Extension, version 6.0
[ 1738.557] (II) Loading extension DRI2
[ 1738.557] (==) Matched nouveau as autoconfigured driver 0
[ 1738.557] (==) Matched nv as autoconfigured driver 1
[ 1738.557] (==) Matched vesa as autoconfigured driver 2
[ 1738.557] (==) Matched fbdev as autoconfigured driver 3
[ 1738.557] (==) Assigned the driver to the xf86ConfigLayout
[ 1738.557] (II) LoadModule: “nouveau”
[ 1738.557] (II) Loading /usr/lib/xorg/modules/drivers/nouveau_drv.so
[ 1738.557] (II) Module nouveau: vendor=”X.Org Foundation”
[ 1738.557] compiled for 1.12.4, module version = 1.0.1
[ 1738.557] Module class: X.Org Video Driver
[ 1738.557] ABI class: X.Org Video Driver, version 12.1
[ 1738.557] (II) LoadModule: “nv”
[ 1738.557] (WW) Warning, couldn’t open module nv
[ 1738.557] (II) UnloadModule: “nv”
[ 1738.558] (II) Unloading nv
[ 1738.558] (EE) Failed to load module “nv” (module does not exist, 0)
[ 1738.558] (II) LoadModule: “vesa”
[ 1738.558] (II) Loading /usr/lib/xorg/modules/drivers/vesa_drv.so
[ 1738.558] (II) Module vesa: vendor=”X.Org Foundation”
[ 1738.558] compiled for 1.12.1, module version = 2.3.1
[ 1738.558] Module class: X.Org Video Driver
[ 1738.558] ABI class: X.Org Video Driver, version 12.0
[ 1738.558] (II) LoadModule: “fbdev”
[ 1738.558] (II) Loading /usr/lib/xorg/modules/drivers/fbdev_drv.so
[ 1738.558] (II) Module fbdev: vendor=”X.Org Foundation”
[ 1738.558] compiled for 1.12.1, module version = 0.4.2
[ 1738.558] ABI class: X.Org Video Driver, version 12.0
[ 1738.558] (II) NOUVEAU driver Date: Fri Jul 6 16:23:50 2012 +1000
[ 1738.558] (II) NOUVEAU driver for NVIDIA chipset families :
[ 1738.558] RIVA TNT (NV04)
[ 1738.558] RIVA TNT2 (NV05)
[ 1738.558] GeForce 256 (NV10)
[ 1738.558] GeForce 2 (NV11, NV15)
[ 1738.558] GeForce 4MX (NV17, NV18)
[ 1738.558] GeForce 3 (NV20)
[ 1738.559] GeForce 4Ti (NV25, NV28)
[ 1738.559] GeForce FX (NV3x)
[ 1738.559] GeForce 6 (NV4x)
[ 1738.559] GeForce 7 (G7x)
[ 1738.559] GeForce 8 (G8x)
[ 1738.559] GeForce GTX 200 (NVA0)
[ 1738.559] GeForce GTX 400 (NVC0)
[ 1738.559] (II) VESA: driver for VESA chipsets: vesa
[ 1738.559] (II) FBDEV: driver for framebuffer: fbdev
[ 1738.559] (++) using VT number 8
[ 1738.564] drmOpenDevice: node name is /dev/dri/card0
[ 1738.572] drmOpenByBusid: Searching for BusID pci:0000:02:00.0
[ 1738.572] drmOpenDevice: node name is /dev/dri/card0
[ 1738.576] drmOpenByBusid: drmOpenMinor returns -1
[ 1738.576] drmOpenDevice: node name is /dev/dri/card1
[ 1738.581] drmOpenByBusid: drmOpenMinor returns -1
[ 1738.581] drmOpenDevice: node name is /dev/dri/card2
[ 1738.586] drmOpenByBusid: drmOpenMinor returns -1
[ 1738.586] drmOpenDevice: node name is /dev/dri/card3
[ 1738.591] drmOpenByBusid: drmOpenMinor returns -1
[ 1738.591] drmOpenDevice: node name is /dev/dri/card4
[ 1738.596] drmOpenByBusid: drmOpenMinor returns -1
[ 1738.596] drmOpenDevice: node name is /dev/dri/card5
[ 1738.601] drmOpenByBusid: drmOpenMinor returns -1
[ 1738.601] drmOpenDevice: node name is /dev/dri/card6
[ 1738.607] drmOpenByBusid: drmOpenMinor returns -1
[ 1738.607] drmOpenDevice: node name is /dev/dri/card7
[ 1738.612] drmOpenByBusid: drmOpenMinor returns -1
[ 1738.612] drmOpenDevice: node name is /dev/dri/card8
[ 1738.617] drmOpenByBusid: drmOpenMinor returns -1
[ 1738.617] drmOpenDevice: node name is /dev/dri/card9
[ 1738.623] drmOpenByBusid: drmOpenMinor returns -1
[ 1738.623] drmOpenDevice: node name is /dev/dri/card10
[ 1738.628] drmOpenByBusid: drmOpenMinor returns -1
[ 1738.628] drmOpenDevice: node name is /dev/dri/card11
[ 1738.633] drmOpenByBusid: drmOpenMinor returns -1
[ 1738.633] drmOpenDevice: node name is /dev/dri/card12
[ 1738.638] drmOpenByBusid: drmOpenMinor returns -1
[ 1738.638] drmOpenDevice: node name is /dev/dri/card13
[ 1738.643] drmOpenByBusid: drmOpenMinor returns -1
[ 1738.643] drmOpenDevice: node name is /dev/dri/card14
[ 1738.649] drmOpenByBusid: drmOpenMinor returns -1
[ 1738.649] drmOpenDevice: node name is /dev/dri/card15
[ 1738.654] drmOpenByBusid: drmOpenMinor returns -1
[ 1738.654] drmOpenDevice: node name is /dev/dri/card0
[ 1738.663] drmOpenDevice: node name is /dev/dri/card0
[ 1738.669] drmOpenDevice: node name is /dev/dri/card1
[ 1738.674] drmOpenDevice: node name is /dev/dri/card2
[ 1738.679] drmOpenDevice: node name is /dev/dri/card3
[ 1738.684] drmOpenDevice: node name is /dev/dri/card4
[ 1738.689] drmOpenDevice: node name is /dev/dri/card5
[ 1738.694] drmOpenDevice: node name is /dev/dri/card6
[ 1738.700] drmOpenDevice: node name is /dev/dri/card7
[ 1738.705] drmOpenDevice: node name is /dev/dri/card8
[ 1738.710] drmOpenDevice: node name is /dev/dri/card9
[ 1738.715] drmOpenDevice: node name is /dev/dri/card10
[ 1738.721] drmOpenDevice: node name is /dev/dri/card11
[ 1738.726] drmOpenDevice: node name is /dev/dri/card12
[ 1738.731] drmOpenDevice: node name is /dev/dri/card13
[ 1738.736] drmOpenDevice: node name is /dev/dri/card14
[ 1738.741] drmOpenDevice: node name is /dev/dri/card15
[ 1738.747] (EE) [drm] failed to open device
[ 1738.747] (WW) Falling back to old probe method for fbdev
[ 1738.747] (II) Loading sub module “fbdevhw”
[ 1738.747] (II) LoadModule: “fbdevhw”
[ 1738.747] (II) Loading /usr/lib/xorg/modules/libfbdevhw.so
[ 1738.747] (II) Module fbdevhw: vendor=”X.Org Foundation”
[ 1738.747] compiled for 1.12.4, module version = 0.0.2
[ 1738.747] ABI class: X.Org Video Driver, version 12.1
[ 1738.747] (II) Loading sub module “vbe”
[ 1738.748] (II) LoadModule: “vbe”
[ 1738.748] (II) Loading /usr/lib/xorg/modules/libvbe.so
[ 1738.748] (II) Module vbe: vendor=”X.Org Foundation”
[ 1738.748] compiled for 1.12.4, module version = 1.1.0
[ 1738.748] ABI class: X.Org Video Driver, version 12.1
[ 1738.748] (II) Loading sub module “int10”
[ 1738.748] (II) LoadModule: “int10″
[ 1738.748] (II) Loading /usr/lib/xorg/modules/libint10.so
[ 1738.749] (II) Module int10: vendor=”X.Org Foundation”
[ 1738.749] compiled for 1.12.4, module version = 1.0.0
[ 1738.749] ABI class: X.Org Video Driver, version 12.1
[ 1738.749] (II) VESA(0): initializing int10
[ 1738.749] (EE) VESA(0): V_BIOS address 0xd00 out of range
[ 1738.749] (II) UnloadModule: “vesa”
[ 1738.749] (II) UnloadSubModule: “int10”
[ 1738.749] (II) Unloading int10
[ 1738.749] (II) UnloadSubModule: “vbe”
[ 1738.749] (II) Unloading vbe
[ 1738.749] (EE) Screen(s) found, but none have a usable configuration.
[ 1738.749]
Fatal server error:
[ 1738.750] no screens found
[ 1738.750]
Please consult the The X.Org Foundation support
at https://wiki.x.org
for help.
[ 1738.750] Please also check the log file at “/var/log/Xorg.1.log” for additional information.
[ 1738.750]
[ 1738.759] Server terminated with error (1). Closing log file.
lspci -nn | grep VGA shows
02:00.0 VGA compatible controller [0300]: NVIDIA Corporation MCP89 [GeForce 320M] [10de:08a3] (rev a2)
and my x.conf
# nvidia-xconfig: X configuration file generated by nvidia-xconfig
# nvidia-xconfig: version 331.79 (buildmeister@swio-display-x86-rhel47-09) Sun May 18 00:42:05 PDT 2014
Section “ServerLayout”
Identifier “Layout0”
Screen 0 “Screen0”
InputDevice “Keyboard0” “CoreKeyboard”
InputDevice “Mouse0” “CorePointer”
EndSection
Section “Files”
EndSection
Section “InputDevice”
# generated from default
Identifier “Mouse0”
Driver “mouse”
Option “Protocol” “auto”
Option “Device” “/dev/psaux”
Option “Emulate3Buttons” “no”
Option “ZAxisMapping” “4 5”
EndSection
Section “InputDevice”
# generated from default
Identifier “Keyboard0”
Driver “kbd”
EndSection
Section “Monitor”
Identifier “Monitor0”
VendorName “Unknown”
ModelName “Unknown”
HorizSync 28.0 – 33.0
VertRefresh 43.0 – 72.0
Option “DPMS”
EndSection
Section “Device”
Identifier “Device0”
Driver “nvidia”
VendorName “NVIDIA Corporation”
EndSection
Section “Screen”
Identifier “Screen0”
Device “Device0”
Monitor “Monitor0”
DefaultDepth 24
SubSection “Display”
Depth 24
EndSubSection
EndSection
thank you for your time if you reply, ive been trying for weeks
WOW LOOONG comment …
This caught my attention.
Kernel command line: BOOT_IMAGE=/vmlinuz-3.14-kali1-amd64 root=/dev/mapper/kali-root ro quiet nouveau.modeset=0 apparmor=1 security=apparmorWhy do you have apparmor enabled in Kali? I thought that breaks a few things, could be wrong but worth a try. Good luck.
-BMO
I’m sorry , I didn’t want to type a whole bunch of comments , and I didn’t want to leave anything out , thank you for the fast reply also I have encryption . Honestly I don’t know why that’s their
you followed samuix’s kali install instructions? I think you just need to update the grub config. Try this:
sed ‘s/quiet/quiet nouveau.modeset=0/g’ -i /etc/default/grub
update-grub
reboot
You don’t need to update grub.cfg, nvidia blacklists nouveau driver as part of the standard installation – see post for explanation. Updating grub was the old way.
Fix for NVIDIA drivers were posted on my blog first with help from readers. Credits were added as due. Love samiux’s blog though, very informative.
I have followed every command accurately but still i got some problems.
My pc has:
root@SarthaKJ:~# lspci | grep VGA
00:02.0 VGA compatible controller: Intel Corporation Haswell Integrated Graphics Controller (rev 06)
01:00.0 VGA compatible controller: NVIDIA Corporation Device 0fcd (rev a1)
(Its Nvidia GT 755M 2GB)
root@SarthaKJ:~# uname -a
Linux SarthaKJ 3.14-kali1-amd64 #1 SMP Debian 3.14.4-1kali1 (2014-05-14) x86_64 GNU/Linux
PROBLEM:
First of all, I got blackscreen with blinking cursor which I solved it by removing /etc/X11/xorg.conf file.
BUT now I have another problem.
root@SarthaKJ:~# glxinfo | grep -i “direct rendering”
Xlib: extension “GLX” missing on display “:0.0”.
Xlib: extension “GLX” missing on display “:0.0”.
Xlib: extension “GLX” missing on display “:0.0”.
Xlib: extension “GLX” missing on display “:0.0”.
Xlib: extension “GLX” missing on display “:0.0”.
Error: couldn’t find RGB GLX visual or fbconfig
Xlib: extension “GLX” missing on display “:0.0”.
Xlib: extension “GLX” missing on display “:0.0”.
Xlib: extension “GLX” missing on display “:0.0”.
Xlib: extension “GLX” missing on display “:0.0”.
Xlib: extension “GLX” missing on display “:0.0”.
And “aptitude install mesa-utils” does not want to get installed. It says this..
root@SarthaKJ:~# aptitude install mesa-utils
No packages will be installed, upgraded, or removed.
0 packages upgraded, 0 newly installed, 0 to remove and 15 not upgraded.
Need to get 0 B of archives. After unpacking 0 B will be used.
Now if I run the command “lsmod | grep nvidia”, the below is the result.
root@SarthaKJ:~# lsmod | grep nvidia
nvidia 10651813 0
i2c_core 24265 7 drm,i915,i2c_i801,drm_kms_helper,i2c_algo_bit,nvidia,videodev
___________________
Please help me!
And Thanks in advance :)
Any chance on a guide for how you got nvidia-settings to work?
Hi GunnerMcStecki,
If you decide to install
nvidia-settings, as far I am aware, CUDA or hashCAT wont work. But the installation is as straightforward as possibleGood side is, you get nice NVIDIA Settings manager, GPU temp monitor etc. Cheers,
-BMO
Hi there.
I managed to install nvidia-settings without allowing apt-get to replace the CUDA enabled NVIDIA Kernel.
I searched to the debian repository: https://packages.debian.org/search?keywords=nvidia-settings
And found: https://packages.debian.org/wheezy-backports/nvidia-settings
There are two versions for debian wheezy (The flavor that kali is based on): The stable 304.xxx and the backport 319.xx
I chose the backport, which is closer to the version of the Nvidia kernel that is installed by ‘aptitude install nvidia-kernel-dkms’
I downloaded the deb package : nvidia-settings_319.72-1~bpo70+1_amd64.deb
Ignore the advice to use aptitude or synaptic to do the installation: they WILL replace the CUDA enabled NVIDIA Kernel.
use
#> dpkg -i nvidia-settings_319.72-1~bpo70+1_amd64.deb
It may complain about some missing required packages. Install the required packages with apt-get or if not in the repository, find them in the debian repository and install them with dpkg.
After the install is done you can start ‘nvidia-settings’ from a terminal.
When you reboot the computer, you may get a black screen.
DO NOT PANIC
type [Ctrl]+[Alt]+F1
log in as root
run
#>nividia-Xconfig
then
#>service gdm3 start
Or
#>reboot
At the end I have the two worlds: CUDA and a graphic NVIDIA settings interface, which in my case I need to handle 2 monitors at the same time in my rig.
Doing that by CLI is, eeeh, Hard??
I have exactly the same problem. I cant get the damn driver to work…..this is almost the end of week 3, i googled and tried different types of installs. The problem everyone is having is optimus laptops ( two video cards ) so linux uses IGP not Nvidia. You Can disable IGP in bios if you have that option, if not you in the same boat as me…. i have MSI GT60 2PE Dominator Pro 3k edition Nvidia GTX 880M….i need that damn card to work:)
My last hope is to try to get Bumblebee working…..after that i will loose all hope…
Dont know why the reply got pushed all the way here, but the problem i get was black screen then i removed xorg and i get this
when i run glxinfo | grep -i “direct rendering”
Xlib: extension “GLX” missing on display “:0.0″.
Xlib: extension “GLX” missing on display “:0.0″.
Xlib: extension “GLX” missing on display “:0.0″.
Xlib: extension “GLX” missing on display “:0.0″.
Xlib: extension “GLX” missing on display “:0.0″.
Error: couldn’t find RGB GLX visual or fbconfig
Xlib: extension “GLX” missing on display “:0.0″.
Xlib: extension “GLX” missing on display “:0.0″.
Xlib: extension “GLX” missing on display “:0.0″.
Xlib: extension “GLX” missing on display “:0.0″.
Xlib: extension “GLX” missing on display “:0.0″.
Xlib: extension “GLX” missing on display “:0.0″.
Xlib: extension “GLX” missing on display “:0.0″.
Try this
mkdir /etc/X11/xorg.conf.d
echo -e ‘Section “Device”\n\tIdentifier “nVidia GPU”\n\tDriver “nvidia”\n\tOption “NoLogo” “1”\n\tOption “RenderAccel” “1”\n\tOption “TripleBuffr” “true”\n\tOption “MigrationHeuristic” “greedy”\nEndSection’ > /etc/X11/xorg.conf.d/20-nvidia.conf
i get black screen :/
Do this go into recovery
rm /etc/X11/xorg.conf
Then try it again
Thanks jeremyboyle, i just skipped that i finally got cuda working!
P.S. is there any benefit to have xorg file at all? isnt the whole point is to get CUDA working? thanks
Well the command I gave above the echo part makes a file inside the xorg.conf.d , xorg and also pull configs out of that area too , keep following the instructions, I think I found out what was wrong with mine too . And it has to do with nvidia improperly miss taking your hardware. And the config gets messed up .
Ill give it a shot in a tomorrow, im working on something :) i mean learing. Thanks for your help
No luck brother, I still get black screen. Thanks for trying to help me out
Hmm… After troubleshooting step B I was able to log back in using the GNOM3 GUI, but I have now a major multiscreen problem. Should I try step C?
I have done step C and it does not seem to fix anything… I just see ¨Unknown¨ on both of my screens, and they display the same except for the right one is stretched out because of another resolution.
Thank you this helped me out a lot! Got it to work on my first try!
Help, right after step 6, I rebooted my system but when it starts back up it goes through grub and the screen turns black thus preventing me from using kali. I have tried ctrl+alt+delete and all it does is reboot the system but the screen stays the same.
Nevermind, I got out of the black screen but now I cant use nvidia drivers. Is there a solution to this?
Hey there,
When I go to type – glxinfo | grep -i “direct rendering”, I get the following error,
Xlib: extension “GLX” missing on display “:0.0”.
Xlib: extension “GLX” missing on display “:0.0”.
Xlib: extension “GLX” missing on display “:0.0”.
Xlib: extension “GLX” missing on display “:0.0”.
Xlib: extension “GLX” missing on display “:0.0”.
Error: couldn’t find RGB GLX visual or fbconfig
Xlib: extension “GLX” missing on display “:0.0”.
Xlib: extension “GLX” missing on display “:0.0”.
Xlib: extension “GLX” missing on display “:0.0”.
Xlib: extension “GLX” missing on display “:0.0”.
Xlib: extension “GLX” missing on display “:0.0”.
Xlib: extension “GLX” missing on display “:0.0”.
Xlib: extension “GLX” missing on display “:0.0”.
Any Idea on what this is and how to fix it.?
I used all methods include yours and official Kali’s to install the NVIDIA driver. However, none of them worked well and unable to use. I tried to reinstall it but the result was still same as before. I’m feeling so frustrated that a unknown factor blocks me to do it. How should I do it?
Notes:
I’m using latest 64 bit Kali with Win 7 64 as dual boot.
I used official meta packages to add more features like headers, Pyrit, Android and so on (like apt-get install kali-linux-all).
My GPU is the Geforce 610M which is designed for laptop.
I reinstalled it a week ago so its current state is near mint.
Other things:
How to upgrade Gnome 3.4.2 to 3.12.2 for Kali Linux?
How should I do to increase the size of root from 40 GB to 50~60 GB (due to the size of tools) (I used Kali Live and Gparted Live USB to do it but I couldn’t move unallocated space (from /home) to root.
I cannot mount the external HDD as a normal user while it works well on root user mode.
Screen shots:
file:///home/user/Screenshot%20from%202014-07-13%2018:55:03.png
file:///home/user/Screenshot%20from%202014-07-13%2018:56:48.png
file:///home/user/Screenshot%20from%202014-07-13%2019:06:43.png
file:///home/user/Screenshot%20from%202014-07-13%2019:08:31.png
file:///home/user/Screenshot%20from%202014-07-13%2019:11:38.png
Hi and thank you for your step by step tutorial ..After i done everything like you said everything appear exactly like you said ,just that my resolution is on 640X480 and i do not have any option ..Now how can i fix this ?
Thank you and R E S P E C T !
Ok Sorry Again
Now If someone has my problem with the resolution please do this !
In /etc/X11/xorg.conf
HorizSync 28.0 – 33.0
VertRefresh 43.0 – 72.0
and replace them with
HorizSync 30.0 – 83.0
VertRefresh 56.0 – 75.0
That solved my problem and so it should for you as well
THANK YOU AND RESPECT
Eddy, please note those maximum values vary from monitor to monitor. It would be advisable (and safer) to respect the maximums other monitors may have, so one should not use directly the values you provided (in case you know that, sorry to repeat it, but it may be useful to others, anyway).
The maximum values can be obtained from your monitor’s user’s handbook/manual/guide — if you don’t have it, try to look for it online on Google with something like “Samsung V733 filetype:pdf” (insert your real monitor brand and model instead of Samsung V733).
If you can’t find any information, you’d really better use the tool mentioned in the post, as it is easier.
Also, it may not work everywhere, but the X System produces a log with the data it gathered. if you type (or copy & paste) the line:
cat /var/log/Xorg.0.log | grep Ranges
maybe you get the correct values to use in xorg.conf as the post explains.
Hi Eddy,
Are you on a flatpanel screen? This link seems promising .. https://askubuntu.com/questions/100900/how-do-i-set-the-correct-monitor-resolution-with-nvidia-drivers-for-a-monitor-th
Cheers,
-BMO
This is how I fixed Mint 17 Cinnamon for an unsupported Samsung monitor, using XRANDR:
https://forums.linuxmint.com/viewtopic.php?f=90&t=172967
May work for others. Note that I got the exact “newmode” settings for my monitor by simply entering “cvt” with the resolution I want “1900 1200” in the Terminal:
$ cvt 1900 1200
Hey i have done step a,b and c of troubleshooting and still get the black screen
I have been following this guide as well as a few others and cannot for the life of me get this working. So I have Kali installed native (only OS on it) on a 3,1 MacBook Pro using EFI and I get this terrible flickering in the gdm. I have tried a million diff ways to get the Nvidia drivers installed and no matter what it locks up right at the beginning after it is loading kernel. I also get a message at the beginning of boot that command true is not found, but that has to do with my EFI I believe. This is really frustrating the hell out of me. Thanks!
when I enter
aptitude install nvidia-kernel-dkms
All I see is,
The following NEW packages will be installed:
dkms{a} nvidia-kernel-dkms
0 packages upgraded, 2 newly installed, 0 to remove and 0 not upgraded.
Need to get 0 B/5,265 kB of archives. After unpacking 16.2 MB will be used.
Do you want to continue? [Y/n/?] n
which doesn’t match the output from when you run the command….
I continue on, but I don’t get the two popups you describe.
And finaly on reboot I get a black screen….
Not entirely sure what to do next.
Any help?
Thanks
Been There, Done that.
Two initial options:
At the black screen type [Ctrl]+[Alt]+F1
a tty session starts
Login: root
password
And you have a console.
if you have not installed before type:
#> apt-get install nvidia-xconfig
#> nvidia-xconfig
This will write or re-write your xorg.conf file
Then start the X server
#> server gdm3 start
You should see a GUI log in
The alternative is to log in in recovery mode and perform similar steps.
And Pray. . .
Thank you so much! All the other guides I used resulted in a blackscreen, but this one worked perfectly! THanks!
You’re welcome.
hey can anyone help with this or even provide reasoning for why this is happening??
i get blackscreen then remove xorg.conf start gdm3 again and glxinfo | grep -i “direct rendering” receive this error ive reinstalled kali on multiple hdds on the same pc and the same error everytime i even tried the official package from nvidia… still no good. and everytime ive tried to install nvidia drivers its been on a fresh install upgraded updated and dist-upgraded please help ive searched everywhere
Xlib: extension “GLX” missing on display “:0.0″.
Xlib: extension “GLX” missing on display “:0.0″.
Xlib: extension “GLX” missing on display “:0.0″.
Xlib: extension “GLX” missing on display “:0.0″.
Xlib: extension “GLX” missing on display “:0.0″.
Error: couldn’t find RGB GLX visual or fbconfig
Xlib: extension “GLX” missing on display “:0.0″.
Xlib: extension “GLX” missing on display “:0.0″.
Xlib: extension “GLX” missing on display “:0.0″.
Xlib: extension “GLX” missing on display “:0.0″.
Xlib: extension “GLX” missing on display “:0.0″.
Xlib: extension “GLX” missing on display “:0.0″.
Xlib: extension “GLX” missing on display “:0.0″.
I can get to the login screen but when I go to type my password no text appears, I then press enter and it let’s me type it, but it says its the wrong password
This install works great, but….. I made it to step 5 “reboot” When I rebooted and selected persistence on my USB boot, it ended up bringing me to a black screen with a cursor flashing at the top left corner. I can’t do anything there except hit ctrl-alt-delete. Any ideas on how to fix this?
Your gonna have to reinstall Kali linux. The same thing happened to me so I had to reinstall kali and stay with the open sourced version of Nvidia (nouvea).
Hi,
I have an old 7300 LE for this box, so I need to use the:
aptitude install nvidia-kernel-legacy-173xx-dkms
However the driver still doesn’t work, and the nouveau is not blacklisted.
Hi blackMORE Ops,
Whenever I get to the step: Step 1: Install Linux headers, I cannot seem to install it correctly because it cannot find the package. Here is what it says when I input the command: aptitude -r install linux-headers-$(uname -r):
Couldn’t find any package whose name or description matched “linux-headers-3.7-trunk-amd64”
Couldn’t find any package whose name or description matched “linux-headers-3.7-trunk-amd64”
The following packages will be REMOVED:
dkms{u} firmware-mod-kit{u} libegl1-nvidia{u} libgles1-nvidia{u} libgles2-nvidia{u} libhackrf{u} liblzma-dev{u} libnvidia-eglcore{u}
libnvidia-ml1{u} libtsk3-3{u} libwireshark2{u} libwiretap2{u} libwsutil2{u} linux-headers-3.18.0-kali1-amd64{u}
linux-headers-3.18.0-kali1-common{u} linux-headers-amd64{u} linux-kbuild-3.18{u} nvidia-driver-bin{u} nvidia-kernel-common{u}
python-apsw{u} unrar-free{u}
0 packages upgraded, 0 newly installed, 21 to remove and 0 not upgraded.
Need to get 0 B of archives. After unpacking 190 MB will be freed.
Do you want to continue? [Y/n/?]
I have tried going through the rest of the tutorial by skipping this, but all i get after reboot is a blinking underscore on a black screen, and have to do the revovery step B in order to have the GDM3 GUI take control again. Any help would be appreciated.
I followed everything to a T. Still getting a blank screen. I am stuck at tty1 screen. Getting wrong password. Can’t move on and I don’t want to reinstall have to many important document for my business on there and have no where to store it.. Tried recovery mode and when it asks for my root password it still says wrong password.. Any ideas….. ? If I can login , I may be able to trouble shoot my problem.. Thanks
Tried everything.. Still getting the text interface.. how do i switch to a gui interface.. please reply asap
Hey wassup. I saw you commented about Kali linux machine thinking its a vmware when its actuallty not. Same thing happened to my machine.
root@TheButcha:~# fglrxinfo
display: :0.0 screen: 0
OpenGL vendor string: VMware, Inc.
OpenGL renderer string: Gallium 0.4 on llvmpipe (LLVM 0x209)
OpenGL version string: 1.4 (2.1 Mesa 8.0.5)
Let me know if you figure anything out. I’m gonna try to solve it without a reinstall.
in step 3 I didn’t got second popup window and in step 6.a I got:: glxinfo | grep -i “direct rendering”
direct rendering: No (If you want to find out why, try setting LIBGL_DEBUG=verbose)
what should I do?
First of all thank you for all the guides and information that you provide on your site.
However I have a question before I proceed with this method.
My Kali installation is on a laptop with dual GPUs. One integrated Intel HD and one NVidia GT 870M.
Will this method work correctly on my device?
Thank you for your time.
By default Intel card works. Once you’ve installed NVIDIA GPU Driver, Intel card driver will be disabled and NVIDIA card driver will be enabled. Hope that explains.
Thank you for your reply!!! I will follow your instructions and hope that they will work!!
Is this worked with nvidia geforce 820M and 840M?
still i’m stuck with black screen error and my nvidia device isn’t listed with >> lspci | grep VGA >> show only my intel shared graphic device. why?
should your lap has got two graphic card like mine. i think we need to install bumblebee. however i couldnt try it succesfully.
#murat thanks for your comment.
is it work for us? can you guide me please. because i’m not expert with linux :)
nVidia has updated their driver package. It contains everything you need.
In contrast to all the guides on installing the nVidia driver on Kali Linux, you must not install anything nVidia related before running the official nVidia installer.
Here is how I got the driver working.
Make sure your Kali Linux system is up to date:
apt-get clean && apt-get update && apt-get upgrade && apt-get dist-upgrade
Install the kernel headers:
apt-get install -y linux-headers-$(uname -r)
Download the nVidia driver for your graphics card and save it in a location convenient to you (e.g. your home directory).
Blacklist the nouveau driver:
make sure you have a file called “nvidia-installer-disable-nouveau.conf” inside of [/etc/modprobe.d/]. If it’s not there, create it and paste inside…
blacklist nouveau
options nouveau modeset=0
Enter the following commands in a terminal as root:
sed ‘s/quiet/quiet nouveau.modeset=0/g’ -i /etc/default/grub
update-grub
update-initramfs
reboot
If you face the login screen after reboot, do not log in but change to a terminal with ALT+F1.
Log in to the terminal as root.
Kill GDM:
service gdm3 stop
Remove all nVidia related stuff:
apt-get purge nvidia-*
Navigate to the directory you downloaded the nVidia driver to.
Make sure the driver installer (*.run) is executable:
chmod +x NVidia…run
Start the nVidia driver installer and follow the instructions on the screen. Let it configure your X server.
Reboot again. You should now be fine
Hope that helps. At least that’s how I got my system working. The nvidia-kernel-dkms package from the Kali repository, unfortunately, does not support my graphics card (GeForce 8400 GS) any more so I had to install the official nVidia driver (340.93) instead.
hi!
i have a problem. Currently, my laptop have 2 GPUs (integrated intel and nVidia) that is switchable. And i would like to ask whether i can use my nvidia driver and proprietary driver.
lspci
VGA compatible controller: Intel Corporation 3rd Gen Core processor Graphics Controller (rev 09)
3D controller: NVIDIA Corporation GF117M [GeForce 610M/710M/820M / GT 620M/625M/630M/720M] (rev a1)
lscpu
Architecture: x86_64
CPU op-mode(s): 32-bit, 64-bit
Byte Order: Little Endian
CPU(s): 4
On-line CPU(s) list: 0-3
Thread(s) per core: 2
Core(s) per socket: 2
Socket(s): 1
NUMA node(s): 1
Vendor ID: GenuineIntel
CPU family: 6
Model: 58
Model name: Intel(R) Core(TM) i5-3230M CPU @ 2.60GHz
Stepping: 9
CPU MHz: 1409.484
CPU max MHz: 3200.0000
CPU min MHz: 1200.0000
BogoMIPS: 5188.41
Virtualization: VT-x
L1d cache: 32K
L1i cache: 32K
L2 cache: 256K
L3 cache: 3072K
NUMA node0 CPU(s): 0-3
is it still possible to get it done?
My installation on kali 2.0 and nvidia gt 630 was a success, but i’m getting oly 640 x 480 display . even Nvidia-settings is providing me only the above stated resolution.Can you please help me out to get 1080p display.If more information is required about the setup please do ask me.
HI i’ve repeated the steps 6th time, each time i perform a clean format on my hdd. however it still stucks at black screen with cursor blinking…
I have a Nvidia GT 635m on my machine. I’ve been searching everywhere but all the steps they provide still reach the same result.. any suggetion?
hey Blackmore i have followed each and every step as you stated and direct rendering was successful but typing command-
lsmod | grep nvidia
doesn’t produce any output where as command-
lsmod | grep nouveau
produces output
don’t know what’s going wrong.
i am using kali linux(sana) 4.0.0
is this the wrong version?
oh!! and one thing more
typing command-
lspci -nn | grep VGA
only showing intel hd graphics but i have nvidia 820M graphics too..
hoping you will reply soon..thanks in advance.
ADD ON- i am using Insyde F35 bios
so don’t have an option to change GPU from Intel to Nvidia or say i can’t disable Intel GPU from bios :(
Works on kali-rolling too.. Thank you
Hi, I am on the most current KALI linux, did the upgrade and dist-upgrade, and there don’t seem to be kernel headers available for me.
This is what I get when I type
apt-get install linux-headers-$(uname -r)
Reading package lists… Done
Building dependency tree
Reading state information… Done
E: Unable to locate package linux-headers-4.3.0-kali1-amd64
E: Couldn’t find any package by glob ‘linux-headers-4.3.0-kali1-amd64’
E: Couldn’t find any package by regex ‘linux-headers-4.3.0-kali1-amd64’
Maybe this OS version is too new?
If I could get the headers working I could probably install because there is a driver out for the GTX-970 which is what I am using, and the built in display drivers work well with it, but I would like the GPU processing capabilities.
Please reply if you can, thanks
Awesome write-up & in detail. Thanks.
error help please
root@kali:~# apt-get install nvidia-kernel-$(uname -r)
Reading package lists… Done
Building dependency tree
Reading state information… Done
E: Unable to locate package nvidia-kernel-4.5.0-kali1-686-pae
E: Couldn’t find any package by glob ‘nvidia-kernel-4.5.0-kali1-686-pae’
E: Couldn’t find any package by regex ‘nvidia-kernel-4.5.0-kali1-686-pae’
root@localhost:~# aptitude -r install linux-headers-$(uname -r)
Couldn’t find any package whose name or description matched “linux-headers-3.14-kali1-amd64”
Couldn’t find any package whose name or description matched “linux-headers-3.14-kali1-amd64”
No packages will be installed, upgraded, or removed.
0 packages upgraded, 0 newly installed, 0 to remove and 0 not upgraded.
Need to get 0 B of archives. After unpacking 0 B will be used.
apt-get install nvidia-kernel-amd64
Reading package lists… Done
Building dependency tree
Reading state information… Done
E: Unable to locate package nvidia-kernel-amd64
Hello juan carlos, and arjun thagunna,
at first, I’d suggest buying a mouse with a scrollwheel. The solution is NOT to install any of those nividia-kernel related packages. It is already described a few post above yours but I repeat it for your convenience:
nVidia has updated their driver package. It contains everything you need.
In contrast to all the guides on installing the nVidia driver on Kali Linux, you must not install anything nVidia related before running the official nVidia installer.
Here is how I got the driver working.
Make sure your Kali Linux system is up to date:
apt-get clean && apt-get update && apt-get upgrade && apt-get dist-upgrade
Install the kernel headers:
apt-get install -y linux-headers-$(uname -r)
If you get errors like alreza jj:
Couldn’t find any package whose name or description matched “linux-headers-3.14-kali1-amd64”
make sure that the correct sources for Kali packages are referenced in /etc/apt/sources.list and that you are connected to the internet.
Download the nVidia driver for your graphics card and save it in a location convenient to you (e.g. your home directory).
Blacklist the nouveau driver:
make sure you have a file called “nvidia-installer-disable-nouveau.conf” inside of [/etc/modprobe.d/]. If it’s not there, create it and paste inside…
blacklist nouveau
options nouveau modeset=0
Enter the following commands in a terminal as root:
sed ‘s/quiet/quiet nouveau.modeset=0/g’ -i /etc/default/grub
update-grub
update-initramfs
reboot
If you face the login screen after reboot, do not log in but change to a terminal with ALT+F1.
Log in to the terminal as root.
Kill GDM:
service gdm3 stop
Remove all nVidia related stuff:
apt-get purge nvidia-*
Navigate to the directory you downloaded the nVidia driver to.
Make sure the driver installer (*.run) is executable:
chmod +x NVidia…run
Start the nVidia driver installer and follow the instructions on the screen. Let it configure your X server.
Reboot again. You should now be fine
Hope that helps. At least that’s how I got my system working. The nvidia-kernel-dkms package from the Kali repository, unfortunately, does not support my graphics card (GeForce 8400 GS) any more so I had to install the official nVidia driver (340.93) instead.
apt-get install nvidia-kernel-$(uname -r)
Couldn’t find any package whose name or description matched “nvidia-kernel-4.9.0-kali2-amd64”
So how to install this step?
Please read the answer right above your comment.