Table of Contents
A detailed guide on installing Kali Linux on VirtualBox
A lot of the users would like to do crazy stuffs with their Kali Linux. If you’re doing something you’re not sure, you want to install unknown packages, modify some code but don’t want to break your HOST OS, running and installing Kali Linux on VirtualBox is the best way to go. You could also try using VMware but as VMware is proprietary and VirtualBox is free to use, there’s no argument which way usual users would go. Running Kali Linux on VirtualBox is great as in that way all you need to do is take a snapshot and if you break sometime, you can quickly roll back. This imposes another problem though. If you keep breaking things and keep rolling back for everything, you don’t really learn the Operating System itself. You are learning to bypass and overlook a problem with a easy way out. I am going to judge that? Maybe not. Linux can be quite complicated sometimes specially you never used it before. You might have just heard about Kali Linux from a friend and learned how much it can achieve and wanted to give it a try without actually installing it in your hard disk alongside your primary OS (may that be Windows or Linux or MAC).
Pros of running Kali Linux on VirtualBox
- You can run more than one OS simultaneously.
- You can install/re-install/backup/move/restore/rollback your guest OS easily.
- You can manage allocation of resource (Memory, Hard disk). Resource Management!
- You can copy your VirualBox to a different machine. Portability!
- You can completely break your installation and roll back in few clicks.
- You’re forced to troubleshoot and thus learn.
- Great for learning and testing.
Cons of running Kali Linux on VirtualBox
- Performance drop. Usually much slower.
- GPU Acceleration doesn’t work.
- USB Wireless cards can be problematic.
- You tend to avoid learning troubleshooting and just rollback quite often.
- You won’t be comfortable installing and running in real machine if you’re too used to VM’s.
- Can’t use FULL graphics as the card is Virtualized.
- Adds an additional layer between OS and actual hardware.
Saying all that, it’s true for any Virtualized environment. If you’re learning, testing.. yes go ahead. Even best one uses VM’s to test cause it’s just too much time consuming to install and re-install and update.
What is VirtualBox
VirtualBox is a general-purpose full virtualizer for x86 hardware, targeted at server, desktop and embedded use. It is a powerful x86 and AMD64/Intel64 virtualization product for enterprise as well as home use. Not only is VirtualBox an extremely feature rich, high performance product for enterprise customers, it is also the only professional solution that is freely available as Open Source Software under the terms of the GNU General Public License (GPL) v2. Presently, VirtualBox runs on Windows, Linux, Macintosh, and Solaris hosts and supports a large number of guest operating systems including but not limited to Windows (NT 4.0, 2000, XP, Server 2003, Vista, Windows 7, Windows 8), DOS/Windows 3.x, Linux (2.4, 2.6 and 3.x), Solaris and OpenSolaris, OS/2, and OpenBSD.
VirtualBox is being actively developed with frequent releases and has an ever growing list of features, supported guest operating systems and platforms it runs on. VirtualBox is a community effort backed by a dedicated company: everyone is encouraged to contribute while Oracle ensures the product always meets professional quality criteria.
Things you need to install
As I am going to show this in Windows here’s the link to Windows installer. You can download MAC or Linux installer and follow EXACTLY the same steps to install and run VirtualBox in your machine.
- VirtualBox 4.3.10 for Windows hosts x86/amd64
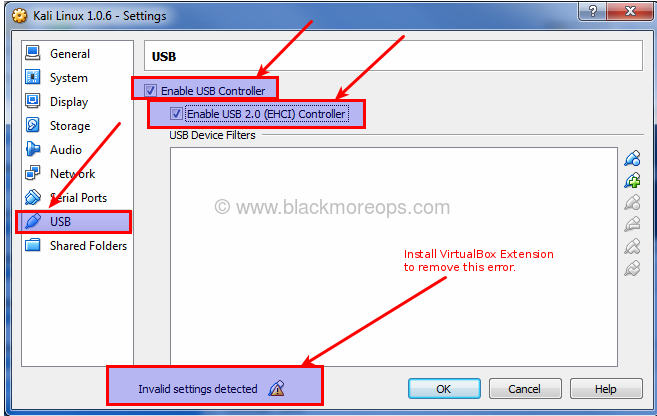
- VirtualBox 4.3.10 Oracle VM VirtualBox Extension Pack for All supported platforms
Extension pack provides the following added functionality:
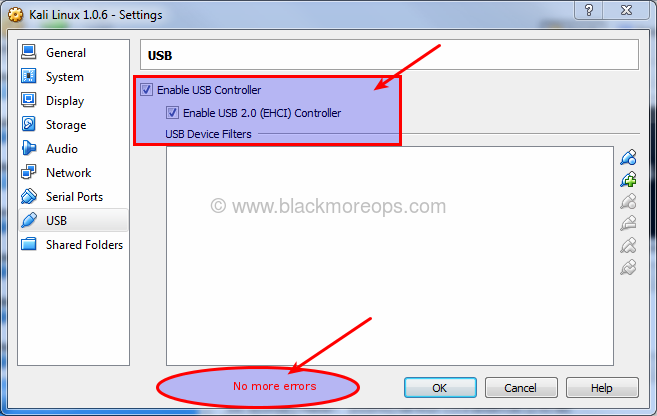
- The virtual USB 2.0 (EHCI) device;
- VirtualBox Remote Desktop Protocol (VRDP) support;
- Host webcam passthrough;
- Intel PXE boot ROM and
- Experimental support for PCI passthrough on Linux hosts.
If you need instructions on how to install VirtualBox in your machines (may that be a Windows, Linux or MAC or Abracadabra, refer to their User Manual. VirtualBox user Manual is VERY detailed and specific installation instruction can be found here.
Download page: https://www.virtualbox.org/wiki/Downloads
Kali Linux
I mean if you don’t know what Kali Linux is, you wont be here!! Right? Anyhow, Kali is the Hindu goddess associated with empowerment! I’m just kidding. Kali Linux is a Debian-derived Linux distribution designed for digital forensics and penetration testing. It is maintained and funded by Offensive Security Ltd. It was developed by Mati Aharoni and Devon Kearns of Offensive Security through the rewriting BackTrack, their previous forensics Linux distribution. Say hi to Mati and Kali Dev team at www.kali.org.
You need to download the latest version of Kali Linux ISO from here.
You can also download from CDImage Page here:
I would personally suggest downloading using TORRENT and it seems more stable and less chance of data corruption.
In this guide I will outline very detailed step by step instructions on installing Kali Linux on VirtualBox where Windows 7 is the HOST operating system.
Installing Kali Linux on VirtualBox
In this guide, I will cover the followings:
- Create a new Virtual Machine
- Create a new Virtual disk (VDI, dynamic allocation etc.)
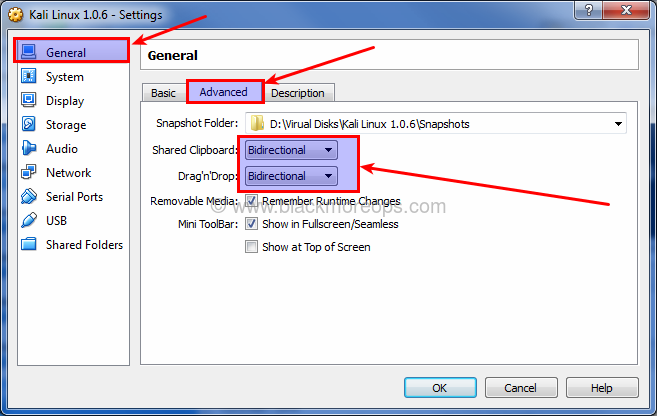
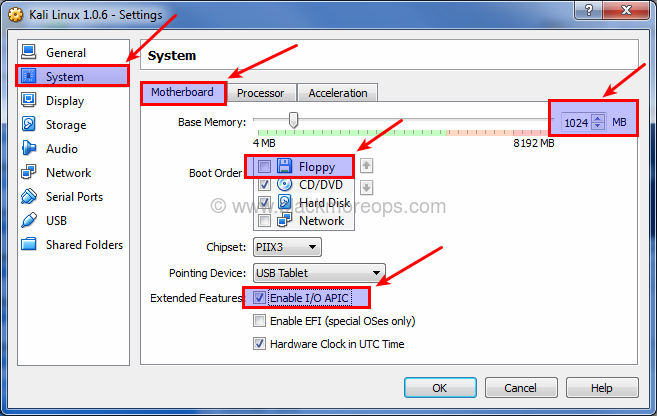
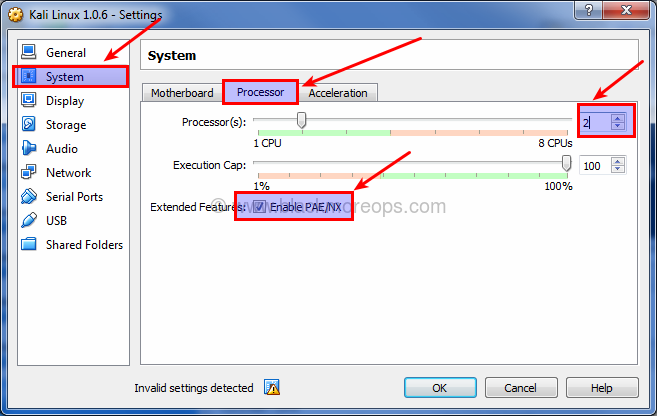
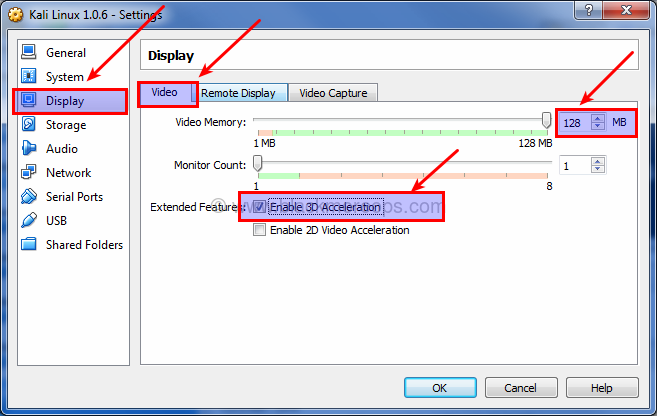
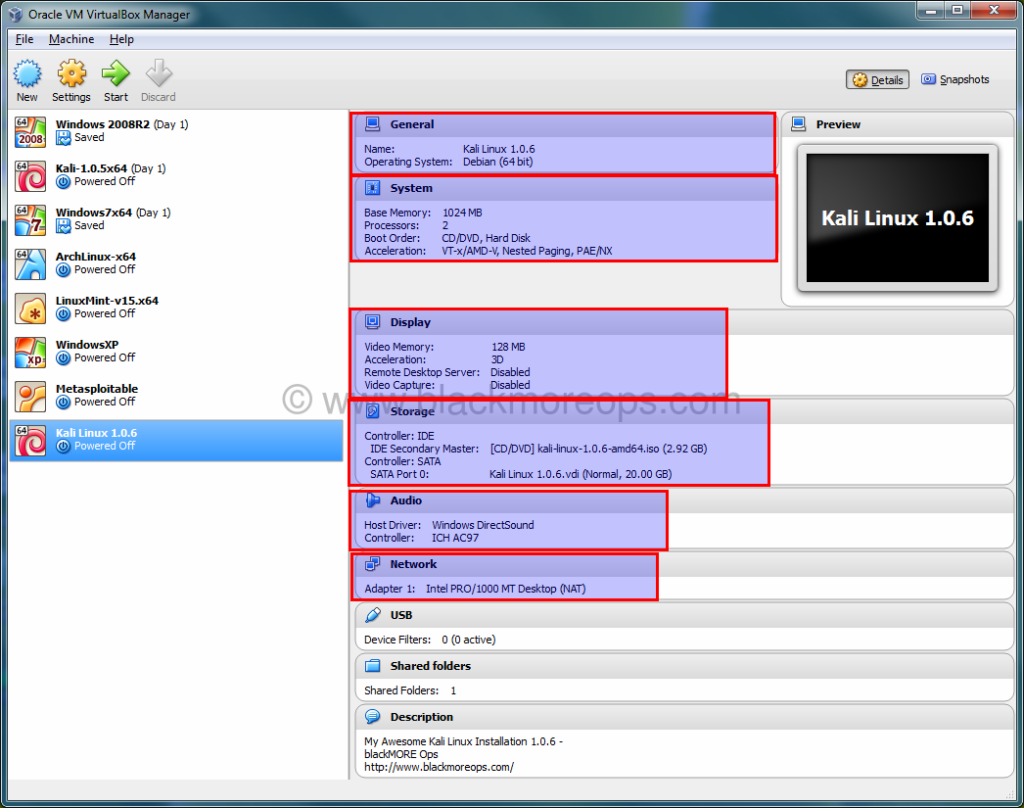
- Modifying some VirtualBox settings (allocating physical and Video memory, selecting OS Type, CPU acceleration etc.)
- Loading Kali ISO
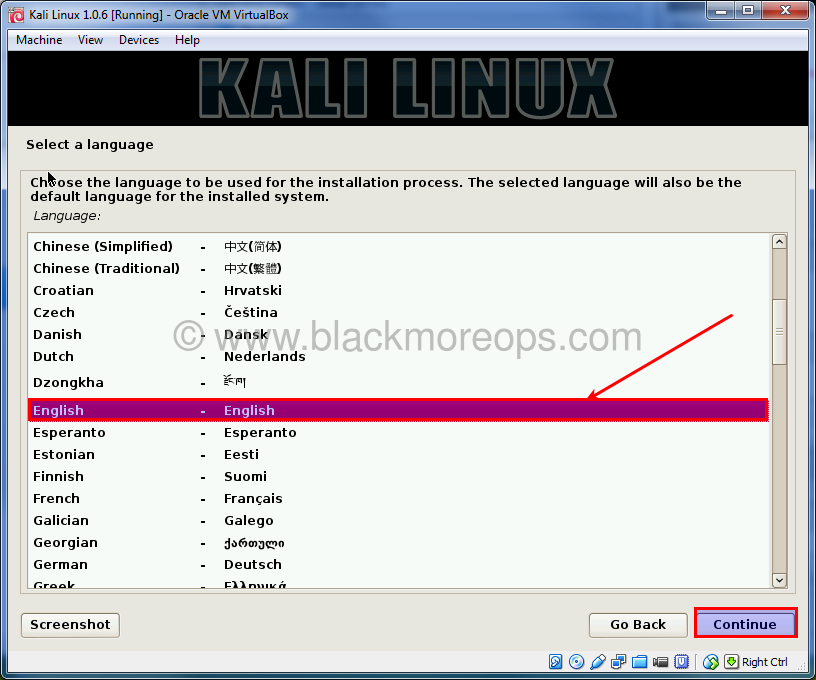
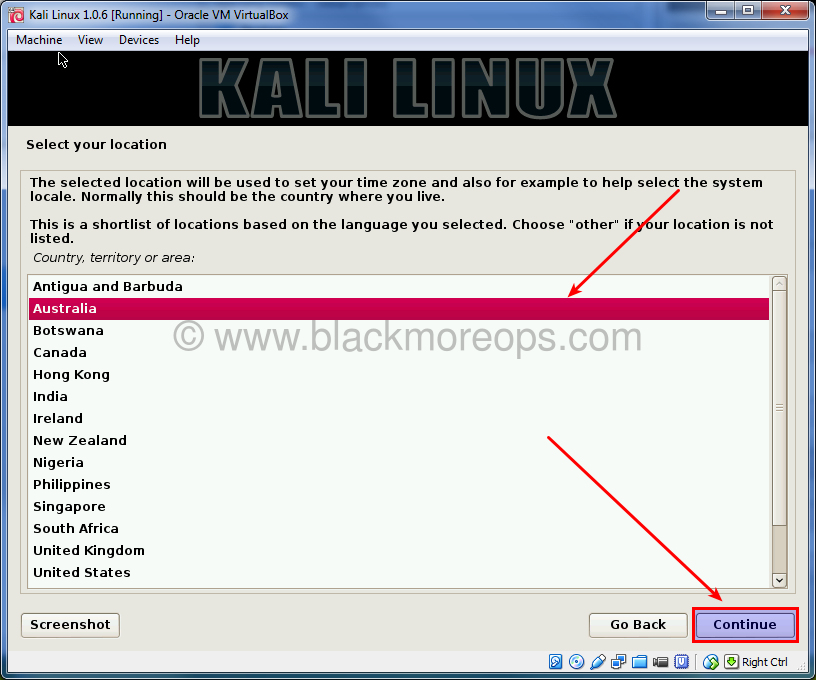
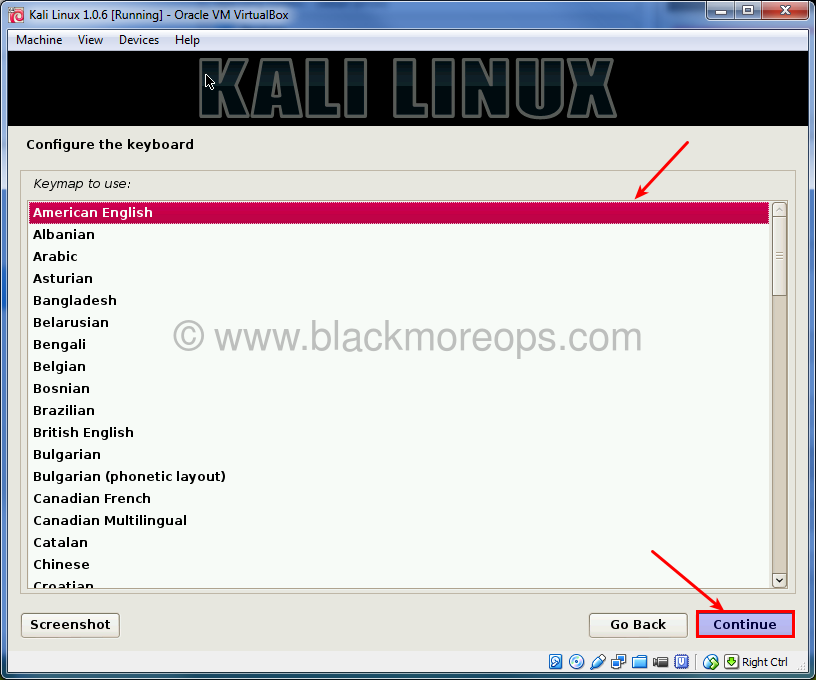
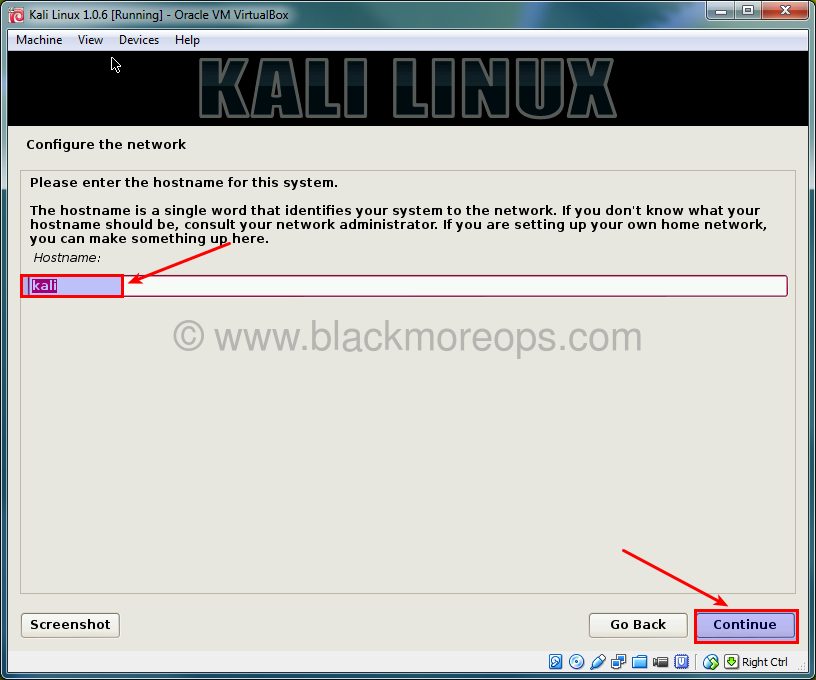
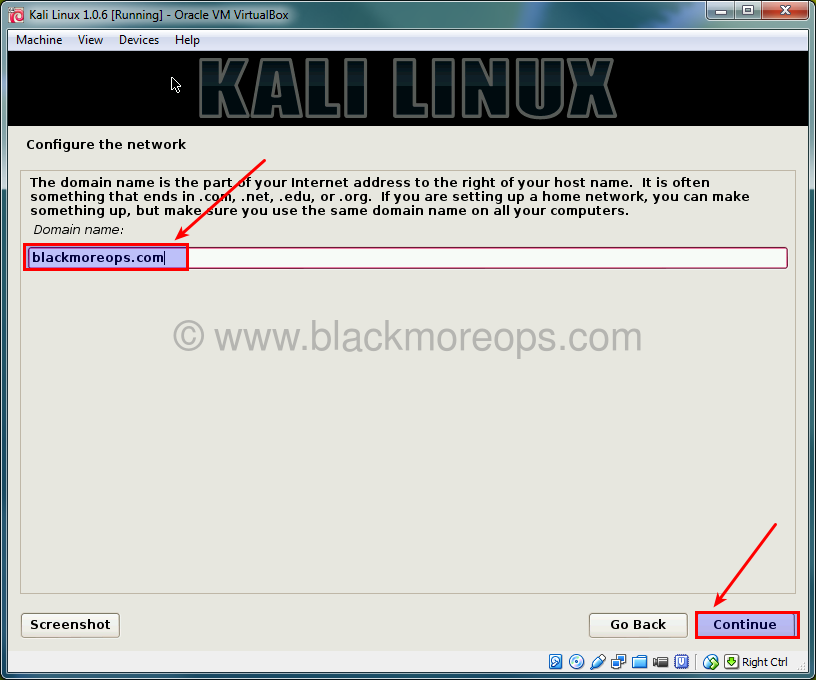
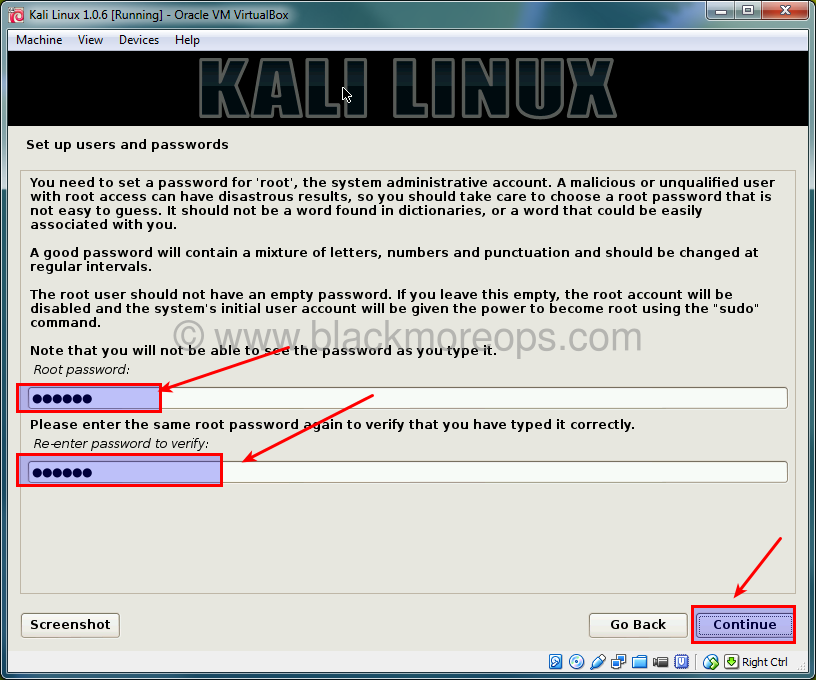
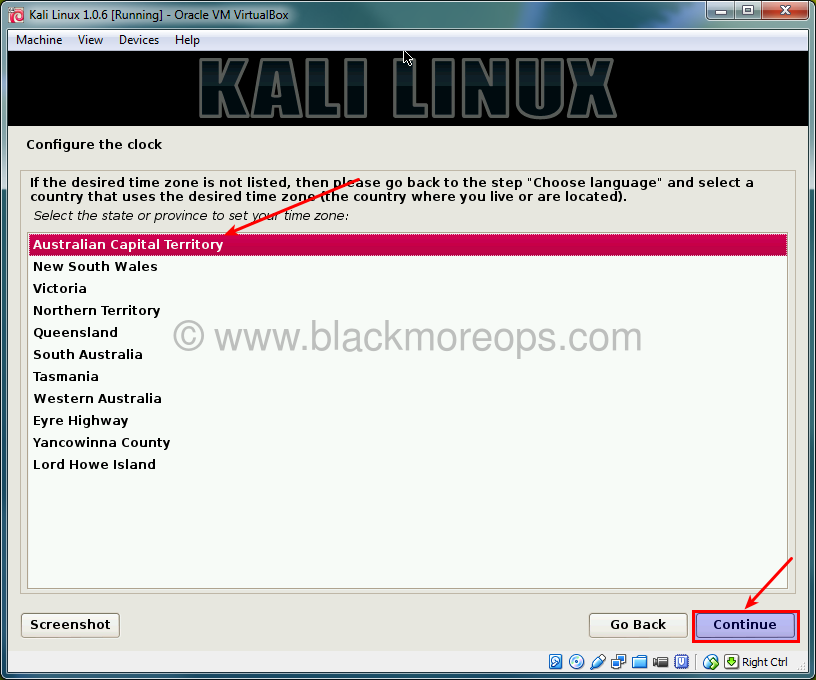
- Booting Kali ISO (initial info, location, timezone etc.)
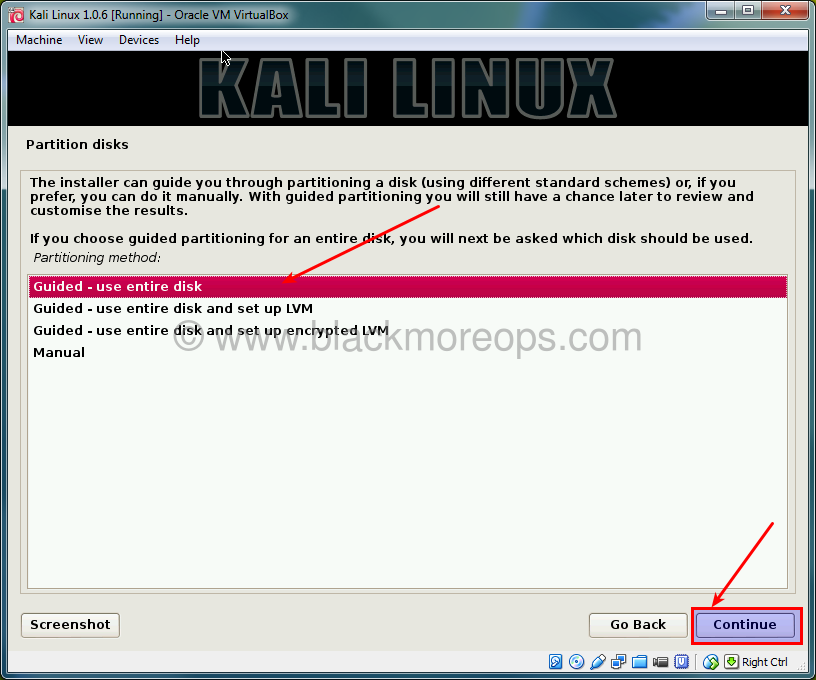
- Kali disk partitioning (you should try other ways than I’ve showed here to learn)
- Finalizing instllation and running Kali on VirtualBox.
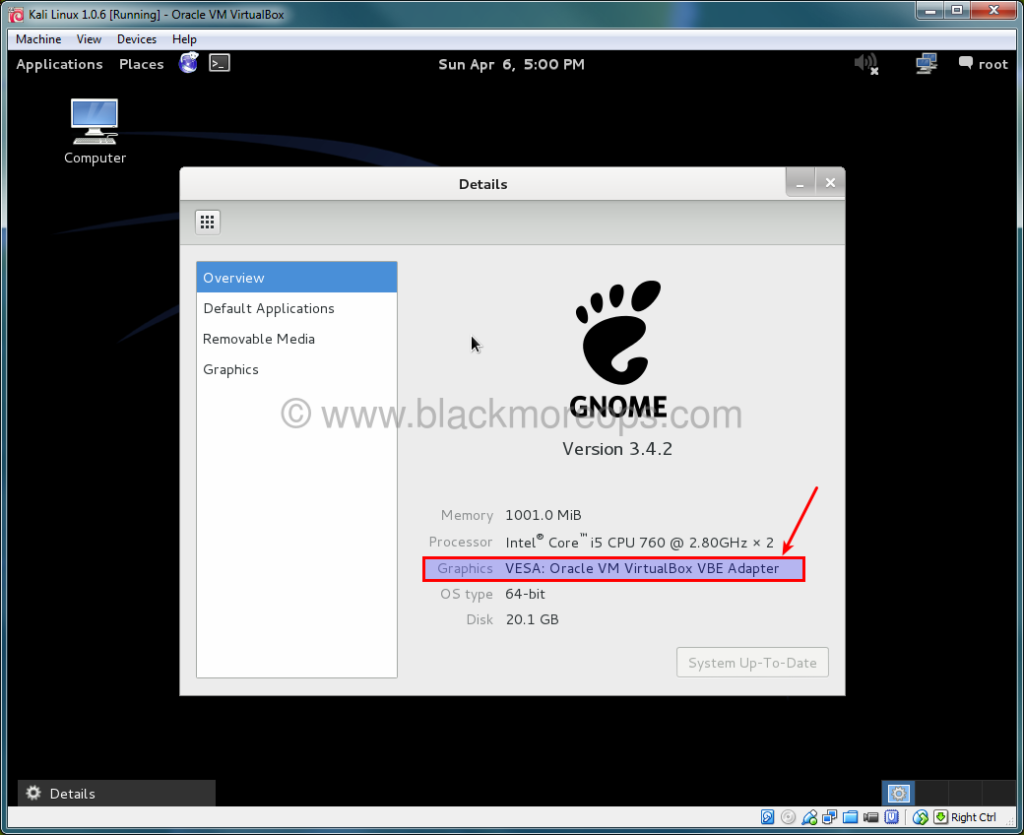
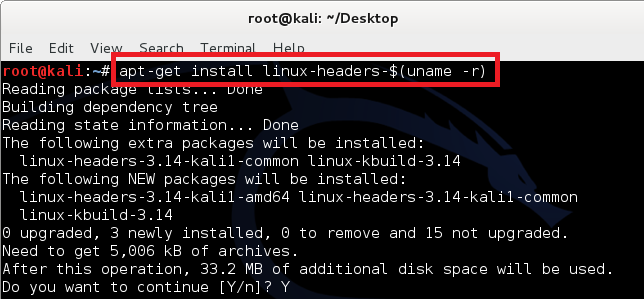
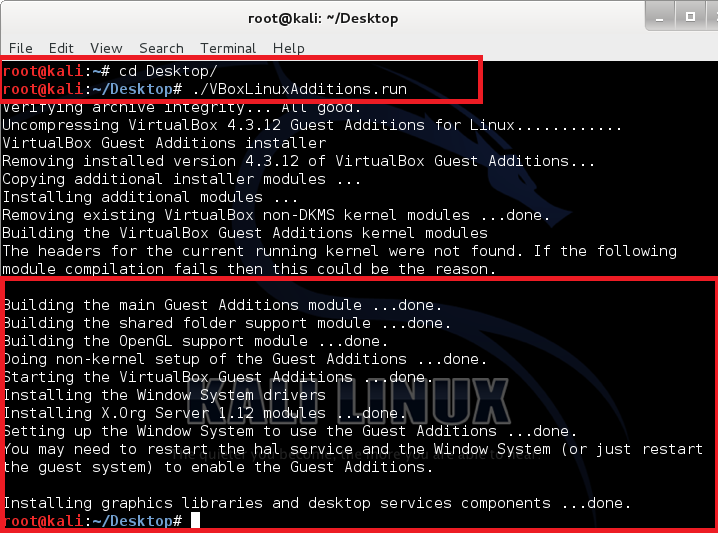
- Install Virtualbox Guest Additions packages
You have two options here to follow this guide,
- You can just use the slideshow in this page and pretty much follow that..
- You can read this really long informative guide to get a better understanding of what to do
So choice is yours.
Step 1: Create a new Virtual Machine
I’ve already given instructions and provided links on how to get VirtualBox and install that above. If you’ve missed it, go back and install VirtualBox.
Once you’ve installed VirtualBox,
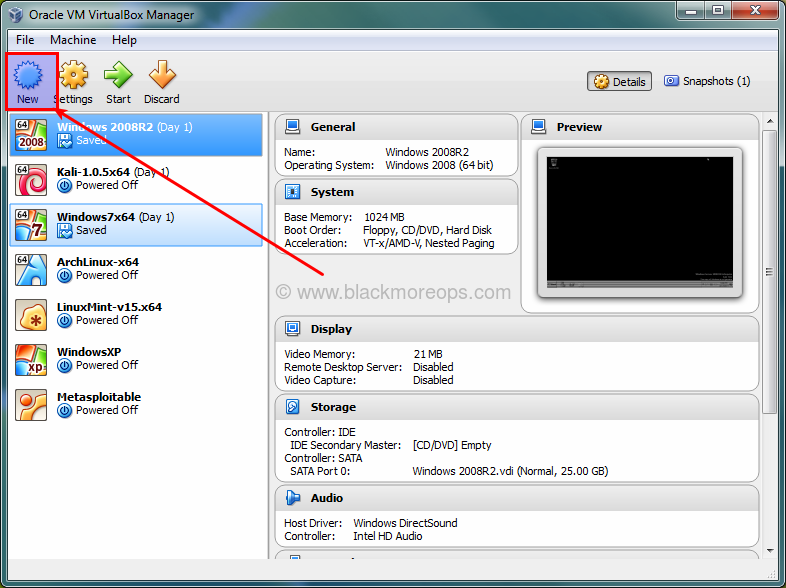
- Open it.
- Click on New to create a New Virtual Machine.
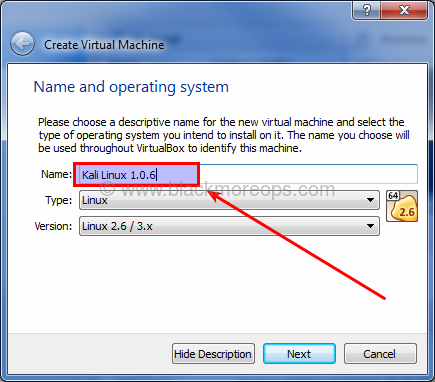
Step 1.a: Enter a name for you VBox
Enter Kali Linux 1.0.6 as the name. You’ll see Type is set to Linux automagically and version will be Linux 2.3/3.x. We will fix those later. Click Next.
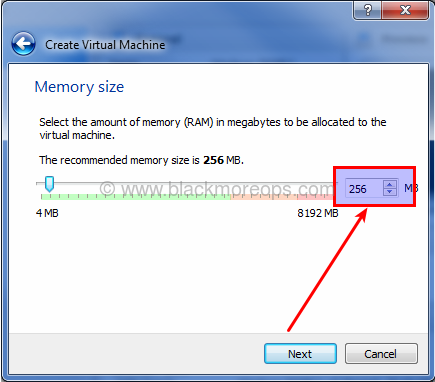
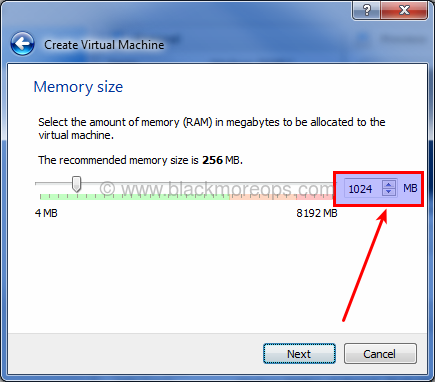
Step 1.b: Allocate Memory/RAM
Default memory size is 256 MB.
Change it to 1024 (1GB).

223 comments
Tutorial was very helpful for noobs., i did it acording to given instructions but it is showing ERROR in starting
process like this, guide me..
Failed to open a session for the virtual machine kali-linux-1.0.9-i386.
The virtual machine ‘kali-linux-1.0.9-i386’ has terminated unexpectedly during startup with exit code 1.
Result Code: E_FAIL (0x80004005)
Component: Machine
Interface: IMachine {480cf695-2d8d-4256-9c7c-cce4184fa048}
Hi Bao! Just wondering did you ever solve this issue? My VB use to work fine with Linux and then all of a sudden I get this when I want to start it! I deleted it installed about 100 time and did the steps again even changed versions of both Linux and VB… but it will no go… I browsed all over the web… seems like no one knows?! if you have solved.. it would be awesome to say how.. thanks!
Avira antivirus? That was my problem…
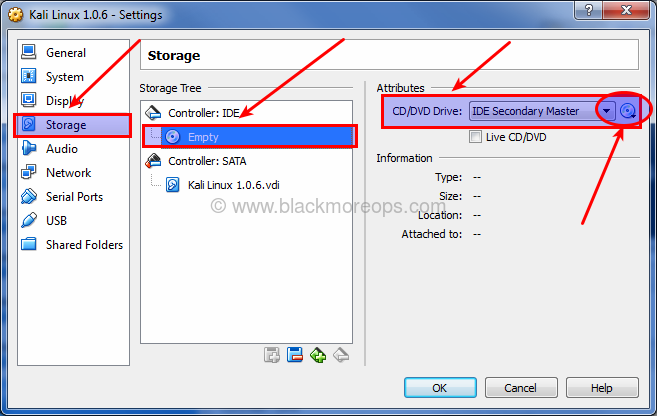
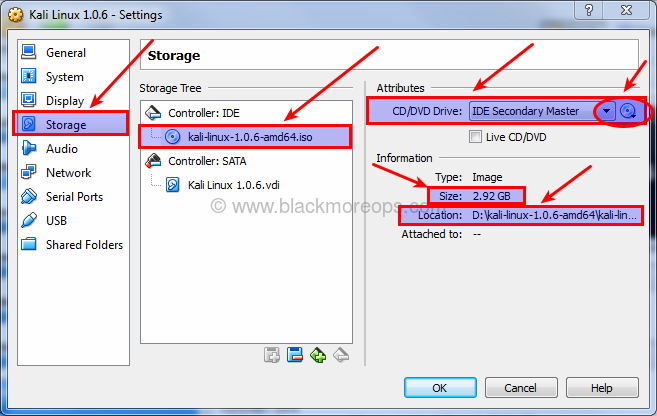
i’m stuck at step 4. i don’t have a cd/dvd drive and i just have the iso file downloaded on my computer and i don’t understand what exactly it is that I’m supposed to do here instead
Just click on the disc icon and select your Kali Linux Iso file =)
Are you blind can’t you read the presentation
For latest Kali disk must be bigger than 8GB, it crashed after installing in my VBox with 8GB and then my virtual disk was broken when I tried to resize it
Thanks! Very helpful.
Hi BlackMORE Ops
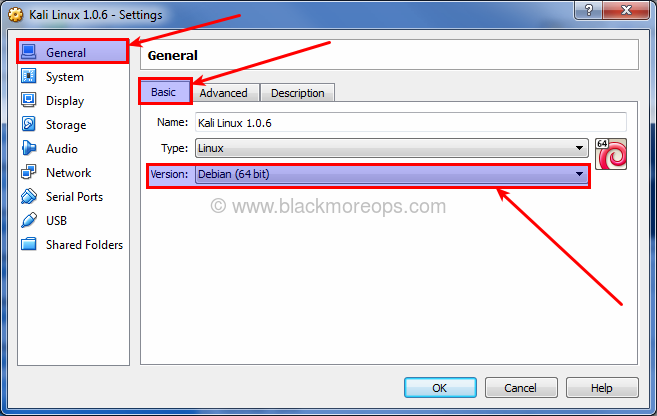
I installed Kali-Linux-1.0.9a-amd64 onto a 64 bit machine running Windows 8 and the current version of VirtualBox (v4.3.16 r95972), but at step 3a above, there are only 32 bit options in the drop down menu – there isn’t the option to select Debian (64 bit), so I selected Debian (32 bit).
When I attempt to boot onto a virtual machine, I receive the message “This kernel requires an x86-64 CPU, but only detected an i686 CPU. Unable to boot – please use a kernel appropriate for your CPU”
Any suggestions would be greatly appreciated
Thanks,
Craig
Hey Craig,this is kinda a sudden reply out of the blue but for your problem (which I personally once encountered)you need to go in your BIOS and then find something that says Hardware Virtualization or any other along those lines and enabled it,after your’re done save and exit your bios,now you should be able to enable 64bit (It worked for me) Peace Out.
thanx nigguh shit was cash
Thank you so much. There are dozens of procedures on the net for installing Kali Linux in VirtualBox. I spent days trying them with no success. Your complete instructions finally did the trick. But half my problem was just the stupid thing that I did not know the proper procedure for logging on. I removed the OS and started over again three times after being unable to log on and thinking I did something wrong. But your instructions were complete right down to the log on. Yeah, simple if you know the trick. But I did not. Thank you again.
Kali-Linux 1.0.9 / Virtualbox 4.3.18 / Windows 7 64-bit Pro
Hi,I’m following your guide on installing Kali Linux on VirtualBox however when the time comes for partitioning disks I encounter the following error:Failed To Load Installer Component,
Loading partman-lvm failed for unknown reason. Aborting.
Using VirtualBox 4.3.18 for Windows hosts (64-bit) and Kali Linux 64-bit Torrent version 1.0.9a.
However I realized that the size of your ISO is 2.92 GB but mine is 2.84GB (if that makes any difference) so I deleted the ISO and downloaded it again but the ISO still remains at 2.84GB so I don’t think that my ISO is corrupted.
Any ideas anyone? Help would be appreciated.Thank You.
Hi Frank
I am installing Kali now using VirtualBox 4.3.18 hosts (64 bit) and Kali Linux 1.0.9a and I am having the same error as you.
Failed To Load Installer Component,
Loading partman-lvm failed for unknown reason. Aborting.
Have you solved it? Please can you give me any idea? Thank you in advance!
Thanks a million times! Just used your guide to install Kali 1.0.9a
Mine gets about 80% done then says it failed
I appreciate the article. I am also using VirtualBox but working with a macbook. I am unclear as to why but when I attempt to select the Kali Iso in step 4 the file is grey and will not allow me to add it. I used the exact settings that you used so it’s possible i used the incorrect Kali file for my system. If anyone seems to know what iso file i should use i’d appreciate the help. Thank you
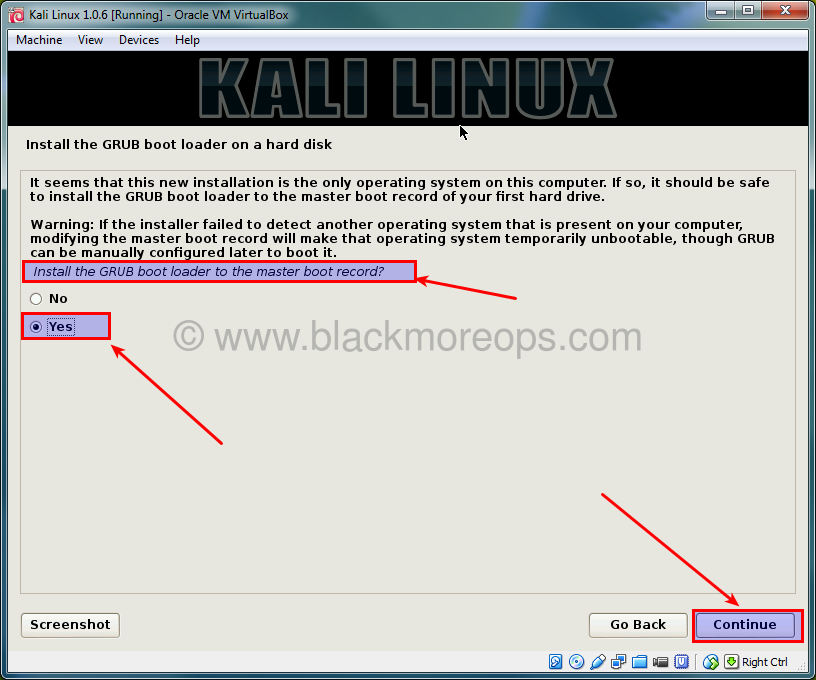
Hello there. I have a little problem. To be specific my problem is after doing Step 7.a! After I hit enter the installation continue…but after that the program don’t want to show me next step,that is Step 7.b: Install GRUB boot loader. Can someone help here? Does anyone have a clue what is a problem!? Please!
absollutely amazing tutorial!!keep up the gud work pal!
Please I need some help on installing kali when I reach about 40% the virual box freezes and the virtual hard disk stops at 4.29 GB.
I have tried to do it over 3 times and each time it stops at the same spot.
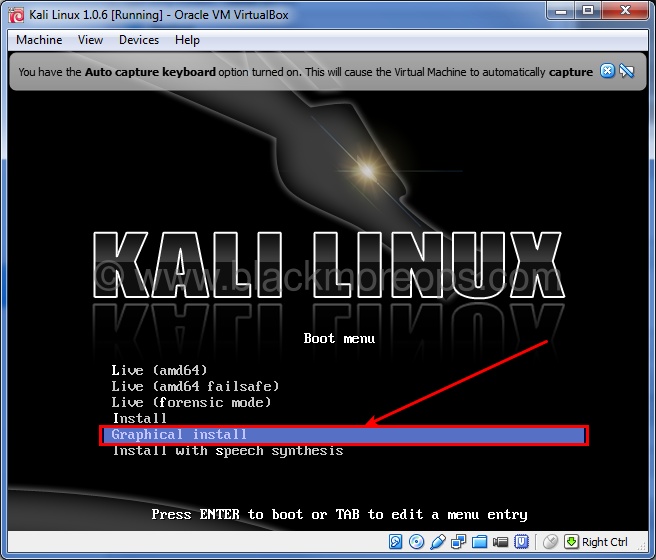
Hi blackMORE Ops! Thanks for your guide! I have some troubles when I press Enter to get in Graphical Install. The machine shut down immediately. Any idea about the problem?
Thanks man. Its a very good installation guide. worked fine for me.
In installed VirtualBox and downloaded Kali to a DVD. I followed all the steps, however, my VirtualBox startup keeps getting aborted and I can never get into Kali. I am using a Mac OS X. Not sure why this is happening.
I can’t seem to get to Step 5.b. Please advise
No solution, just similar experiences.
I had the same issue of aborting on GUI startup on Kali 2.0, Virtual Box 4.3.28 on OSX. Aborted with multiple issues, some of them being
flags: 64 bit ncq stag only ccc
measured clock 69907 rejected
And a whole lot of other things I don’t understand. Time was of the essence so I abandoned that and installed it all successfully and painlessly on a borrowed Win7 box.
I tried non-GUI (like plain “install”) and it also aborted, but at different points.
Frustration won out. Good luck.
After much trial and error and self troubleshooting I was able to do this on my own. Thank you very much !
I am using VirtualBox version – 4.3.20 r96997
Running Windows 7 Pro 32-bit
When I attempt to start VM, I receive a popup message with the abort button:
NtWriteVirtualMemory/Peb failed: 0xc0000022 (RC=-1073741790)
I then recieve another popup “failed to open a session for the virtual machine “XXXX” ….
The error code is as follows:
Result Code:
E_FAIL (0x80004005)
Component:
Machine
Interface: IMachine {480cf695-2d8d-4256-9c7c-cce4184fa048}
In the startup log, here are what seem to be some relevant details
c: Error (rc=-1073741790):358c.755
c: NtWriteVirtualMemory/Peb failed: 0xc0000022358c.755
c: Error -1073741790 in supR3HardNtChildScrewUpPebForInitialImageEvents! (enmWhat=5)358c.755
c: NtWriteVirtualMemory/Peb failed: 0xc0000022358c.755
c: supR3HardNtEnableThreadCreation:358c.755
c: supR3HardenedWinVerifyCacheScheduleImports: Import todo: #0 ‘opengl32.dll’.358c.755
c: supR3HardenedWinVerifyCacheScheduleImports: Import todo: #1 ‘vboxrt.dll’.358c.755
.
.
c: supR3HardenedMonitor_LdrLoadDll: error opening ‘C:\Windows\system32\wintab32.dll’: 0 (NtPath=\??\C:\Windows\system32\wintab32.dll; Input=C:\Windows\system32\wintab32.dll)358c.755
c: supR3HardenedMonitor_LdrLoadDll: pName=C:\Windows\system32\wintab32.dll (rcNtResolve=0xc0150008) *pfFlags=0x0 pwszSearchPath=00704b1
Anyone have a suggestion?
I assume you’ve downloaded 64bit Kali Linux iso?
I’m having issues installing on Yosemite. I’ve verified that the hash of my downloaded file is correct. After choosing Graphical Install, it just aborts. No error whatsoever. Help? Thanks!