
How many of you failed to connect to WiFi network in Linux? Did you bumped into issues like the followings in different forums, discussion page, blogs? I am sure everyone did at some point. Following list shows just the results from Page 1 of a Google search result with “Unable to connect to WiFi network in Linux” keywords. 
- Cannot connect to wifi at home after upgrade to ubuntu 14.04
- Arch Linux not connecting to Wifi anymore
- I can’t connect to my wifi
- Cannot connect to WiFi
- Ubuntu 13.04 can detect wi-fi but can’t connect
- Unable to connect to wireless network ath9k
- Crazy! I can see wireless network but can’t connect
- Unable to connect to Wifi Access point in Debian 7
- Unable to connect Wireless
Following guide explains how you can connect to a WiFi network in Linux from command Line. This guide will take you through the steps for connecting to a WPA/WPA2 WiFi network. In case you’ve only got wired connection only, you can use this guide to setup DHCP or static IP address from command line in Linux.
Table of Contents
WiFi network from command line – Required tools
Following tools are required to connect to WiFi network in Linux from command line
Before we jump into technical jargons let’s just quickly go over each item at a time.
Linux WPA/WPA2/IEEE 802.1X Supplicant
wpa_supplicant is a WPA Supplicant for Linux, BSD, Mac OS X, and Windows with support for WPA and WPA2 (IEEE 802.11i / RSN). It is suitable for both desktop/laptop computers and embedded systems. Supplicant is the IEEE 802.1X/WPA component that is used in the client stations. It implements key negotiation with a WPA Authenticator and it controls the roaming and IEEE 802.11 authentication/association of the wlan driver.
iw – Linux Wireless
iw is a new nl80211 based CLI configuration utility for wireless devices. It supports all new drivers that have been added to the kernel recently. The old tool iwconfing, which uses Wireless Extensions interface, is deprecated and it’s strongly recommended to switch to iw and nl80211.
ip – ip program in Linux
ip is used to show / manipulate routing, devices, policy routing and tunnels. It is used for enabling/disabling devices and it helps you to find general networking informations. ip was written by Alexey N. Kuznetsov and added in Linux 2.2. Use man ip to see full help/man page.
ping
Good old ping For every ping, there shall be a pong …. ping-pong – ping-pong – ping-pong … that should explain it.
BTW man ping helps too …
Step 1: Find available WiFi adapters – WiFi network from command line
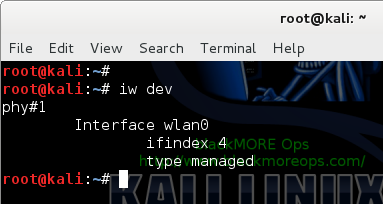
This actually help .. I mean you need to know your WiFi device name before you go an connect to a WiFi network. So just use the following command that will list all the connected WiFi adapters in your Linux machines.
root@kali:~# iw dev
phy#1
    Interface wlan0
        ifindex 4
        type managed
root@kali:~#
Let me explain the output:
This system has 1 physical WiFi adapters.
- Designated name: phy#1
- Device names: wlan0
- Interface Index: 4. Usually as per connected ports (which can be an USB port).
- Type: Managed. Type specifies the operational mode of the wireless devices. managed means the device is a WiFi station or client that connects to an access point.
Step 2: Check device status – WiFi network from command line
By this time many of you are thinking, why two network devices. The reason I am using two is because I would like to show how a connected and disconnected device looks like side by side. Next command will show you exactly that.
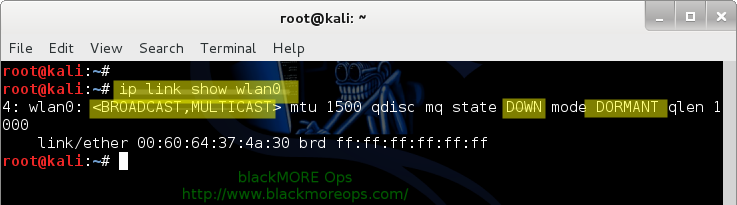
You can check that if the wireless device is up or not using the following command:
root@kali:~# ip link show wlan0
4: wlan0: <BROADCAST,MULTICAST> mtu 1500 qdisc mq state DOWN mode DORMANT qlen 1000
    link/ether 00:60:64:37:4a:30 brd ff:ff:ff:ff:ff:ff
root@kali:~#
As you can already see, I got once interface (wlan0) as state UP and wlan1 as state DOWN.
Look for the word “UP” inside the brackets in the first line of the output.
In the above example, wlan1 is not UP. Execute the following command to
Step 3: Bring up the WiFi interface – WiFi network from command line
Use the following command to bring up the WiFI interface
root@kali:~# ip link set wlan0 up
Note: If you’re using Ubuntu, Linux Mint, CentOS, Fedora etc. use the command with ‘sudo’ prefix

If you run the show link command again, you can tell that wlan1 is now UP.
root@kali:~# ip link show wlan0
4: wlan0: <BROADCAST,MULTICAST,UP,LOWER_UP> mtu 1500 qdisc mq state UP mode DORMANT qlen 1000
    link/ether 00:60:64:37:4a:30 brd ff:ff:ff:ff:ff:ff
root@kali:~#
Step 4: Check the connection status – WiFi network from command line
You can check WiFi network connection status from command line using the following command
root@kali:~# iw wlan0 link
Not connected.
root@kali:~#
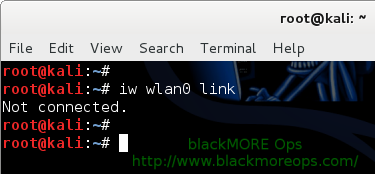
The above output shows that you are not connected to any network.
Step 5: Scan to find WiFi Network – WiFi network from command line
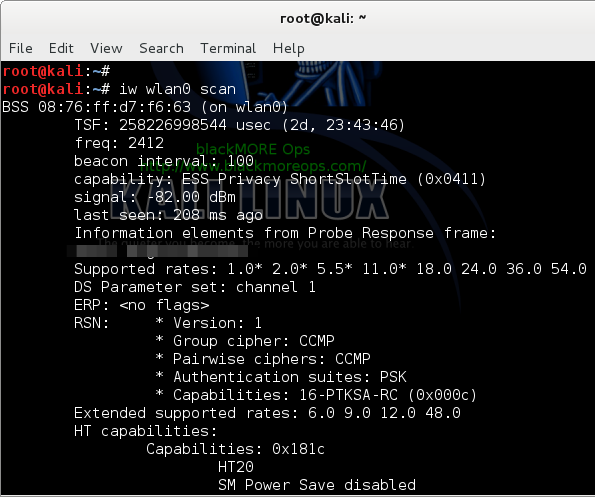
Scan to find out what WiFi network(s) are detected
root@kali:~# iw wlan0 scan
BSS 9c:97:26:de:12:37 (on wlan0)
    TSF: 5311608514951 usec (61d, 11:26:48)
    freq: 2462
    beacon interval: 100
    capability: ESS Privacy ShortSlotTime (0x0411)
    signal: -53.00 dBm
    last seen: 104 ms ago
    Information elements from Probe Response frame:
    SSID: blackMOREOps
    Supported rates: 1.0* 2.0* 5.5* 11.0* 18.0 24.0 36.0 54.0
    DS Parameter set: channel 11
    ERP: Barker_Preamble_Mode
    RSN:     * Version: 1
         * Group cipher: CCMP
         * Pairwise ciphers: CCMP
         * Authentication suites: PSK
         * Capabilities: 16-PTKSA-RC (0x000c)
    Extended supported rates: 6.0 9.0 12.0 48.0
---- truncated ----
The 2 important pieces of information from the above are the SSID and the security protocol (WPA/WPA2 vs WEP). The SSID from the above example is blackMOREOps. The security protocol is RSN, also commonly referred to as WPA2. The security protocol is important because it determines what tool you use to connect to the network.
— following image is a sample only —
Step 6: Generate a wpa/wpa2 configuration file – WiFi network from command line
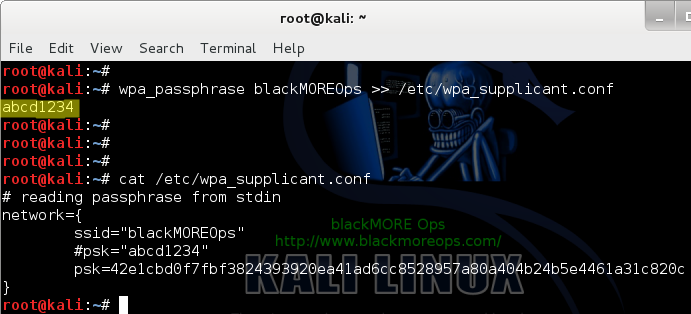
Now we will generate a configuration file for wpa_supplicant that contains the pre-shared key (“passphrase”) for the WiFi network.
root@kali:~# wpa_passphrase blackMOREOps >> /etc/wpa_supplicant.conf
abcd1234
root@kali:~#
(where 'abcd1234' was the Network password)
wpa_passphrase uses SSID as a string, that means you need to type in the passphrase for the WiFi network blackMOREOps after you run the command.
Note: If you’re using Ubuntu, Linux Mint, CentOS, Fedora etc. use the command with ‘sudo’ prefix
wpa_passphrase will create the necessary configuration entries based on your input. Each new network will be added as a new configuration (it wont replace existing configurations) in the configurations file /etc/wpa_supplicant.conf.
root@kali:~# cat /etc/wpa_supplicant.conf
# reading passphrase from stdin
network={
 ssid="blackMOREOps"
 #psk="abcd1234"
 psk=42e1cbd0f7fbf3824393920ea41ad6cc8528957a80a404b24b5e4461a31c820c
}
root@kali:~#
Step 7: Connect to WPA/WPA2 WiFi network – WiFi network from command line
Now that we have the configuration file, we can use it to connect to the WiFi network. We will be using wpa_supplicant to connect. Use the following command
root@kali:~# wpa_supplicant -B -D wext -i wlan0 -c /etc/wpa_supplicant.conf
ioctl[SIOCSIWENCODEEXT]: Invalid argument
ioctl[SIOCSIWENCODEEXT]: Invalid argument
root@kali:~#
Where,
- -B means run wpa_supplicant in the background.
- -D specifies the wireless driver. wext is the generic driver.
- -c specifies the path for the configuration file.
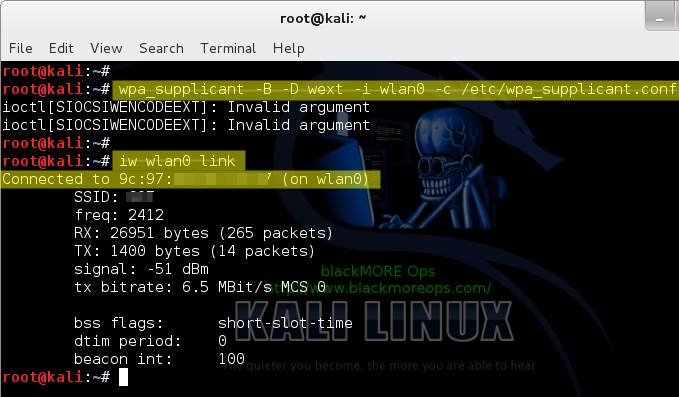
Use the iw command to verify that you are indeed connected to the SSID.
root@kali:~# iw wlan0 link
Connected to 9c:97:00:aa:11:33 (on wlan0)
    SSID: blackMOREOps
    freq: 2412
    RX: 26951 bytes (265 packets)
    TX: 1400 bytes (14 packets)
    signal: -51 dBm
    tx bitrate: 6.5 MBit/s MCS 0

    bss flags:    short-slot-time
    dtim period:    0
    beacon int:    100
Step 8: Get an IP using dhclient – WiFi network from command line
Until step 7, we’ve spent time connecting to the WiFi network. Now use dhclient to get an IP address by DHCP
root@kali:~# dhclient wlan0
Reloading /etc/samba/smb.conf: smbd only.
root@kali:~#
You can use ip or ifconfig command to verify the IP address assigned by DHCP. The IP address is 10.0.0.4 from below.
root@kali:~# ip addr show wlan0
4: wlan0: <BROADCAST,MULTICAST,UP,LOWER_UP> mtu 1500 qdisc mq state UP qlen 1000
    link/ether 00:60:64:37:4a:30 brd ff:ff:ff:ff:ff:ff
    inet 10.0.0.4/24 brd 10.0.0.255 scope global wlan0
       valid_lft forever preferred_lft forever
    inet6 fe80::260:64ff:fe37:4a30/64 scope link
       valid_lft forever preferred_lft forever
root@kali:~#

(or)

root@kali:~# ifconfig wlan0
wlan0 Link encap:Ethernet HWaddr 00:60:64:37:4a:30
 inet addr:10.0.0.4 Bcast:10.0.0.255 Mask:255.255.255.0
 inet6 addr: fe80::260:64ff:fe37:4a30/64 Scope:Link
 UP BROADCAST RUNNING MULTICAST MTU:1500 Metric:1
 RX packets:23868 errors:0 dropped:0 overruns:0 frame:0
 TX packets:23502 errors:0 dropped:0 overruns:0 carrier:0
 collisions:0 txqueuelen:1000
 RX bytes:22999066 (21.9 MiB) TX bytes:5776947 (5.5 MiB)

root@kali:~#
Add default routing rule.The last configuration step is to make sure that you have the proper routing rules.
root@kali:~# ip route show
default via 10.0.0.138 dev wlan0
10.0.0.0/24 dev wlan0  proto kernel  scope link  src 10.0.0.4

Step 9: Test connectivity – WiFi network from command line
Ping Google’s IP to confirm network connection (or you can just browse?)
root@kali:~# ping 8.8.8.8
PING 8.8.8.8 (8.8.8.8) 56(84) bytes of data.
64 bytes from 8.8.8.8: icmp_req=3 ttl=42 time=265 ms
64 bytes from 8.8.8.8: icmp_req=4 ttl=42 time=176 ms
64 bytes from 8.8.8.8: icmp_req=5 ttl=42 time=174 ms
64 bytes from 8.8.8.8: icmp_req=6 ttl=42 time=174 ms
^C
--- 8.8.8.8 ping statistics ---
6 packets transmitted, 4 received, 33% packet loss, time 5020ms
rtt min/avg/max/mdev = 174.353/197.683/265.456/39.134 ms
root@kali:~#
Conclusion
This is a very detailed and long guide. Here is a short summary of all the things you need to do in just few line.
root@kali:~# iw dev
root@kali:~# ip link set wlan0 up
root@kali:~# iw wlan0 scan
root@kali:~# wpa_passphrase blackMOREOps >> /etc/wpa_supplicant.conf
root@kali:~# wpa_supplicant -i wlan0 -c /etc/wpa_supplicant.conf
root@kali:~# iw wlan0 link
root@kali:~# dhclient wlan0
root@kali:~# ping 8.8.8.8
(Where wlan0 is wifi adapter and blackMOREOps is SSID)
(Add Routing manually)
root@kali:~# ip route add default via 10.0.0.138 dev wlan0
At the end of it, you should be able to connect to WiFi network. Depending on the Linux distro you are using and how things go, your commands might be slightly different. Edit commands as required to meet your needs. Thanks for reading. Please share and tweet.
82 comments
even it doesntshow that it is connected to which network!
you are marvellous it is working for me now after following the steps … Mind blowing…
In my terminal when I type iwconfig it say’s nl80211 not found? Am i supposed to be connected to the internet before I even open up a terminal through my ethernet cable.
Wow this is awesome. Only it does not work for me even as the Gui tools do. Anyone else test this successfully on Kali 1.1? If I get time I will try it on a previous Kail release.
Everything seems to work right up to turning the interface up w/ wpa_supplicant where it never connects. My key and ssid are correct in the config file (confirmed with a separate calculation of the key). Though I can bring the WLAN right up with the GUI. Using AWUS036NH adapter.
Also failing on my Raspberry Pi 2 w/Kali 1.1 which is where I really need to get it to work for a class project.
Any thoughts are welcome.
Setup a SSID with WEP with simple password and SSID name (for testing) and see if you can connect to it.
I did a another 3 hour blitz at this and no joy. On my Kali 1.1 VM on my MBP I can’t get any WEP connection at all(using iwconfig). On the Raspberry Pi, I eventually got a connection that disconnected right away but it was inconsistent. I forced the channel shown in AP config and now I consistently get connected, then disconnected with a deauth.
wlan0: deauthenticating from xx:xx:xx:xx:xx:xx by local choice (Reason: 3=DEAUTH_LEAVING)
My gut tells me that something in both cases is interfering with the manual control. Like whatever makes it connect so easy in the GUI, is not allowing another process to control the WIFI. On the Pi it is probably a bug as there is no gui loaded in the base Pi Kali image.
I fried on this one right now…need to move to a different problem…any thoughts would be welcome.
I never got WEP to work but I came across another method for WPA that did work. Here is what I did for posterity:
#vi /etc/network/interfaces
(Add this text to that file.)
auto wlan0
iface wlan0 inet dhcp
wpa-ssid YOUR-SSID-HERE
wpa-psk YOUR-PASSWORD-HERE
#ifup wlan0
#halt -p
(power off/on)
Interface came up during reboot.
This method is nice because it persists after reload though it really irritates me the manual way is not working for me….
That worked perfect. You are awesome.
See how Hackers can Break Your Wifi security within a minutes and get access to your network without your Consent…click on https://www.youtube.com/watch?v=tAhIDImYMng
Great article. Worked for Kali 2.0 I wanted to stop using network manager so I have more control over my WiFi adapters for testing. I use a Dell laptop that has a built in Intel wireless card (Centrino Advanced-N + WiMAX 6250), and an Alpha AR9271 (Atheros UB91C). One note regarding the commands in the conclusion: root@kali:~# wpa_supplicant -i wlan0 -c /etc/wpa_supplicant.conf is missing the “-B” flag. Thanks again!
On my Fedora-20 system, the WPA Supplicant config file live here:
/etc/wpa_supplicant/wpa_supplicant.conf
…hope that helps someone else get things hum’n!
Thanks for this great tutorial I am using a 2006 Toshiba A215 S7422 Satellite laptop which now has Linux Mint17.2 MATE runs as fast as it did when brand new in WinVista. I have a home network I use the laptop for as all my other workstations, desktops and storage are ethernet cable connected. Nice to be able to roam around with wireless now and then here. I use a Linksys E3000 router (simultaneous dual band ) i use “N” for both 2.4g and 5g bands . the laptop has a built in wifi as most did, but it is only ‘G: 54mbps which is slower than my cable internet. so, only use N for a Rosewill xternal usb which is only 2.4g but works and this helped me to disable the built in laptop wifi and ‘up’ the usb easily so ,not having to bother disconnection the prior constant of the ‘g’ band from going in circles since i no longer transmit on that , 2.4g is n only.
now, to try to boost the connection speed somehow from configuring via terminal.
i have not gotten anywhere and the speeds vary, not unusual, but to try to maximize highest potential speeds as my windows gui gizmo seemed to be able to do, the one ralink interface was very complex in what it displayed and allowed to be tweaked. trying to duplicate that process,somehow, in the terminal and in linux. drivers are built in and compatible as my Netgear N600 was not. nothing got that thing working in linux …connects the same dual boot workstation at 300mbps every time. no go in any of my 4 linux mint machines. or not as of the 17,2 update a few months ago
apt-get install iw
awesome! running on centos 7. here’s my startup script (after following your config steps):
sudo ip link set up
sudo wpa_supplicant -B -D wext -i -c /etc/wpa_supplicant/wpa_supplicant.conf
sudo dhclient
(for anyone getting started, save yourself infinite pain by setting up a wired connection so you can pull down the repo’s and tools req’d first – at least on centos 7, the wpa_supplicant tool, for just one example, is not installed out-of-the-box).
and how do you make it permanent so you don’t have to enter all these commands again?
vswm (Very Simple Wireless Manager) is a command line tool that manages the wireless connection. It is dead simple. It reads the known networks from a config file and scan the available networks. Then, it connects to the first match.
https://github.com/dmelo/vswm
amazing stuff! thanks
Bummed that after step 7, it continues to be “not connected”. I wonder what I’ve done wrong. Following the steps closely. Running kali off an SD card and can access the network no problem in windows. Thanks!
i have an issue regarding my wireless device it says there is device
like when i give the command iwconfig
it show no wireless extension
thanks man it help me very much
Great article and I hope I get an answer to my problem:
I will start with a general question first then if there is hope I will provide ALL the tech data to fix it
If you have a wifi device (using RALINK RT5350F) with a known MAC address that my router CANNOT see ( but it did one time in 100 attempts) ; Can I use linux command(s) to force connect to my local wifi.????
Hello Samir,
Once your Router finds the MAC address of your card(after successful connection), have it set a static IP for your card. Then configure static IP in Network-Manager as well. You can’t really force it to connect to some SSID that it can’t seen. Also, depending on your Wireless Router, you might want to just enable 2.4Ghz and set a channel that your card understands (for example channel 1 or 5 or 7). Cheers,
-BMO
Great response….
Conclusion: The MAC address of NO VALUE unless the router see the device.
In my case the router does NOT see the device. I monitored the Diag Log File and no request WITH THE MAC ADDRESS was initiated.
My only access to the device is through an app on my mobile. The app should initiate the request but it does not.
Since I managed once to actually see the router acknowledgment of the device and actually getting an IP; I can safely conclude that the device is NOT malfunctioning ( I have two of them)
Another conclusion: by tweaking the router ( as you suggested) there is a chance that I can get a reliable “handshaking”
Nice tutor bro….keep the good work!!
So, add up these forex trading strategies in your initial trading plans and see how it’ll
help you trading safely and smartly. Give your date of birth and
then attain interesting details about your future job,.
Demo training will allow you to practice forex trading with fake money so that you can see
how to act before you go live.