
How many of you failed to connect to WiFi network in Linux? Did you bumped into issues like the followings in different forums, discussion page, blogs? I am sure everyone did at some point. Following list shows just the results from Page 1 of a Google search result with “Unable to connect to WiFi network in Linux” keywords. 
- Cannot connect to wifi at home after upgrade to ubuntu 14.04
- Arch Linux not connecting to Wifi anymore
- I can’t connect to my wifi
- Cannot connect to WiFi
- Ubuntu 13.04 can detect wi-fi but can’t connect
- Unable to connect to wireless network ath9k
- Crazy! I can see wireless network but can’t connect
- Unable to connect to Wifi Access point in Debian 7
- Unable to connect Wireless
Following guide explains how you can connect to a WiFi network in Linux from command Line. This guide will take you through the steps for connecting to a WPA/WPA2 WiFi network. In case you’ve only got wired connection only, you can use this guide to setup DHCP or static IP address from command line in Linux.
Table of Contents
WiFi network from command line – Required tools
Following tools are required to connect to WiFi network in Linux from command line
Before we jump into technical jargons let’s just quickly go over each item at a time.
Linux WPA/WPA2/IEEE 802.1X Supplicant
wpa_supplicant is a WPA Supplicant for Linux, BSD, Mac OS X, and Windows with support for WPA and WPA2 (IEEE 802.11i / RSN). It is suitable for both desktop/laptop computers and embedded systems. Supplicant is the IEEE 802.1X/WPA component that is used in the client stations. It implements key negotiation with a WPA Authenticator and it controls the roaming and IEEE 802.11 authentication/association of the wlan driver.
iw – Linux Wireless
iw is a new nl80211 based CLI configuration utility for wireless devices. It supports all new drivers that have been added to the kernel recently. The old tool iwconfing, which uses Wireless Extensions interface, is deprecated and it’s strongly recommended to switch to iw and nl80211.
ip – ip program in Linux
ip is used to show / manipulate routing, devices, policy routing and tunnels. It is used for enabling/disabling devices and it helps you to find general networking informations. ip was written by Alexey N. Kuznetsov and added in Linux 2.2. Use man ip to see full help/man page.
ping
Good old ping For every ping, there shall be a pong …. ping-pong – ping-pong – ping-pong … that should explain it.
BTW man ping helps too …
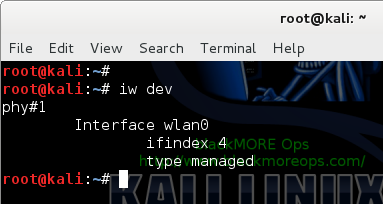
Step 1: Find available WiFi adapters – WiFi network from command line
This actually help .. I mean you need to know your WiFi device name before you go an connect to a WiFi network. So just use the following command that will list all the connected WiFi adapters in your Linux machines.
root@kali:~# iw dev
phy#1
    Interface wlan0
        ifindex 4
        type managed
root@kali:~#
Let me explain the output:
This system has 1 physical WiFi adapters.
- Designated name: phy#1
- Device names: wlan0
- Interface Index: 4. Usually as per connected ports (which can be an USB port).
- Type: Managed. Type specifies the operational mode of the wireless devices. managed means the device is a WiFi station or client that connects to an access point.
Step 2: Check device status – WiFi network from command line
By this time many of you are thinking, why two network devices. The reason I am using two is because I would like to show how a connected and disconnected device looks like side by side. Next command will show you exactly that.
You can check that if the wireless device is up or not using the following command:
root@kali:~# ip link show wlan0
4: wlan0: <BROADCAST,MULTICAST> mtu 1500 qdisc mq state DOWN mode DORMANT qlen 1000
    link/ether 00:60:64:37:4a:30 brd ff:ff:ff:ff:ff:ff
root@kali:~#
As you can already see, I got once interface (wlan0) as state UP and wlan1 as state DOWN.
Look for the word “UP” inside the brackets in the first line of the output.
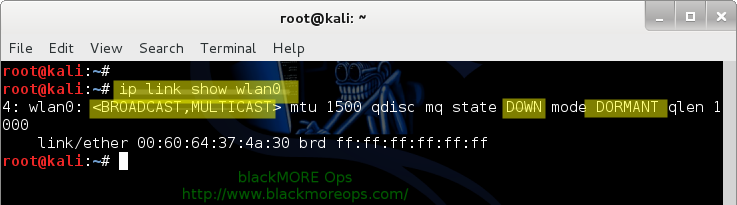
In the above example, wlan1 is not UP. Execute the following command to
Step 3: Bring up the WiFi interface – WiFi network from command line
Use the following command to bring up the WiFI interface
root@kali:~# ip link set wlan0 up
Note: If you’re using Ubuntu, Linux Mint, CentOS, Fedora etc. use the command with ‘sudo’ prefix

If you run the show link command again, you can tell that wlan1 is now UP.
root@kali:~# ip link show wlan0
4: wlan0: <BROADCAST,MULTICAST,UP,LOWER_UP> mtu 1500 qdisc mq state UP mode DORMANT qlen 1000
    link/ether 00:60:64:37:4a:30 brd ff:ff:ff:ff:ff:ff
root@kali:~#
Step 4: Check the connection status – WiFi network from command line
You can check WiFi network connection status from command line using the following command
root@kali:~# iw wlan0 link
Not connected.
root@kali:~#
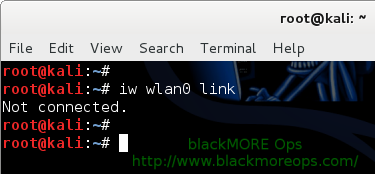
The above output shows that you are not connected to any network.
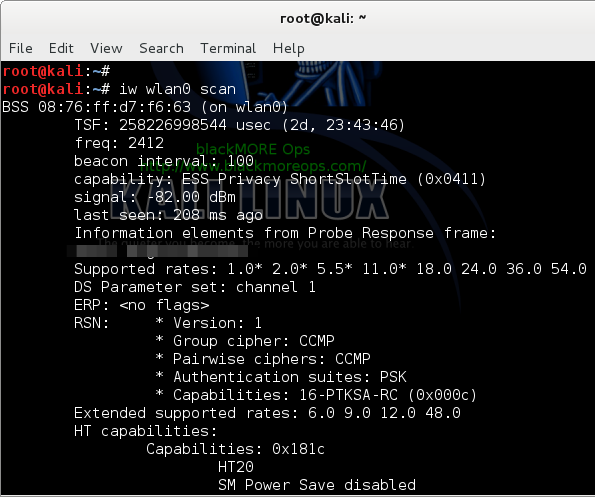
Step 5: Scan to find WiFi Network – WiFi network from command line
Scan to find out what WiFi network(s) are detected
root@kali:~# iw wlan0 scan
BSS 9c:97:26:de:12:37 (on wlan0)
    TSF: 5311608514951 usec (61d, 11:26:48)
    freq: 2462
    beacon interval: 100
    capability: ESS Privacy ShortSlotTime (0x0411)
    signal: -53.00 dBm
    last seen: 104 ms ago
    Information elements from Probe Response frame:
    SSID: blackMOREOps
    Supported rates: 1.0* 2.0* 5.5* 11.0* 18.0 24.0 36.0 54.0
    DS Parameter set: channel 11
    ERP: Barker_Preamble_Mode
    RSN:     * Version: 1
         * Group cipher: CCMP
         * Pairwise ciphers: CCMP
         * Authentication suites: PSK
         * Capabilities: 16-PTKSA-RC (0x000c)
    Extended supported rates: 6.0 9.0 12.0 48.0
---- truncated ----
The 2 important pieces of information from the above are the SSID and the security protocol (WPA/WPA2 vs WEP). The SSID from the above example is blackMOREOps. The security protocol is RSN, also commonly referred to as WPA2. The security protocol is important because it determines what tool you use to connect to the network.
— following image is a sample only —
Step 6: Generate a wpa/wpa2 configuration file – WiFi network from command line
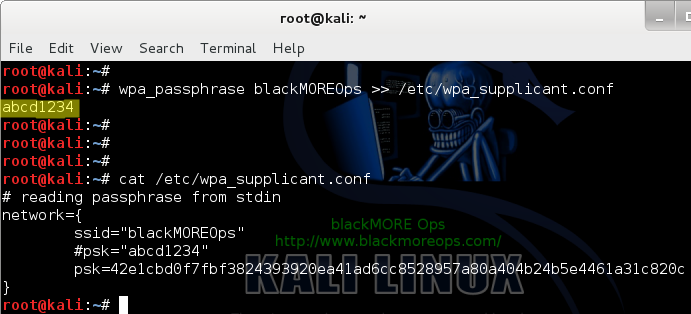
Now we will generate a configuration file for wpa_supplicant that contains the pre-shared key (“passphrase”) for the WiFi network.
root@kali:~# wpa_passphrase blackMOREOps >> /etc/wpa_supplicant.conf
abcd1234
root@kali:~#
(where 'abcd1234' was the Network password)
wpa_passphrase uses SSID as a string, that means you need to type in the passphrase for the WiFi network blackMOREOps after you run the command.
Note: If you’re using Ubuntu, Linux Mint, CentOS, Fedora etc. use the command with ‘sudo’ prefix
wpa_passphrase will create the necessary configuration entries based on your input. Each new network will be added as a new configuration (it wont replace existing configurations) in the configurations file /etc/wpa_supplicant.conf.
root@kali:~# cat /etc/wpa_supplicant.conf
# reading passphrase from stdin
network={
 ssid="blackMOREOps"
 #psk="abcd1234"
 psk=42e1cbd0f7fbf3824393920ea41ad6cc8528957a80a404b24b5e4461a31c820c
}
root@kali:~#
Step 7: Connect to WPA/WPA2 WiFi network – WiFi network from command line
Now that we have the configuration file, we can use it to connect to the WiFi network. We will be using wpa_supplicant to connect. Use the following command
root@kali:~# wpa_supplicant -B -D wext -i wlan0 -c /etc/wpa_supplicant.conf
ioctl[SIOCSIWENCODEEXT]: Invalid argument
ioctl[SIOCSIWENCODEEXT]: Invalid argument
root@kali:~#
Where,
- -B means run wpa_supplicant in the background.
- -D specifies the wireless driver. wext is the generic driver.
- -c specifies the path for the configuration file.
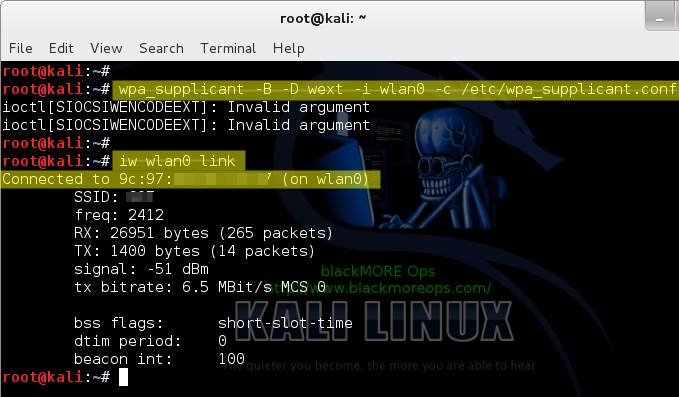
Use the iw command to verify that you are indeed connected to the SSID.
root@kali:~# iw wlan0 link
Connected to 9c:97:00:aa:11:33 (on wlan0)
    SSID: blackMOREOps
    freq: 2412
    RX: 26951 bytes (265 packets)
    TX: 1400 bytes (14 packets)
    signal: -51 dBm
    tx bitrate: 6.5 MBit/s MCS 0

    bss flags:    short-slot-time
    dtim period:    0
    beacon int:    100
Step 8: Get an IP using dhclient – WiFi network from command line
Until step 7, we’ve spent time connecting to the WiFi network. Now use dhclient to get an IP address by DHCP
root@kali:~# dhclient wlan0
Reloading /etc/samba/smb.conf: smbd only.
root@kali:~#
You can use ip or ifconfig command to verify the IP address assigned by DHCP. The IP address is 10.0.0.4 from below.
root@kali:~# ip addr show wlan0
4: wlan0: <BROADCAST,MULTICAST,UP,LOWER_UP> mtu 1500 qdisc mq state UP qlen 1000
    link/ether 00:60:64:37:4a:30 brd ff:ff:ff:ff:ff:ff
    inet 10.0.0.4/24 brd 10.0.0.255 scope global wlan0
       valid_lft forever preferred_lft forever
    inet6 fe80::260:64ff:fe37:4a30/64 scope link
       valid_lft forever preferred_lft forever
root@kali:~#

(or)

root@kali:~# ifconfig wlan0
wlan0 Link encap:Ethernet HWaddr 00:60:64:37:4a:30
 inet addr:10.0.0.4 Bcast:10.0.0.255 Mask:255.255.255.0
 inet6 addr: fe80::260:64ff:fe37:4a30/64 Scope:Link
 UP BROADCAST RUNNING MULTICAST MTU:1500 Metric:1
 RX packets:23868 errors:0 dropped:0 overruns:0 frame:0
 TX packets:23502 errors:0 dropped:0 overruns:0 carrier:0
 collisions:0 txqueuelen:1000
 RX bytes:22999066 (21.9 MiB) TX bytes:5776947 (5.5 MiB)

root@kali:~#
Add default routing rule.The last configuration step is to make sure that you have the proper routing rules.
root@kali:~# ip route show
default via 10.0.0.138 dev wlan0
10.0.0.0/24 dev wlan0  proto kernel  scope link  src 10.0.0.4

Step 9: Test connectivity – WiFi network from command line
Ping Google’s IP to confirm network connection (or you can just browse?)
root@kali:~# ping 8.8.8.8
PING 8.8.8.8 (8.8.8.8) 56(84) bytes of data.
64 bytes from 8.8.8.8: icmp_req=3 ttl=42 time=265 ms
64 bytes from 8.8.8.8: icmp_req=4 ttl=42 time=176 ms
64 bytes from 8.8.8.8: icmp_req=5 ttl=42 time=174 ms
64 bytes from 8.8.8.8: icmp_req=6 ttl=42 time=174 ms
^C
--- 8.8.8.8 ping statistics ---
6 packets transmitted, 4 received, 33% packet loss, time 5020ms
rtt min/avg/max/mdev = 174.353/197.683/265.456/39.134 ms
root@kali:~#
Conclusion
This is a very detailed and long guide. Here is a short summary of all the things you need to do in just few line.
root@kali:~# iw dev
root@kali:~# ip link set wlan0 up
root@kali:~# iw wlan0 scan
root@kali:~# wpa_passphrase blackMOREOps >> /etc/wpa_supplicant.conf
root@kali:~# wpa_supplicant -i wlan0 -c /etc/wpa_supplicant.conf
root@kali:~# iw wlan0 link
root@kali:~# dhclient wlan0
root@kali:~# ping 8.8.8.8
(Where wlan0 is wifi adapter and blackMOREOps is SSID)
(Add Routing manually)
root@kali:~# ip route add default via 10.0.0.138 dev wlan0
At the end of it, you should be able to connect to WiFi network. Depending on the Linux distro you are using and how things go, your commands might be slightly different. Edit commands as required to meet your needs. Thanks for reading. Please share and tweet.
82 comments
This is a really nice resource and it’s especially great that you made a best effort to keep it distro agnostic. Thanks!
The only thing I would add is a mention of the Network Manager command line tools. Since most distro’s use NM these days it’s nice to be able to work within that system from the command line too.
Thanks for the idea tachyon1.
I was thinking along the line that once you’ve got your Internet sorted, you can use NM or Wicd … I will try to write a separate guide on NM. Cheers,
-BMO
My experience tells to ping a domain name rather than an IP address, because it instantly shows if your DNS settings are correct or not, while IP ping works most of the time after connecting to a WiFi :)
Hi Tomas,
You’re right, I was thinking of adding a section for DNS … I will include your idea + DNS settings. ta,
-BMO
can u give out A VIDEO FOR THIS IT WILL BE A LOT OF HELP
translation: This nice explanation is not enough for me, I want it even easier.
Wanna take a look at ceni?
http://manual.aptosid.com/de/inet-ceni-de.htm
Thank you dude,it’s very useful.
you have really upped the knowledge level/detail since this site started… great job… I think it is great you focused on iw in this post.
You should now try and do a primer on “ip” (as in ip link, ip addr, ip route, ip tunnel)… that is a serious headache to try and figure out– even if taken in small chunks!
One thing I am trying to right now is figure out how to create a bash script that creates a virtual wireless monitor, then changes the mac address on each to an identical new address. Part of figuring this out (while learning as much as possible), is to use the “iw” command instead of “airmon-ng”.
Essentially, all airmon-ng really does is create an additional (virtual?) wireless interface using the same hardware NIC. So you can create this new interface with “iw dev wlan1 interface add mon1 type monitor” at the command line. (with “wlan1” being (for me) my Alfa wireless USB adapter). That command adds an interface called “mon1” and sets it to monitor mode (which is the same as “PROMISC” when running ifconfig).
I wanted to learn this because when you use Reaver or Bully, you have to make sure that you are spoofing the actual hardware device as well as the virtual device (which is typically created using airmon-ng). I think you actually mention this in an earlier post. So anyway, I am trying to write a little bash script which creates mon1 from wlan1, then each to the same new mac address This way I don’t have to execute 10 different shell commands before I start running reaver/bully.
Anyway… great job!
Thank you very much. Its very helpful even for newbie like me.
i am setting the ip link but the state is not changing to up its still down i dont know what to do can u please help me i am running kali linux on vm player
Tutorial is nice but what about nl80211 not found? What does that mean? I am using opensuse 12.3 and my phone as portable wifi hotspot which is using WPA2
Hello and thanks for the tutorial. I did everything as written here, but when I ran step 7, the screen was filled with error messages and the device (Rpi running Kali 1.0.9 w/tft support) didn’t respond to keyboard. had to open ssh and reboot, and never got wifi access. on the other hand, when I tried to connect to a public insecure wifi, the connection was automatic, I didn’t do anything and it worked.
if anyone has an idea what is wrong, I would appreciate it.
Thanks again!
What if ip fails to bring up your wireless device. Where may the problem lie?
I’m using CentOs 6.5, with an Intel Pro Wireless 3945ABG. The iwl3945 driver is installed and loaded as module into the kernel.
Here is the output when I follow your tutorial:
$ iw dev
phy#0
Interface wlan0
ifindex 2
wdev 0x1
addr 00:18:de:30:d3:97
type managed
$ ip link show wlan0
2: wlan0: mtu 1500 qdisc mq state DOWN qlen 1000
link/ether 00:18:de:30:d3:97 brd ff:ff:ff:ff:ff:ff
# ip link set wlan0 up
# ip link show wlan0
2: wlan0: mtu 1500 qdisc mq state DOWN qlen 1000
link/ether 00:18:de:30:d3:97 brd ff:ff:ff:ff:ff:ff
I am having the same problem…. PLEASE HELP!!!!
I was having the same problem. I solved it by turning off the network manager before starting thus tutorial steps
$/etc/init.d/network-manager stop
Hope it helps
it didn’t work…..
is there any other alternative to up the state of wifi device
when a ‘iw’ command is involved I get the same error:
# iw wlan0 link
n180211 not found.
how you repair your problem ?
give me answer i have same problem …………..
reply me please
U r using old version of wifi device, instead iw use ‘iwconfig’ tool
Look. I have no other network connection. I can’t get wpasupplicant with apt get, because I have no effing wifi connection. It’s 2015 and Ubuntu has NO native way of connecting to a WPA network card from the cli? I keep getting amazed at the level of nope this OS is.
thank you..it worked…
you may find permission denail using wpa_passphrase
here’s the solution : sudo sh -c ‘wpa_passphrase mywireless “secretpassphrase” > /etc/wpa_supplicant.conf’
Thanks for this!
I’ve got too used to the GUIs :-)
Hi Gustavo,
Aren’t we all? I almost tried to swipe my screen yesterday!
Happy that it all worked out for you. Cheers,
-BMO
Running an AWUS036H with a lifeboat Kali USB and got to the point of running iw wlan1 link and it came back not connected. Everything else looked and worked fine.
Any ideas?
Great site btw, loads of great info!
Hi Chris,
Assign a static IP in router for the MAC and retry.
Change wireless security to WEP and retry.
Another option is to use wicd instead.
/var/log/messageswill tell you more. Cheers,--BMO
Well, you mis a step to activate the hardware I think and to put the passphrase in action with WPA2.
This guide is not working for Linux Mint 17.1 XFCE or Linux Mint 13 XFCE beyond step 6. The author seems to be making an assumption of knowledge on the part of the user. I have found ZERO step by step wireless connection guides for Linux on the internet that are written by people who actually want anyone with no knowledge of Linux to understand them.
Followed this to the letter with two different routers and two different wireless dongles and on step 7 it simply reports “Not connected”. Amazed that the author is actually suggesting someone use WEP security. I’m a complete idiot with this stuff and even I know that.
I mean to say, that even an idiot like me knows you shouldn’t use WEP.
You use WEP to test .. does scanning shows any network at all?
Sees all networks. Connects to none.
And this guide didn’t work in elementary OS luna or Ubuntu 14.04 either. It appears that if the wireless nic is not present when the OS is first installed, you are out of luck unless you are a software engineer.
Good to know you were suggesting WEP for testing only. That makes sense. Unfortunately, none of my routers support WEP.
If gnome network manager (assuming that you are using GUI, isn’t working then wicd is another tool to try. Surprising that your cards are failing for multiple routers and different linux distro. Do you have the correct password or are you able to use a non linux device to connect? Do you have MAC filtering enabled in the routers? Logs showing nothing? Very unlikely that everything is failing and no logs to dig into.
Just got it working in debian 7 …
Now it is connecting for me in Linux Mint 17.1 XFCE. I just wish I knew why it suddenly decided to connect when it would not before.
Wish I could replay to my own comment up there or edit it. This does work on Linux Mint XFCE 17.1 (based on Ubuntu, which everyone knows is based on Debian). There is something funny with my network.
That’s ok. Happy that it all worked out for you. Enjoy.
hi guys this is a great site. kudos to you guys! please if you wouldn’t mind, can you help me out? i have being trying to run kali in my laptop(acer aspire E 11 running windows 8.1) but it doesn’t see the image. Even when i tried booting from a usb which i imaged kali into, same usb i use to boot in other systems the system still doesn’t recognise it. please i need your assitance, thanls.
In one of your many interesting presentations, you mention you also have an AWUS036H, and I hope you can help me with my connection issues for that antenna.
While I am new to Linux in general, I recently installed the Kali Linux VMware on a host using Win7 x64. Once installed, I got everything (apt-get update, upgrade, and dist-upgrade), and performed many of the top 20 items you recommend. However, I am unable to get my antenna to connect, even using your recommendations in your article on wireless connections.
When I attempt to connect my AWUS036H antenna in the VM, I get the following:
“The device “Realtek RTL8187_Wireless” was unable to connect to its ideal host controller. An attempt will be made to connect this device to the best available host controller. This might result in undefined behavior for this device.”
Some of my following commands, and their responses, are as follows:
root@ItYAoHBd:~# ip link set wlan0 up
RTNETLINK answers: Operation not possible due to RF-kill
root@ItYAoHBd:~# rfkill list all
3: phy3: Wireless LAN
Soft blocked: no
Hard blocked: yes
root@zQEHZVbO:~# rfkill unblock all
Can’t open RFKILL control device: No such file or directory
From the above, you may note I also installed the script you provided to change the user name at boot-up.
This is more than frustrating, and I have researched every link I can find on the subject but no cigars. You are, in so many ways, my last option for a knowledgeable answer.
i installed linux yesterday on vmware workstation. it is connected to internet but not showing. when i click the wireless icon it doesnot show the available networks. What should i do? kindly help me.